How to use iPhone 11 Camera? (Tutorial) By Nick Ackerman
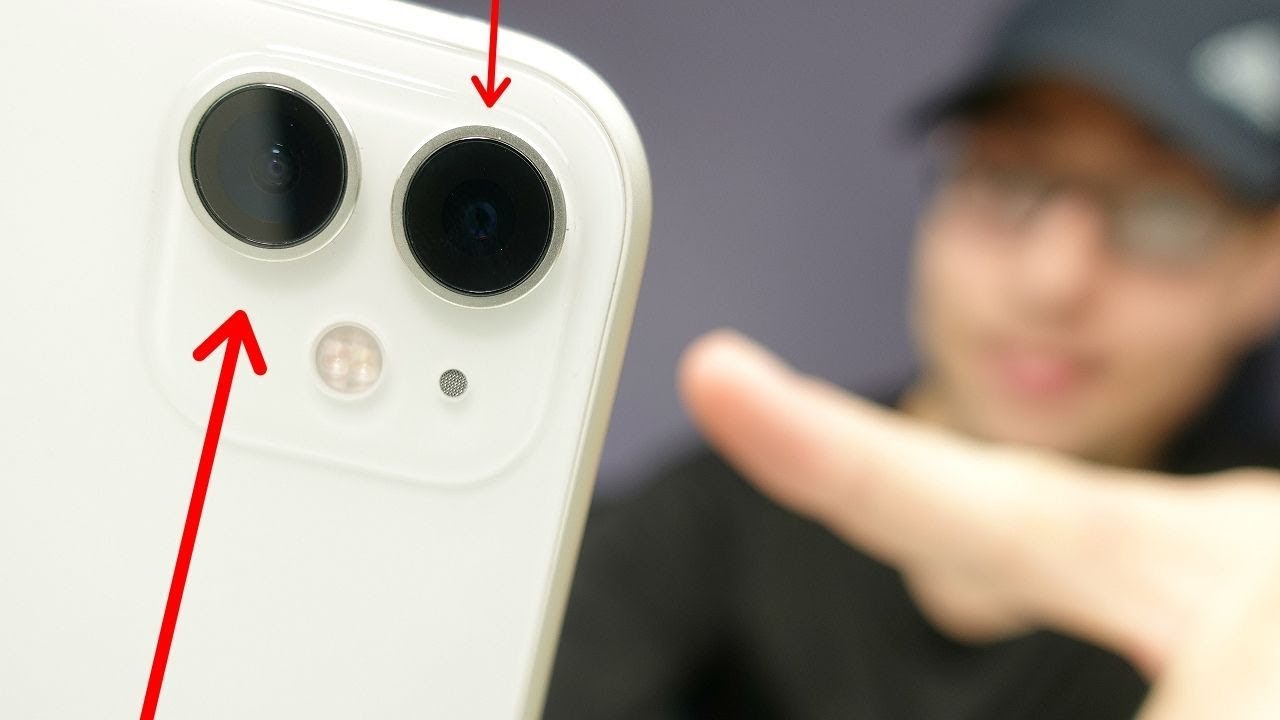
So, what is up guys Nick here, helping you to master your technology, how to use the iPhone 11 camera system here now you see a lot of photos and samples, and you know this is a great camera so far and some people wonder how you're getting such sharp results, how YouTubers are getting these results, and I'm gonna share with you all of that today. Now quick refresher, 12, megapixel, dual cameras on the rear, but with the 11. What's neat as Apple decided to go with an ultra wide-angle on this camera instead of the telephoto of Pryor, dual camera iPhones. Now these are capable up to 4k 60p, recording, which many cameras aren't even capable of doing, although it's doing it on a much tinier sensor, you can see right here on the front. We do have a 12 megapixel. You can't really see it, but we have a 12 megapixel hidden in there and that does 4k 60 on the front as well, which is a big step up over prior iPhones now.
The first thing I want to talk about is how you access this camera from the lock screen. Now a lot of people seem to forget this, and I still see people opening up their app open up their phone going into the application, and you probably missed the moment by then just quickly go ahead and swipe to the right and get into your camera. That's the fastest way to not miss a moment on this foam. Next up, I've even seen, people tapping this, and they're like to come on open up. What's going on here in this fast-paced world, we seem to forget that you have to haptic press that camera to get in, so those are the way to access the camera very fast.
You can also tell Siri open the camera, and Siri will open the camera albeit's not the fastest option. You can also say, take a selfie, and it will open the selfie camera for you, so those are some things of some ways to access it now, for me, I like to keep the camera app itself all the way down on the right, so it's easier for your thumb if you're a righty to go ahead and find that camera an apple. Also knows this: that's why the selfie to the rear camera option is right. There kind of where that dock is down there on the right side. Now, if you're a lefty- and you often have your phone in the left hand, I would put it over there for faster access as well, but again that selfie camera button is still going to be on the right.
So you still got to reach over for that, but if you're Lefty put it over there, not for me, if I'm doing video I like to keep the camera up here like higher up because I'm, typically attaching the rode, video mic l I'll, leave a link to this microphone. This is probably the best microphone you can get for the iPhone. It goes right into the Lightning port, plug it in right there, but you can see with the wind muff when you're outside that this microphone is now blocking your ability to touch the dock right there. So I do like to keep the camera up there when doing video and using a microphone attachment like this. Now, if you're using something like a lav Older microphone with just a dongle attachment, then this is not really a problem for you, but for that case, I like to keep it right there.
So if you're going to use this camera properly, the first thing you want to know is the settings in this camera. So let's go to those settings right here now in preserve settings. These are gonna, be the things that you don't want to switch all the time. So if you want to preserve the last video mode, you'll turn on the camera mode right there, rather than resetting back to the original photo mode. Every time you reopen the camera now also, you could turn on these creative controls where it will use the last filter.
You had the last aspect: ratio if you like to keep everything the same way. Every time you want to use these preserve settings, a lot of people will probably benefit from turning off the live photo because sometimes it takes live photos, and you don't want to take the live photo now. One thing you absolutely need to turn on if you want to get the best results, is the grid lines so turn this on? That's gonna. Allow you, in the camera to see the rules of thirds so right here, you're going to see right there. You can frame your photos properly when you turn on the grids' in it's not gonna, be necessary for people who don't want the best results, but if you're watching this video, you probably do want the best results, so use the grid lines and frame your photos in the rules of 3rd.
If you want to know more about that, I'll leave a link down below where you can learn about the rules of 3rd now scan QR codes, just going to locate those QR codes when you get a product or something like that, you just need to scan it really quickly. It'll just automatically recognize it and record video settings now. For me, I like to keep things in 4k 60, every time, I record because I this phone at 700 bucks I want the best quality I can get out of this phone. But if you're trying to save the most space and have pretty decent video I would stick to ten eighty thirty, but if you want high quality video go to 4k thirty, if you want a super smooth, feel stick between 1080 60 and 4k 60. If you're looking for a cinematic feel you're going to go to 4k at twenty-four, that's like what they kind of do.
When they're doing those cinematic slow movie like feel you're going to go to the twenty-four make. It also locks the camera. So it's not switching between modes as well. Now what does this record stereo sound? Well, this is gonna record a lot more of the environment noise and the people in the environment, whereas if you turn this on it kind of focuses more mono more on your voice and what's closer to it, so it's going to be probably a little. Tinny err, I! Don't I! Don't like the audio when the stereo sound is off! It just doesn't sound as good if you're not using an external microphone.
If you use an external microphone, this doesn't really matter anymore. A lot of people have problems with compatibility issues, especially if you're using like Windows computer, if you're using a Windows computer I recommend you go to most compatible because a lot of these formats are only gonna work with Apple stuff. So if you're working with Apple stuff leave it in high efficiency, but I would say, if you're working with other programs other than apple programs, you're going to want to use most compatible. In addition, if you're just trying to save space on your phone, I would use the high efficiency mode as well on the iPhone 11. Now, when talking about composition, you have the ability to capture some data outside the frame on the iPhone 11, which will allow you to crop out like the wide-angle parts that you missed.
You'll see it in an example. Soon you can also do that same thing in the video capture, and you can auto apply these adjustments just by toggling that on now here's the thing these will go away after 30 days. So if you do plan on cropping your right angle, make sure you do that, or you're not going to be able to after 30 days and 30 days might seem like a long time. But you might forget this. If you haven't gone back to that photo in a while, so make sure you make your edits rather quickly.
Now smart HDR is where Apple is combining different parts of the photos. Separate exposures using the diffusion, all those things combined, and you're going to have really sharp results with proper balance of exposure, and things like that would out even happen to know anything about that stuff. So if you want the crispiest results, use the smart HDR. If you want a more natural photo, you want to tweak pose to yourself. I would probably turn that off.
I think Apple does a great job with this, so I would just leave it on if you're looking for the best results from your iPhone camera. So now that you have mastered the settings, let's see how we use these settings here. So we got the rule of thirds going on there. Now you can just tap the One X to go between the ultra-wide and the standard wide. Now one thing people do a lot.
Are they pinch to zoom like this and to me, that's a little like easy to make the phone jiggle get a blurry photo? So what I like to do is grip the phone, nice and tight here on both edges and then take this and use the slider to go ahead and zoom. It allows you to stay a lot more stable and get you a better result now for each one of these lines, you're going up point 1x, so you'll see right here, point 1, point, 2, point 3 and all the way, all the way up to 5x, which is digital, zoom. So anything past the 1x you're going to start to create a little more noise on the iPhone 11 because feeding past the 1x you're, basically cropping in it's a digital zoom, so you're not actually zooming with an actual hardware lens, which means that the quality will suffer past the 1x at 26 mil. So if you go backwards here, that's actually a hardware lens. So you should get pretty good quality out of that photo right there.
Okay, so a lot of people when they open up the iPhones camera, they just take a photo. They don't even focus, but there is a way to focus the exact object that you want to focus on, so you just tap anywhere on the screen. A lot of people knew this already, but one thing you may not have known is that you can also lock the exposure on this and focus here so just hold it down until you see an eat, lock and that'll pinpoint right on the thing you want to focus now you can take your thumb and raise the exposure or lower it right. There, there's no way to do shadow adjustment like you could do on the pixel, but still at the same time you can change the exposure and get the right photo now hold it steady, just go ahead and take the photo like that now. In addition, you could go ahead and hold down this to start making video lock it to the right there and that will keep recording video.
This key right here is the ability to take photos, while in this actual video, so you can be recording video and taking photos at the same time, but no longer you just hold down to burst. Now you have to take it left to start bursting, which you could see right there it'll keep going on the phone. Both those modes do work in the selfie mode as well. Holding down to do video lock the video, take the photos and bursting as well. It works in both selfie and the rear camera so, for the best results always tap to focus, it will always give you the cleanest shot and will get the focus every time, although the iPhone does a good job at just taking a photo without tapping the focus most of the time, if you're trying to make sure that this photo you're taking is going to come out properly, always do that now the ways to get to you, your modes like filters and things like that have changed a little on the iPhone 11.
All you have to do is swipe up anywhere on the screen, and it will bring those modes up, and you could see right here that you now have the ability to change your flash right here from flash auto on and off. And then you have your live photos right here. You could turn those off. You also have something new here, which is the 16 by 9 aspect ratio, which means that you can now take YouTube thumbnails YouTube videos in a way that a camera actually could you couldn't do this before go to 4:3, that's gonna, be your highest quality photo or one to one, which is your Instagram photo right there. Now you do have your timers right here up to 10 seconds and you guys kind of know how this stuff works, and there are your filters.
So don't forget that on the iPhone 11, you must swipe up to get to your filters and things like that. I've already had people ask me: where are the filters on this camera and again the same features apply to the front-facing camera when accessing those modes. Now, when in video settings, you should also note that, with the Iowa's 13.2 Apple did include the ability to change between the HD and 4k on the iPhone 11 up here in the right corner, you just tap on them, and you could change between the frame rates as well. This is a very welcome addition, as you always had to go back into settings and leave the camera before, but that's no longer true here now for the iPhone 11, but people say there's no way you're getting this quality on the iPhone 11 on some of my prior videos. Well, you have to keep in mind that there are studio lights where I'm at you can see these very bright lights and that's something I want you to note.
You can see another one right. There I got three of them. What I want you to note is that and that's what I want to know to get the absolute professional best results you possibly can on the ? 11 you're going to want great lighting for this camera. It's a tiny sensor, so you need to pull in as much light as possible. It's not a huge sensor like you know, some cameras on the market have, but it does have a night mode that uses a combination of software and long exposure to give you a decent picture in dark lighting and speaking of that night mode, let's go and activate it.
You can see right up there. We have that exposure now down here you will see the night mode, it will only appear when it is dark enough for the camera senses, it's dark enough. You don't see it until then. Now you can change up to max 10 seconds on the exposure, the more seconds you have, the more light you're gonna, let in but at the same time you're also going to create more noise, so fewer seconds less noise, more seconds, more noise, more light, though, on more seconds so, depending on your situation play around with it and see how much exposure you want to get the longer ? is the longer you're going to have to wait for that photo to finish. They'll, keep in mind how shaky are your hands? What's the weather like? Is it freezing? Are you able to hold that phone steady for 10 seconds? You might need a tripod for something like this.
Typically, around 3 seconds I think is pretty decent at nighttime for people to just hold your phone 3 seconds. Take the photo. Ok guys so here in video, do keep in mind that if you do go wide on this phone, you are going to reduce the sharpness of the video. The standard wide-angle camera in here, not the ultra-wide there's, the regular One X is actually a much sharper video than the one. That's on the ultra-wide.
So keep that in mind. But if you want to have fun, then go ahead and use that ultra-wide, but for sharper video keep it on the One X. So the next one is the slow motion video. Now you can change between 120 and 240 FPS HD. This doesn't do 4k, but at the same time, if you want more slow motion and keep it in to 240 FPS, it's going to give you the better results.
Now, if you flip it over to the front, you can also see you can do 120 fps, slow motion here on the front camera as well. Now, if you swipe over to the right, this is a time-lapse. This is where you're going to get that fast motion where it looks like you're going through time on your camera, hold that down and make sure when you're, using this to use it for quite a few minutes, or it's just gonna. Looks very short. If you do this for, like a few seconds, the vid just going to go so fast, it's gonna look like you didn't record anything, basically, okay, guys, so now we're in the portrait mode and one difference between the 10r and the Eleven is that you can now do you object detection do portraits with the objects now you'll see up in the right-hand corner.
We do have the ability to control our f-stops and if you don't know anything about what these are just keep it simple and understand this. The lower you go down the more background blur you're gonna, get the more you go up, you're, going to just keep everything in focus, so tweak it down to get more blur and tweak it up to get less blur. So that's, basically all you need to know there, and then you can blur the background as good as possible on people or objects. You do have studio light and all these modes, like contour light stage, light height, key light, mono and stage light mono are like added effects to the portrait mode, but for me, they kind of make the photo look a little fake. But if you guys do like them, they are there again.
This does apply to the front-facing camera as well. You can do portraits this way, and you can change the F stops as well on the front-facing camera, and you have pretty much the same modes on the front-facing portrait as well. Now one thing you can't do on the iPhone: is you can't blurb background and video? So do keep that in mind if you are trying to let's say, get better quality video with background blur with the F stops not possible here for the iPhone just yet and lastly, we have our panel. This is a traditional iPhone mode. We all kind of know how to do this.
You just snap it and move it along the line, and it will create a wider angle photo up here in the top left corner. We do have ourselves our flash and again up here in the top right corner. Is our live photos this little arrow pointing up just signifies? You can also pull up your different modes down there and other than that. You basically have just learned, essentially everything you need to know about the camera. For me to get the best results.
What I usually do is I stick to the standard wide for photography. It just has sharper results than the ultra-wide I go to ultra-wide when I want a funner looking photo, but I don't go to that for the highest quality result now on the front-facing camera. What I typically do is now for the front-facing camera and the rear camera I, typically leave them in 4k 64 the highest results, and when doing portrait, I typically leave it in the standard portrait mode, just natural light, I, don't really like those other modes. They don't they just kind of make the photos, look a little fake and over here in photo mode I, just let the smart HDR and everything do its job. Now, when taking videos, if you're going to make videos for YouTube, always record them in landscape, it looks more professional.
In addition, if you're going to do them on Instagram you're, always going to want to record into the portrait mode, and last thing I should mention is that you can use the volume rocker to go ahead and start recording and stop recording same with the bottom one. You can use either one of those to go ahead and trigger, recording or photography and to not use a flash unless it's absolutely necessary. You have night mode now on this phone, so you shouldn't always need that and when you're in daylight you don't need the flash. It just kind of doesn't seem to be necessary for taking photos a lot of the time and also keep in mind that you can go wide here on this front-facing camera now, if you want to get more people in your frame, so keep these things in mind, always use an external microphone. I'll leave a link to this one down below it's probably the best value in iPhone microphones right now, if you want to get great video, you can also use a dongle on a level ear to get decent audio as well.
That's a little closer to your mouth now when taking photos. If you want the best photo, quality, always use a tripod of some sort or a gorilla pod, something that you can go ahead and touch the iPhone to that will stabilize the shot. Now, if you want even smoother video get a gimbals I'll leave a link to this gorilla pod. It's an awesome, gorilla pod by Joe B and also, if you're, using a regular gorilla, pod or a tripod you're going to need something to attach the phone to gimbals come with a phone attachment, and some tripods do include these with the purchase. So do keep that in mind, make sure you're paying attention, or you might just buy this separate and not need it.
But if you get one with this hot shoe on the top, you can attach things like lights. To get you better, you know lighting and nighttime. If you're doing nighttime video, you can attach things like extra external microphones, that'll go into you. The dongle, if you would like, so I, will leave a link to this one as well down below this is a great little tool to add to your tripod, to get better footage from your iPhone 11. I use it basically, every time I make an iPhone 11 video, so we're a little higher up here now, and you can see that plenty of lighting, so there's stuff too showing on the outside of the frame here that you cannot get in the photo itself.
This is that photos to capture outside the frame. Now, when you do go ahead and click in the gallery view, if we go ahead and hit edit on this photo, we're going to go over here to the crop button, and you're going to see, there's actually more information in that photo. So that's how you can kind of crop out, but again this only seems to work when you have a lot of lighting. This will also work in video mode as well, but that's basically photos outside the frame, it's a great option, but make sure that you do edit these out before 30 days, so that is it for the iPhone 11 how to use it. I mean if you guys were taking notes paying attention after this video you're going to know now how to get the absolute best results out of the iPhone 11 and how to use this phone to the best of its abilities and keep in mind.
This still has a battery inside it. So you're going to have to make sure you have a full charge if you're going to be running all day, doing a lot of video work or a lot of photo work make sure you bring an external battery pack, because, although it has great battery life still the camera is one of the biggest trainers on any phone. If you guys found this video helpful entertaining and forming, do me a favor click that, like button for me, subscribe if you haven't already Nick helping you to master your technology. Thank you very much for watching be sure to be well and peace.
Source : Nick Ackerman
Phones In This Article

Related Articles
![iPhone X vs iPhone 6 [ Speed Test ] | Did Apple Slow Down Old iPhone 📱?](https://img.youtube.com/vi/mVxqHlS-FTM/maxresdefault.jpg )


Comments are disabled
Latest Articles


