ASUS ROG Gaming Phone Teardown Disassembly Repair Video Z01QD By PBKreviews
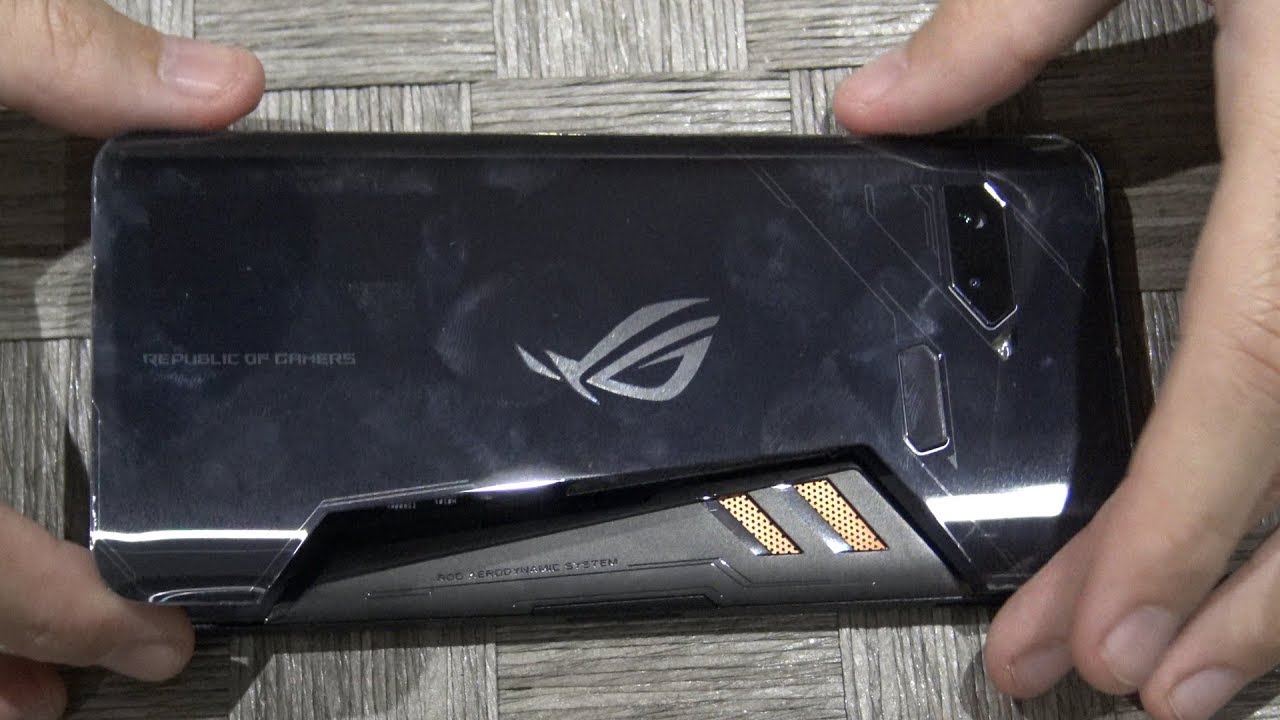
We got the ASUS ROG gaming phone here, and we're going to tear it down first thing: first, remove the sim tray on the side of the phone next remove the rubber cover covering the ports over here on the side. Next thing you want to do heat the back of the phone with either a hair dryer or a heat gun, whichever you have or prefer it has some strong adhesive going throughout the side of the phone, so you're going to have to work your way with the pry tool. Afterwards, I prefer guitar pick or something plastic, so you don't damage the frame of the phone, but if you do need to, you can use something thin like a razor just to get an edge on the corner or somewhere through the size of the phone to get your pie tool inside and then once you get it in just work. You're way around. It's going to be a little tough on this one. Like I said, the adhesive is pretty strong all right next, once you work your way throughout the size of the phone, and you loosen the adhesive you're going to pry, the back off from bottom upwards, there's a cable underneath here for the fingerprint scanner.
You don't want to rip that so right here you have a rubber covering the connector, take that rubber out and then disconnect the cable. That's attached to the board, once you've got that cable disconnected put your back aside. So now you have 11 Phillips screws. You're going to have to remove throughout the phone go ahead and remove those all right. Once you remove all your screws next thing you want to do you want to pry off this plastic piece over here that says ROG aerodynamic system, there's adhesive, underneath it, so you're going to have to pry it off all right.
Once you remove that, you have two more Phillips screws everything here. You need to remove, go ahead and remove those two Phillips screws all right once you've got those two screws removed. You're going to need to pry off this plastic frame, so this is inside the mid-frame of the phone. It has some adhesive all the way around as well, so you're going to have to pry this one up as well. These are practical to get in some side and just work your way around all right.
Once you got that loosened up next thing. You want to do get underneath this white panel over here, which lights up the logo for the ROG sign on the back, get underneath it lift it up away from the battery and then lift it up that aside next thing, there's a cable over here that goes for the LED lights that light that up you're going to have to lift that off up and away from the frame that it's sitting on I'll lift. The plastic cover it's pretty heavy, considering the copper heat pipe he has over here. So take a closer look at the back or the inside and behind the copper you can see. There's a lot of copper throughout the whole plastic piece over here.
There's copper here here here: there's some around the screw holes over here and here there's some here- there's also some over here. So basically it goes throughout the frame for the most part and keeps the phone cool. If you put us next to the phone over here, the main parts- I would think would be this and this we should be going over here and here now at this point, you're going to go ahead and disconnect the battery cable, which is located over here next, go ahead and disconnect all the rest of the cables throughout the phone two cables down. Here you have to disconnect there's one more over here next to the battery pop that off and then there's a protective tape over one of the connectors over here, which leaves for the LED lights. I light up the logo, remove that tape and lift the lock switch, and you'll be able to pull the LED lights right there and next you got another cable over here and disconnect that flip.
The phone around another cable right here go ahead and disconnect that cable and one more right here and then next we got one over here on top for the front facing camera, and then you have a cable over here for your main cameras disconnect that one now you have four more Phillips screws. You need to remove. You got one over here. Furthermore, you got one here. Furthermore, you have one on top over here, and you have one more over here, so go ahead and remove those screws all right.
Next, you don't want to lift the sticker over here, the black one. I don't know if it's like a thermal shield or what it is, but I'm going to pry it off all right now you can lift the main board, make sure none of the cables get in the way you got. This blue cable over here disconnects this one as well, and you're going to protect the tape over here as well. Peel that off this is attached to your charger port or goes over the charger port. So all right! So at this point let me move this over, so you guys can see all right.
So here's your main board. You got some thermal paste over here, I believe which would be over your processor. Here's the extra connectors on the side which you can use for the accessories or the extra heating fan it comes with not the cooling fan, I'm sorry and your sim reader over here. Let's put that aside, alright, so there's also another copper piece over here that goes on the mid-frame of the phone, and you have your vibrating motor over here. You have your speaker down here your charger port over here.
Your cameras are over here, your top of your speakers over here and your front facing cameras over here and also for the battery. You have two pull tabs over here. So if you wanted to craft the battery you'd be pulling off those two pull tabs and lifting the battery. So in order to remove your camera, you have three more Phillips screws go ahead and remove those screws. These cameras put that aside right now, the bottom speaker assembly- you have this cable over here, which makes contact with the board.
That's on the plastic piece just go underneath it lift it up. Spear comes off next, you got another Phillips screw over here for your charger port go ahead and remove that screw just got that removed once you got that removed just pull out your charger port right here. Put that aside, then you have access to the cable over here. That goes for your headphone jack. Put that aside, it's not pretty much left with the mid-frame, your battery, your vibrator motor, your front facing your front facing camera.
You have your speaker over here on the top, your earpiece speaker, and you have a cable over here for your screen. Now, if you wanted to remove your screen, you have to basically heat up the front of the phone, and you have to pry the screen off the mid-frame and also your power button over here and your volume keys. The cable runs underneath the battery over here, which connects to the board over here, so you'd have to remove the battery to get access to removing that or replacing that and your pull tabs for the battery are here, here's one of them and the second one is over here all right. Now we're going to go ahead and reassemble the phone. We're going to put our headphone jack in first next, we'll put our charger port in slide.
It back in place next go ahead and screw it back in all right. Nice go ahead and put your speaker back in it's going to make sure your battery tabs don't get stuck underneath it all right. Nice go ahead and put your cameras back in and then screw them back in all right. Next, we're going to put the main board back in to make sure now the cables get stuck underneath it. So all right next go ahead and put the screws back in for your main board, all right once you've got all your screws for the main board back in go ahead and connect all the cables.
All right next go ahead and put this tape back over all right. Next, put your LED lights for the logo back in make sure your lock is unlocked first, which is lifted position once your cable is back in push the lock-down to lock it in place. Next put the protective tape back over or now at this point go ahead and put your battery cable back on reconnect it all right again, our next get your back plastic cover with the copper heat pipe, that's on it! Put it back in place, make sure LED light. Cable doesn't get stuck underneath it just go around pop back in place. All right! Next put your LED light, cable back into that plastic piece! Push it down then you're going to put the light panel back over.
All right now go ahead and put all the screws back in all right. Once you put all the screws back in you're. Going to put this plastic piece back over next, your backplate you're, going to reattach the cable for your fingerprint reader. All right once you've got your cable back in you're. Going to put your rubber cover back over once.
You've got that back in place, you're going to reattach your back cover over, and then you're most likely going to need to apply some new adhesive all around. As far as repairability goes on this phone, I honestly don't think it's an easy phone to repair. It has a lot of adhesive throughout the phone on multiple layers. Even so, once you repair you pry all that stuff off you're going to have to reply new adhesive throughout the phone. But aside from that as power on the phone, and you're done.
Source : PBKreviews
Phones In This Article

Related Articles


![Lenovo Chromebook Duet - InDepth user rundown [Unboxing, performance, gaming, emulation, etc]](https://img.youtube.com/vi/Njy-ajF9oSw/maxresdefault.jpg )


Comments are disabled
Latest Articles


