Apple Pencil 2 Review & Unboxing for 2018 iPad Pro | "Buy, Skip, Wait for Gen 3?" By iCrackUriDevice
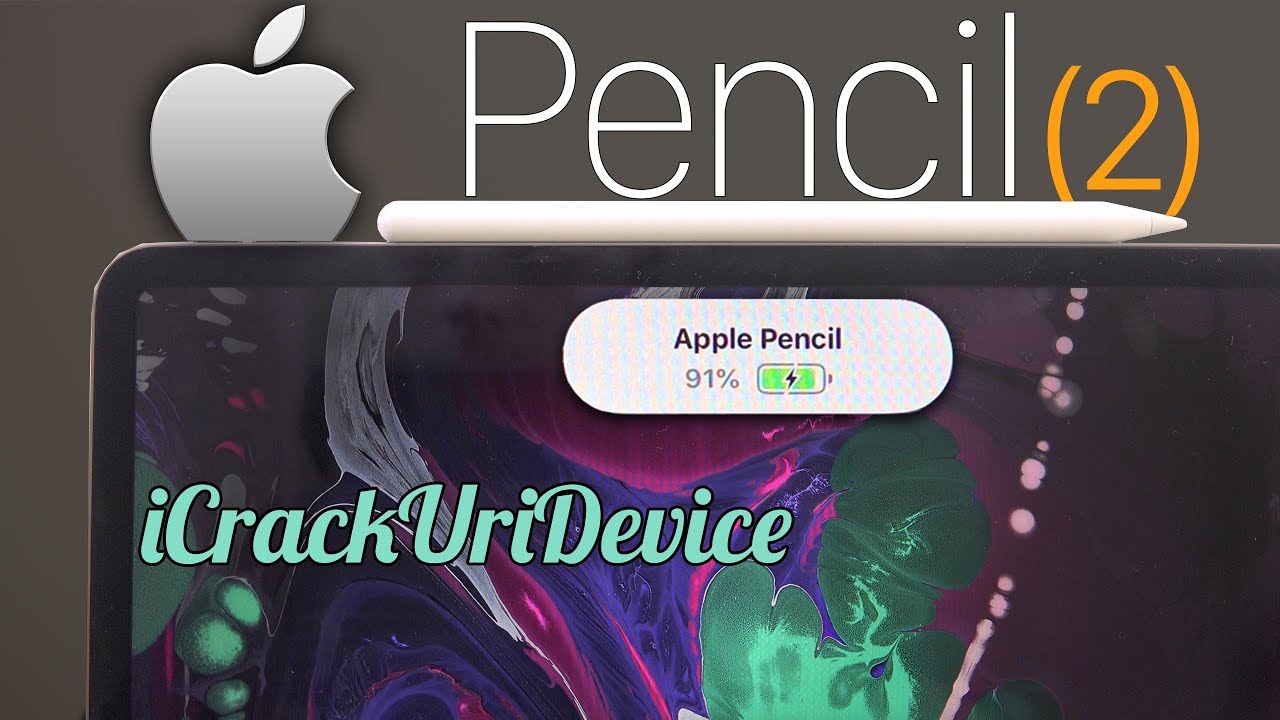
Hey, what's up YouTube, it's ICU in today's video we're going to be unboxing quickly, setting up and reviewing the second-generation Apple Pencil we're going to call it the Apple Pencil -. It was just released today. November 7th, alongside both new iPad Pro models, the smaller 11 inches and this 12 point.9 inch model here- and these are the only 2 iPads that this brand-new Apple Pencil device will work with. So keep that in mind, if you are interested in getting it, it's also $29 more before-tax than its predecessor was, which was already pretty pricey, starting at $99, again pre-tax. So this one here is actually $30 more now that I'm just thinking about it because it is 129. So let's go ahead and get straight into this video.
You can see that the box is just very simple, we'll start with the box and again on the front. It just has a picture of the device, the pencil itself, which is fully redesigned to again function with the brand-new iPads and their own redesign, and then either side simply says Apple Pencil, and we don't have anything on either the top or the bottom and the back just contains some additional information tells you which iPads it's compatible with again. We already went over that and that this is the second generation of the product. So let's go ahead and just peel the plastic back like so again, Apple is moving more toward that ease of unboxing experience with those plastic tabs which are just fantastic and speaking of plastic tabs. There is one more right here on the far corner that we can use to just slide it out like so and immediately right on top you'll notice, we have the familiar text designed by Apple in California.
This lifts to reveal the Apple Pencil. Let's go ahead and set that down for just a second, and we'll return here to see what comes inside this little sleeve right here, which actually takes up the majority of the volume inside this box. So on the top we have a sheet that simply says Apple Pencil. It walks you through how you actually connect it to the device simply by attaching it magnetically to the side, which is fantastic, and we don't have anything on the other side of this little sheet here. So let's set that down, then we have another folio style sheet that just walks through some Apple Pencil information and another one as well.
So basically just some boring literature that we don't need to go through. So let's go ahead and just take the pencil out now. One thing to note which I find pretty interesting is that we actually do not get a secondary tip like we did with the first Apple Pencil, pretty much. What you guys just saw those few sheets right there and that quick set-up guide for the Apple Pencil is all you get. That's it this time previously again, like I said it did come with a longer form, adapter that you could actually connect to the iPad, because previously you did have to connect it to the Lightning port at the bottom, and it also came with an additional tip.
But again we don't have that this time around. We just have this little plastic tab here. That is protecting the pencil. If I can get this to focus there, we go can take that off like so, and the device is slightly more streamlined. We no longer have that silver tip at the end it says Apple Pencil, or rather it has an Apple logo and says pencil, and this one side is completely flat.
This works with the gestures that are supported here. You can slide, or it is receptive to that. You can also double tap right here, and this is where it connects magnetically to the side of the iPad as well, and if, for whatever reason you needed to, you, can switch out the tip if it becomes damaged, or again it wears out over time. So let's go ahead and screw that back in its just very simple and basic and the connection process. So let's go over that right now, so on the side of the iPad I believe it is this side where the volume rocker is you'll notice on this space gray one.
We actually have this little elongated of black oval like thing here and what you're supposed to be able to do is just attach it like so and, as you can see, we have a graphic which is the wrong way. So I don't know, maybe I'm supposed to do it the other way around, but it seems to actually pick up regardless. So I can tap on connect right there, and it says: welcome to Apple Pencil use apps in a whole new way, and then it also says create an instant note and switch with a gesture, so pretty cool stuff. Basically, everything I've walked. You guys through thus far, so let's go ahead and tap on continue and then exploring double tap so again, double tap lets you switch by default inside the Notes app between which ever tool you're using and the eraser.
So, let's tap done and that should be it I mean this is how the Apple Pencil charges as well as connects. So the connection has been established, but you can see here it just fits on like so there we go. If you don't get it just right, it kind of just sit there, but when you really get it, it definitely has that snap to it, and it says, depending on which way your device is oriented, Apple Pencil. So let's go ahead and move it like this and get it closed up, and it also says the charge level there. So one more time can we get the Apple Pencil, and it says it is 88% charged.
So pretty cool I mean it comes mostly charged, and it doesn't take long to charge it at all. It should only take several minutes to get to a half charge and then maybe like 10 minutes or so to get to a full charge if we're going based off the specs of its predecessor. So let's go ahead and test this out again. It should just immediately start working, and we're going to go inside. Of a new note we're going to tap on draw so this the and I apologize.
My handwriting is just awful. This is definitely not a device for me or not one. That I would use on a regular basis in my ordinary workflow, but for those who are artists or creative types, I can definitely see the validity behind picking something like this up, but, like I said it's just not for me. So let's go ahead and try this de gesture to switch back and forth. You can see down there at the bottom.
When I do this, it immediately goes to the eraser, so now I can erase. Then I can tap it to go back whoops, and it works just like so and again there is basically zero wag I mean if you guys are interested in styluses at all or drawing on your iPad. This is pretty much the one you're going to want to go with. I know some people don't like how thin this is in comparison to other styluses that are for different devices, but I think it's just fine. It's its very similar to a regular sketching pencil, yeah I mean I, don't really know what else there is to say about it.
Let's go ahead and try it just when we are on the lock screen. It should just immediately pop up inside a note. It's called instant notes. You can see here so, and it will obviously work inside any application and really the applications for this Apple Pencil are endless and developers will be able to make use of that double tap gesture inside their applications using the new API is available inside of iOS 12.1 and up, but they just have to do the work to implement it and, like I said it should be able to do whatever they design. So that's the Apple Pencil I mean it is pressure-sensitive, just like the old one.
So you can see here when I'm slowly drawing along it is a very light line and when I start pushing down it increases in the darkness of the line. So you can see it's actually using the pressure-sensitive tip to do that. Let's go ahead and get up close, like I said. Barely touching down and then increasing and pressure, we get a darker line as we start going and of course you can use the edges of it to get more of a wider stroke. Just like you would on a real pencil and there is zero lag so from the second I touch the screen it draws like there is no lag whatsoever and that's probably better showcased here, like no lag at all.
This is like the best implementation of a digital stylus for drawing that I've ever seen again. I'm not super huge on drawing or arts by any means. But this is awesome. If you are, I wouldn't or couldn't justify the 129 dollar price tag personally, but if you can- and this is something you do for your work or your hobby, and you do it on an every day or a daily basis- definitely recommend it. It's far superior to its predecessor in that this is simply how easy it is to get charging like boom, you're, immediately sucked to the right place.
If you kind of just come at the side like so like before, I was trying to fiddle with it and get it right on camera, but if I'm just like going to it, naturally there you go it just it works it's that simple, and it should work in both orientations as well. So you can see, regardless of which way, I try to place it on the iPad still connects and charges, and I just realized that was out of shot. So let's go ahead and flip that around one more time- and that's it guys- this is how simple, using the brand-new Apple Pencil is with the 2018 iPad Pro models. I really hope you guys enjoyed this video be sure to give it a thumbs up if you did subscribe, if you have yet ? until next time, this is I see you signing out.
Source : iCrackUriDevice
Phones In This Article
Related Articles


Comments are disabled
Latest Articles


