Samsung Galaxy S10 Pro Mode: How, Why, & When To Use It By Brent Hall
What's up everybody welcome to another episode today. We're going to be talking all about the Pro Mode in the Galaxy S 10. So a lot of you guys have been asking me to explain the settings of Pro, Mode and kind of go over the why's and the how's and the wins. So, let's jump right into it. I'm going to go through everything in the Pro Mode and show you what it does and how it works, and then, after that, if you're still sticking around then I'll talk about a few ways that I like to use Pro Mode and how that can help up your photography. So, let's jump into it alright.
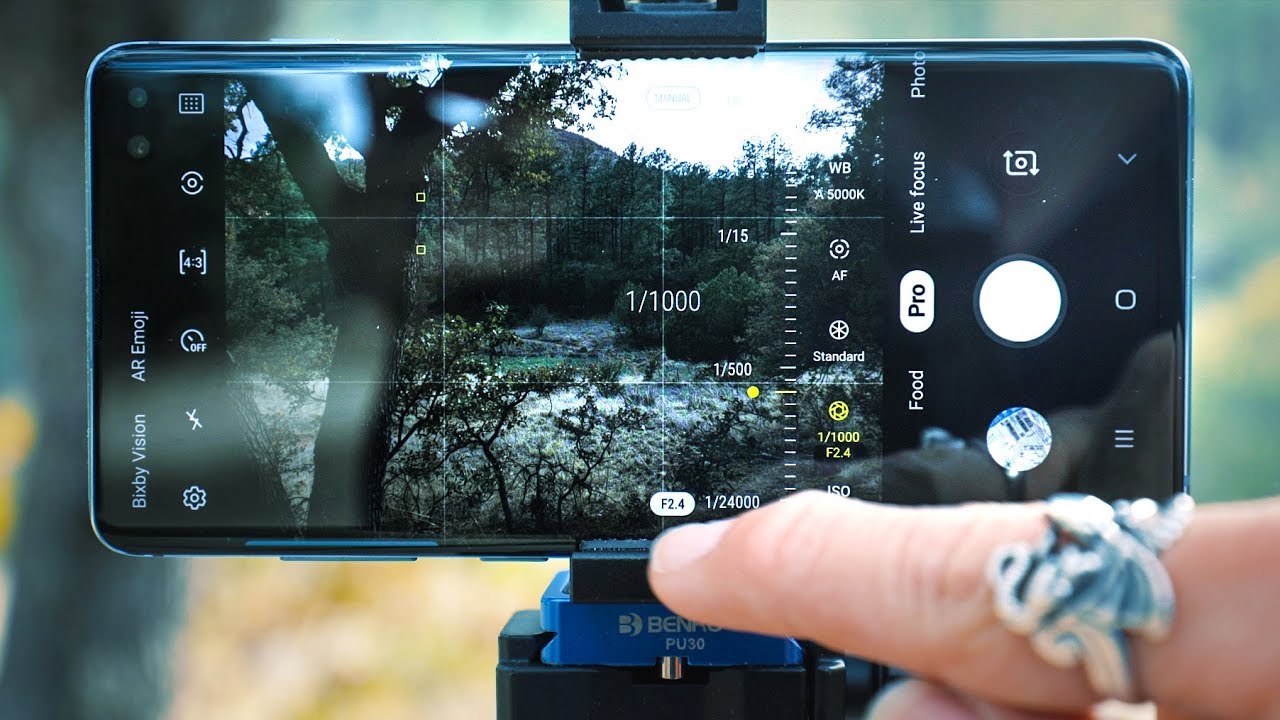
So here we are, let's go switch it into pro mode. So the first thing you'll notice, is that that screen that just popped up and said raw plus JPEG will be saved. So that's the first reason why you want to shoot in Pro Mode, because you have the ability to do raw. So let's look at ISO first, since that's at the bottom. So what is ISO? If you don't know what ISO is actually I have a series on photography: basics for ISO, shutter, speed and aperture.
You can learn about all of those, and they're very handy. So ISO is your sensitivity to light, so you can see it goes down from 50, and you definitely want to shoot it as low as possible for as long as possible. So always I always go to changing my shutter speed and aperture before I change, my ISO, so it starts at 50, and it goes all the way up to 800 so out here right now, that's really bright, and you can balance that out by dropping your shutter bring that back down, but so that looks normal. However, we're at 800 ISO, which is the max, and that will be very noisy in the image. If you do that, so we definitely want to keep it as low as possible, and now it's super dark because we change our shutter speed.
So let's talk about shutter speed. Now, that's right! Here, this guy and by default we have the shutter speed here on a slider, and it can go from 124 thousandth of a second which is ridiculously fast all the way up to 10 seconds, which is quite a long time. So we want to be somewhere in the middle there, and the next thing in the shutter setting is you'll also see this F 1.5 down here. So if we go and shutter, and we click that, and then we clicked F 1.5, that's how you change your aperture. So now it's set to the F 2.4 aperture, which lets in a little less light. So if it's super bright outside, or you need more depth of field, you can change that there or, conversely, if it's super dark outside any more light, you can open up the aperture with that 1.5. So the next thing we have is our picture profiles.
So you'll see here, you have a bunch of sliders with shadows, highlights saturation contrast, tint color temperature. So if we change that that'll change the look of our image, and then you can set that to have it be like your LUT or your color profile, whatever you want. Obviously that looks horrible reset that, and then you can save that as a preset. So if you are shooting in a certain situation- and you know the look that you want- you can go ahead and make that custom preset there. So the next thing we have is the AF and by default you'll see it's yellow right there, which means that it's on auto.
So if you just start sliding it, it will automatically switch it to manual, and you will see now that you slide it down here towards this flower. The flower means macro means close-up. So if I put my hand right there, you can see that it that's its minimum focus, distance, and it'll focus on my hand and not anything else, and then, if we go back there and then slide it up to the little Mountain symbol which conveniently there's a mountain in my shot, but the mountain symbol means infinity, so that will focus on everything. That's really far away and in the manual focus you'll notice. I have these green.
You see all that green, that's showing up. That's called focus, peaking and that's showing me everything. That's in focus so right now having it at infinity, pretty much everything in the image is in focus and then, if I take my hand away, you'll see that it's not focused on my hand, because my hand is too close, and it's focused on infinity. So that's kind of the focusing thing and the focus peaking very handy thing to have, especially when it's dark or whatever, and you can't see all right. So the next thing we have is W B, which is a white balance.
So this is your color temperature of the entire image and again by default it's set to auto and as soon as you start sliding it switches over to manual, and now you'll see the symbol up there. It says manual if you click that it'll switch it back to auto, and it will put it to what it thinks it needs to be, and it'll tell you it thinks it needs to be at 4900 right now. So we can warm it up, and then you'll see the little picture that pops up. That means the cloudy that's a preset that it has, and then you slide back down. You see another picture.
Pop-Up 5500 Kelvin is pretty standard for outside daylight, which is the little sunshine there, and then we slide it down, and then you can see the fluorescent bulb, and then we slide it down even more, and you can see the halogen bulb. So those are all color presets that are built in just to give you kind of guideline. But you can control that based on your scene and your lighting up here- and this is really stupid of Samsung. But up here you can't really see it. But if, if I move, there is a there is a gauge if I switch there, it is so right there.
You can see. That is your exposure meter, and that says that will tell you if you're, overexposed or underexposed or perfectly exposed, if you're perfectly exposed it will be set to point zero and then, if you're underexposed it'll be set to minus whatever and then, if you're overexposed it'll be plus whatever the exposure. So that's how you can gauge you can tell my highlights: are kind of blowing out there and if I move it up, you can see now it says plus 2.0, so I'm two stops overexposed, and then I can zoom it all the way down, and it gets a little hard to see, but it says ? whatever. So that's your exposure meter and that's very handy to make sure you have everything properly exposed so over here you can change the metering to center-weighted, which means it's averaging, the entire image and everything to figure out the exposure, or you can change it to spot metering, which will only meter on a certain spot in the image that you tell that way. If you're shooting, when something that's backlit, then it won't make your subject.
Super dark and that'll help you in those scenarios and then, of course you still have your flash, so you can still have your flash in Pro Mode. You can have it turned on you'll notice that you do not have an auto mode, because this is in Pro Mode. So it's either going to be on or off, and it will let you tell it that and then, of course you have your timer. So if you need two-second timers for it to stop shaking or whatever, if you're doing a long exposure, that's very handy as well. Alright, so that's, basically all the settings in Pro Mode and that's the technical part of how they work and all that stuff.
So, if you're still with me- and you want to know like a couple of reasons why you might want to use Pro Mode so a few, the reasons that I like to use Pro Mode is one for extremely low light stuff. Obviously, because this isn't like a Google Pixel 3 with all of its fancy software stuff, so having the ability to control your shutter speed control your aperture control, your ISO means that you'll be able to do much better low-light stuff. Another reason that I really like using pro mode is for long exposures during the daytime now to do that. I usually need to use a filter, but it helps me get cool shots like this, with the waterfalls and have that's water smoothed out over a longer period of time, and to do that, you have to be able to adjust your shutter speed. So that's really important.
Another reason that I would use Pro Mode is if there is a scene that has a lot of dynamic range or anything that you know you're going to be doing a lot of heavy editing to then you can utilize that shooting in RAW and have that raw DMG and whether you're editing it on your phone and Snap seed or Lightroom, mobile or whatever, or whether you take it on to your computer. Then you can edit it in Lightroom or Photoshop, and you'll have that raw ability, which will let you be able to push it a little harder. If you know you're going to be editing a lot and then another reason that I like to use pro mode would be to do stuff like this, for the light trails- and you can have the long exposures and have cars driving by and blur people out of the sidewalks and that sort of thing, and it's really fun to play around with that, especially in cityscape scenarios. So those are some of the few ways that I like to use Pro Mode and of course you can use it for anything else like action sports. If you really want to control your shutter or anything like that.
So if you have any questions about anything that I went over in Pro, Mode or that I missed, or that you want to know, leave those in the comments below, and I'll definitely answer them. If you like this- and you want to see more definitely make sure you subscribe to my channel I've got new videos. Every Tuesday and Friday hit that like button. If this video helped you out, thanks for watching I'll, see you the next one.
Source : Brent Hall
Phones In This Article


Related Articles


![[EN] Poco F3 Review! Snapdragon 870 In-depth Performance Analysis. Extended Camera Test!](https://img.youtube.com/vi/yaqwbTakoVY/maxresdefault.jpg )

Comments are disabled
Latest Articles


