Samsung Galaxy Note 20 Ultra Screen Protector & Camera Protector By Talk Tech
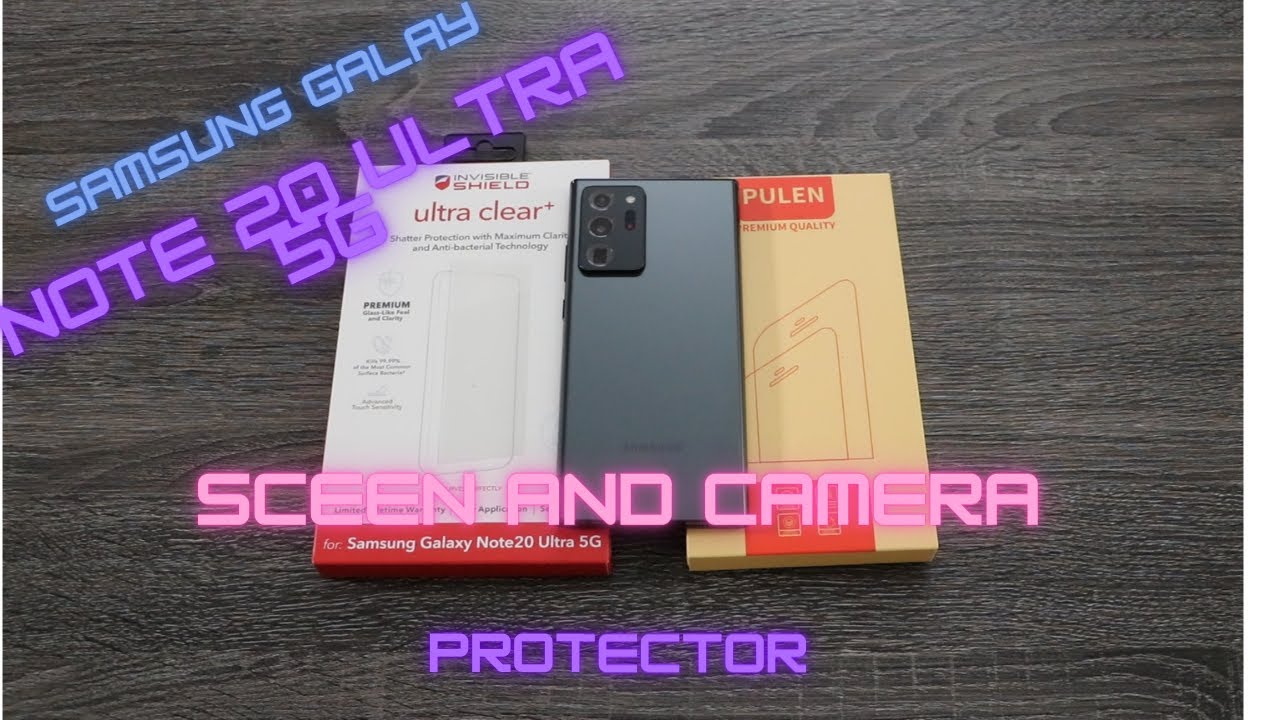
We got the Galaxy Note, 20 ultra congratulations. The next thing you need to do is make sure you protect your device. What's up YouTube FAM. This is sly and welcome back to another episode of talk tech. I am excited. What we have here is the Galaxy Note 20 ultra, and we want to make sure that we keep it protected.
You have the best display on the market today, and then you have this awesome set of cameras on the back and what we want to make sure is that we keep both of those protected and safe from scratches dents and chips, and this is how we're going to do that with a couple of screen protectors. So I have two different screen protectors, we're going to look at today, so without any further ado, let's go ahead and jump on in. We have our invisible shield, and this is actually going to be for the front of our note 20 ultra, and then we have this screen protector right here, which is actually going to be for the back for the camera housing. So what I'm going to do is go ahead and take our note 20, I'm going to set that to the side, and then we'll come back to the screen protector in a minute, but right now we're going to start off with the visible shield so really quickly. This is invisible shield and this is the ultra clear plus, and this is a shatter protection with maximum clarity and antibacterial technology.
It feels like glass and has glass clarity, but this is a plastic screen protector. It's not glass, it kills 99 of the most common surface, bacteria, okay- and this is rated number one. So on the back here we have a little tab, we'll just take that tab off, and then we'll slide. Everything out, as you can see, there's nothing else in the box, and we don't need the box, so we're going to go ahead and toss that to the side now as you're looking at it, there's a plastic cover or casing box on it make sure you hold onto this right here. This is actually part of the installation process.
So we'll take this and set this to the side. Here's our actual screen protector itself, and in here we have all our goodies. It's our instruction guide, microfiber cloth. This is our dust, removal, sticker and then visible shield, squeegee and then an alcohol wipe. So all the stuff we're going to use- and we have our tray right here, but let's go ahead and start with the instructions clean.
Your device, remove any pre-installed protective film from your device screen clean your screen thoroughly using the cleaning, wipe microfiber cloth and dust remover sticker. Even if you have just taken the phone out of the box, something left on the screen will show up after you apply the invisible shield. So this time we are going to use our cloth and then also our alcohol wipe. I suggest that you make sure that you wash your hands thoroughly before doing this process, want to make sure that you don't have any objects of dust lint, anything like that actually on your hands. The second reason is to make sure that if you have oily skin that you're removing that oil from your skin and that doesn't go on the device itself, you will see that underneath the screen protector, if you don't get it off beforehand, so just a quick wipe down with the alcohol wipe and then another one with the microfiber cloth step number two place your phone in a tray.
Remove the installation shield from the box. The bottom piece of the clear container: is your installation tray place your phone in the tray align the camera. With the camera cut out in the tray, your phone should fit snugly. You must use the installation tray to ensure proper alignment and installation. So here's the bottom piece of the tray you can see it says top right here on both sides and there's an arrow.
So what we're going to do is we're going to set that down, I'm taking my phone, and I'm trying as much as possible not to touch the screen itself. There's the camera right there and that's the cutout that they're talking about for the camera, so it'll face just like that, and it actually fits in there very snugly and then what I do just to make sure that I don't have any grease or particles on my device one more time. I take that alcohol wipe that we used a minute ago and this time I'm holding the tray instead of my phone, and I give it a nice wipe down all the way through, just to make sure we don't have any smudges or anything else on our device. So once I do that, I take that microfiber cloth that was in there, and then I just wiped the screen down one more time to make sure once again that we don't have anything on the screen itself. Step number three is peel in place: peel away the protective backing using the tab mark number one do not touch the exposed surface, put the visible shield on the installation tray by placing the holes in the top tab two over the pegs at top of the tray and the holes on the bottom tab.
Three over the pegs at the bottom of the tray. So when I was reading the directions, here are the pegs right here- that's the top- and obviously that's the bottom. And then, if you look on here, there are holes for the pegs itself. So when I was reading the directions two on the top three on the bottom, that's where they go. So what we're simply going to do is we're going to pull off this back layer here we're going to make sure that we don't touch that section there at this point in time, we're going to go ahead and line these up.
So there are pigs, 3, and we're going to align that with the pegs 2 on the top okay. So we have that number four activate dust removal layer run a squeegee lightly up and down the visible shield screen protector two to three times to activate the dust removal layer on this metal. Section go down once come back up here twice three times and this for fun there's four times step. Five is the most important. Applying a visit shield with one hand place the squeegee in the middle of the screen, with the other hand, use tab 2 to lift the edge of the protective layer at the top of the visible shield, run the squeegee from the middle of the screen to the top, and doing so will automatically lift and push off the top half of the protective backing turn the installation tray 180 degrees, so that the top of the tray is now at the bottom place your squeegee again in the center of the screen and lift tab, three run the squeegee up and down the top, which will remove the remaining half of the protective backing.
We have our squeegee and once again this is the most important. So what we're going to do is we're going to lift this back, and it's a slight protective layer underneath of it. You'll see it start to peel back, and we're going to take the squeegee going middle, and we're going to be nice. Slow fluent move all the way up to the top and then at that time we're going to rotate 180 degrees, and we're going to do the same thing on this end. So we're going to lift that protective layer back and slightly fold it and then starting at the middle, we're going to work our squeegee down and one fluid movement to get the other end step.
Six. Take the foam out of the installation, tray use, tab, four to peel away the protective top layer using the microfiber cloth and your thumb to smooth down the sides of the invest shield around the curved edges of your phone and gently press out any micro bubbles. So I'm going to wipe it down real, quick one time. Okay and then it says that I need to remove this layer right here: okay and then using the microfiber cloth and my thumb I'm going to want to push down any bubbles, work down the edges with that small bubble right there hold down the edges. Now, I'm going to take it out of the tray and finish working down any bubbles.
I may have okay, so just wipe it down. One more time and we actually have a little teeny bubble right there and those usually fall out within a few hours, and we actually have the installation of the invisible shield. So at this point in time, we're going to go ahead and turn this on the front. I feel safe that the screen is protected, and we're actually going to wipe down the camera hump in the back, we're going to go ahead and grab our other screen protector and slide this out the box. Take this follow that to the side, so we actually have two protectors: okay, some guide stickers and an actual microfiber cloth, so we'll go ahead and set that to the side there.
Okay, so we have everything just like we did on the front, we're gonna. Take the microfiber cloth once again we're to give that a quick wipe down. Then we have our wet naps and our dry naps, so we'll take one set, and we'll open that wet nap first or that alcohol patch, and what we want to do is we want to wipe down the surface, to make sure that we don't have any debris underneath of it. That will stop the protector from actually being able to adhere to that glass and then a dry wipe obviously dry that down now there are dust absorbers and guided stickers to dust absorber, which you would do if there's dust or lint on here, which just simply pick it up with that sticky piece and then the guided stickers are to actually help you put the screen protectors themselves on there, but this time we're actually not going to use that. So we'll actually move this back over here to the center.
We actually have two protectors themselves. This particular one is black. I thought black would look extremely well on there and then for myself, I'm just going to turn it to the side right up to the top to the bottom. Just like that and then once again taking a microfiber cloth, I'm just going to go ahead over it, pushing it down getting a good seal and what this does are without adding a lot of extra girths to your camera housing. It pushes it up a little and actually has the cameras themselves sitting down.
So if it's on a surface, you don't have to worry about those that camera glass being scratched up and possibly affecting your pictures. So this is the back of the device, and this is what it looks like with our screen protector over the camera housing. And then, if we turn to the front here, you can actually see the front of the device and, as you can tell, you can't even tell that there is a screen protector on there. So hey this is sly. This has been another exciting episode of talk tech.
I appreciate you guys checking us out make sure that you stay tuned. If you like, the video give us a thumbs up and hit that subscribe button to get the latest on the Galaxy Note, 20 and other exciting devices and accessories. We have I'll talk to you soon. Peace.
Source : Talk Tech
Phones In This Article
Related Articles

Comments are disabled
Latest Articles


