Samsung A9 2018 A920F Screen Replacement Full tutorial - nothing left by CrocFIX By CrocFIX
Welcome to a new tutorial I will show you today how to replace your LCD screen on a thousand a 9 mm 18 models. It's usually the 920. So if you need any parts or tools, you can buy them directly. For my video description link- and this will also subscribe- know support my channel so don't forget to subscribe. Thanks hit the subscribe button, but first we have to open the back, so we'll heal it up a little I'm using around 200 grief and for around maybe two or three minutes. After that.
We need to make a gap between the back panel, the back glass and the frame so try to use your fingernail just to make a small gap and then use a plastic card just put it slowly under the adhesive glue, but be carefully don't damage they don't damage the glass or don't damage the color under the glass because you can easily remove the color. So it won't look nice after that. Slowly, work around with your plastic cart around the frame and that's it maybe the best. If you, after two three minutes use of a plastic card, you use again the heat gun to warm it up, you can work very easily if the phone is warm, I mean if the back glass is warm better than cold. Remember not to lift the back panel glass too, strong or too fast, because it can, it can break, and if you don't have a spare part.
Oh, then you have a problem, so just work slowly and carefully. So there we go easy job first part is done. We removed the back glass. So now we will have to remove all the screws. There are a lot of them, so yeah keep going okay.
Now we will have to remove the SIM tray. Okay, there we go after the SIM tray is removed. We will have to remove the middle frame, so I thought that the middle frame is also glued to the frame. But it's not, so you don't have actually to heat it up. You just have to make a gap between the middle frame and the screen, and then you can go around with your fingernail or with the plastic tool better go with a plastic tool, so you see I'm making a gap here then the middle free account comes apart easily, so just be careful, and maybe you need a little more work in the corners.
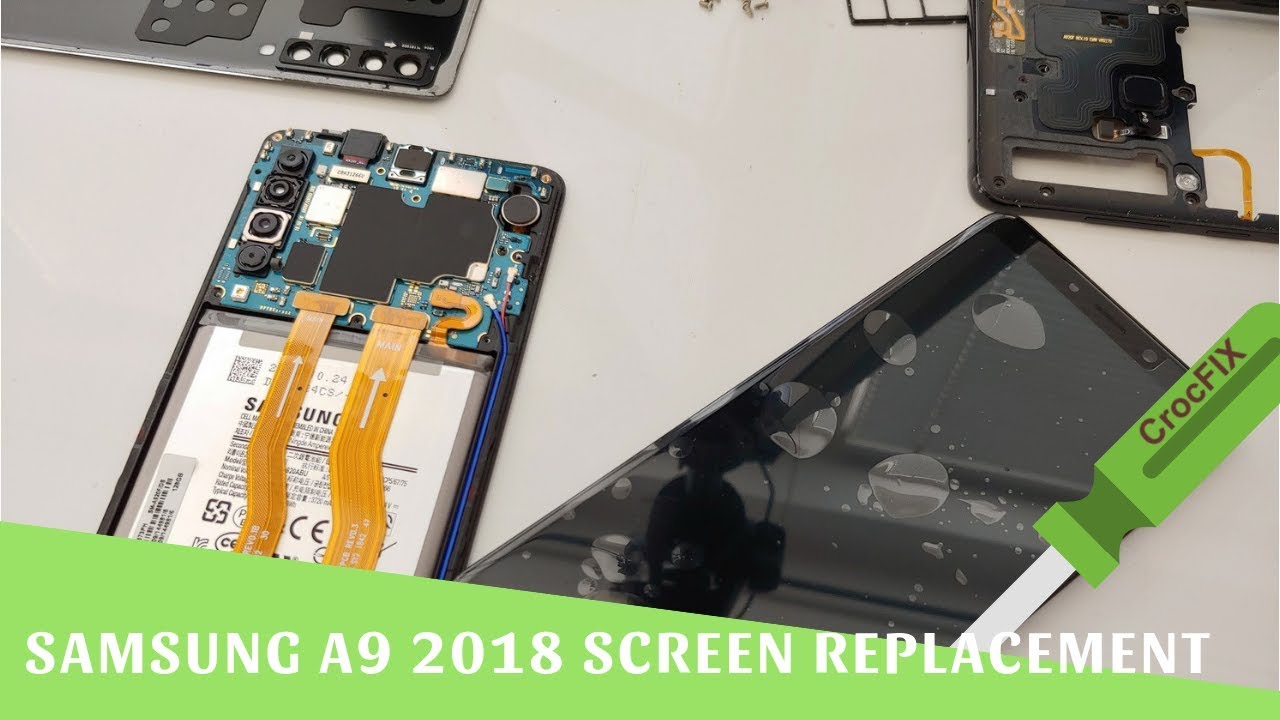
But it's not it's not that hard. It's easy job! Okay, there we go Botha. We separated the middle frame, easy job, so here I have a genuine Samsung screen. It comes with already assembled in the frame, so I will disconnect no buttons and cameras and don't forget the battery, all connectors the screen connector and button, the charging port connector- and here we have a small screw for the main board, remove it. Okay, we can lift the motherboard, and then we will disconnect this antenna cables.
One is for Wi-Fi and the other one is for your cell reception. Okay, now I'm going to remove the speaker. So first, let's remove screw there and then remove this screw down there. Now we are going to remove the charging port. Okay, the charging port and its small motherboard is glued a little underneath so just gently lift it up like I did so now we are going to remove this front sensor.
Just I have to figure out what is the best way to remove it, and you have to be carefully because this flex, cable is really fragile, so don't crack it break it or yes, you know what I mean I'm using the heat gun here around 140 degrees, to heat it up a little, it's easier to remove because the glue underneath it's getting softer now we'll remove the vibration unit, just lift it up gently and let's assemble it already to the new frame with a new screen I'm using hear hear, a small screwdriver and think it's the best way just go from that side close to the speaker, lift it out, slowly be careful, II, don't crack it, and then you can use a help with some tweezers just be sure to work really slow. There is some glue under that be sure the position is same like a boss in the other screen gently push it inside, align it to the frame and stick the tape or whatever it was back to the frame, so I'm. Removing this small piece of protective foil here at the bottom and I put it on a new screen. I mean on a new frame, okay, so no we will have to do the other stuff, and this is to remove the battery. This is really a pain in the ass, because the battery is really hard glued under the frame so removed the flex cable first and then try to work around first to make a gap between the battery and between the frame.
This is not a really easy job and be careful. It doesn't damage the battery. So a view see I'm using here a different tool, so just use a tool which is better for you. There is some kind of sticky tape under the glue I mean under the battery, so I just tried to remove it with tweezers, but be really careful. It doesn't make a hole inside the battery, it will damage your battery, or even it can be dangerous.
So if you're professional do it like I did, if not just, leave it and try to go with a plastic card instead. So if you see I'm trying to remove this sticky glue or just to cut it with a plastic card and then yeah just to try to remove the battery, it's a really hard job, but anyway you have to be patient and work slowly. Okay, the gap is getting bigger, and we try to remove some more glue. I try to heat it up a little, I used around to 120 degrees, not too much and not for too long. Okay, another try, let's go okay.
Finally, and the winner is I'm. The winner now try to make the battery like new so make it even push it down. It has to be even everywhere, remove the small pieces of glue, and then you can go with your fingernail. You see like I, do just to remove these small bubbles inside. If you want to work with a tool, just be careful, II don't like.
If some bubbles are too big, don't use it to better use. Just your fingernail okay looks almost, almost like new, and it's not damaged it's not open, it should work. Normally. Okay, we proceed, and now we are going to assemble the bottom charging motherboard again the charging port. So stick it back again, don't forget the screw and remove the protective fall for the heat sink and all other files then take the motherboard, and we will assemble the motherboard back to the frame watch out for all flex cables, align it.
Ok, I'm, removing here the protective fall for the front camera and let's connect the front camera back to the motherboard I'm. So sorry, you're watching my hairstyle, so I have to figure out a better view angle for the video recording. Ok, let's connect the antennas back, so I figure out it's better to first go with a red cable, put it in the frame and then after you connect the blue cable and go over the red cable. So it's better. It will be better aligned and stay better in the frame.
Okay, see first the red one and then after we go the blue one. Okay, now I'm an assembling back the speaker, the bottom speaker and screw it back inside a frame. I know the screw for the main board. Okay. Now we're going to glue the battery back inside the frame, so I'm using here a double-sided adhesive tape just to stick it inside the frame.
There we go, align it carefully and watch out. The flex. Cable will reach the motherboard, so you can connect it easily. Okay, let's connect bottom charging port again. Okay, now we are having to assemble the middle frame back again, as you will see, it's the best way is to take it out, and then you start from the top.
So you push it in the top you push it inside, like I did, and then you work down to the bottom and press it yeah press it all around. You have to hear click. Okay. Now we have to screw all the screws back inside the frame, let's connect it for the first time. Okay, we see the screen is working.
Okay, it's charging! Probably the battery is empty, so just finish all screwing here: okay, it's showing one percent. So it's charging, it will need a couple of minutes, but we have to assemble back the rear glass. As you see, my other half here is still okay, but it's not in your case. You can use the t7000 or the 8000 glue for better holding okay, so I'm heating up back the rear adhesive. Here it's almost like new, so it will be good enough for this backplate and anyway, this phone is not waterproof.
So okay, No gently press all over the phone and in every corner by every pressing, be a little stronger, but don't break anything for better holding. We put back the SIM tray and that's it your phone is repaired. That's it guys! Congratulations thank for watching! If you have any questions you can comment below. I will try to answer your questions as soon as possible. If you want to donate, there is also a donate link and don't forget to subscribe for more videos, thanks.
Source : CrocFIX
Phones In This Article

Related Articles


Comments are disabled
Latest Articles


