Oneplus 9 Teardown By Geardo
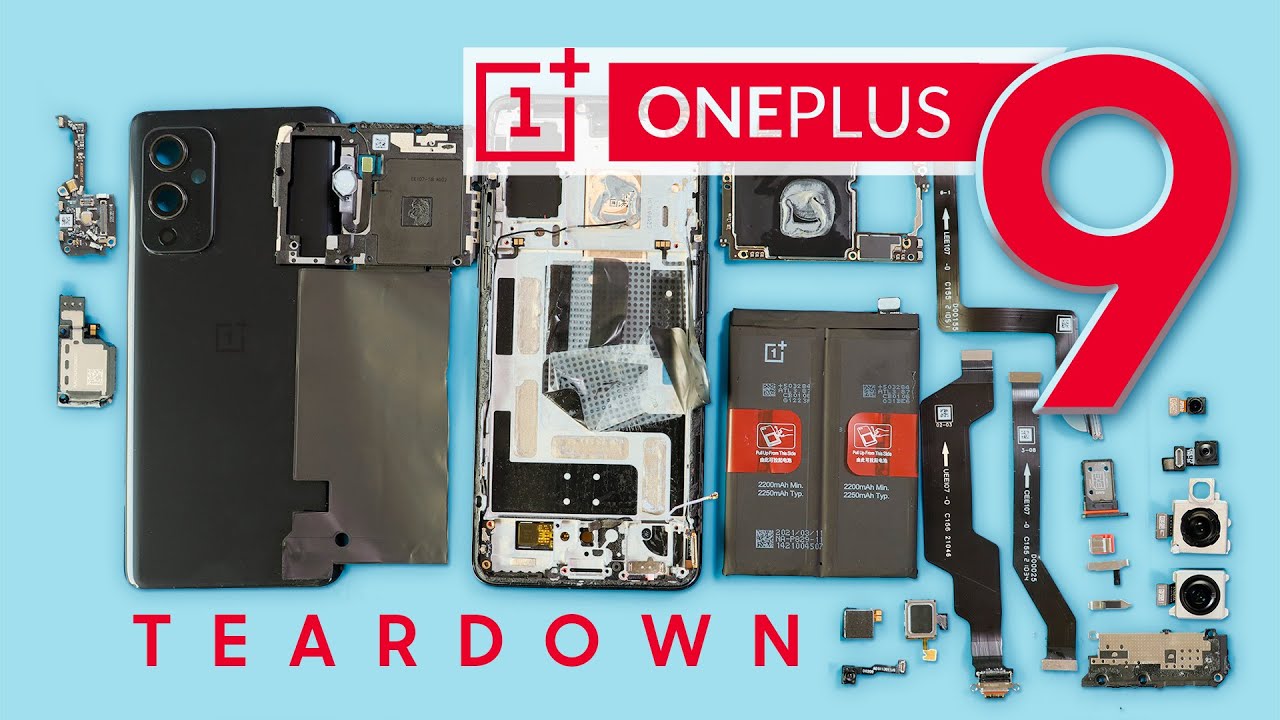
Hello everyone welcome back to ghetto. Today we will show you how to tear down or disassemble the OnePlus 9 for repairs. The same device got damaged from our water tanks and, let's see the tear down and cleaning will help to restore the phone to start. We need to have the right tools to proceed with the teardown, which you can find in the description. First turn off the phone and take out the sim tray and followed by the back cover removal to remove the back cover. It needs to hit gently around the back of edges until the pastel adhesive becomes soft.
For this we are using a heating pad place, the background side on the pad and select the mobile phone heating option and leave it till heating completes. Alternatively, you can use a heat gun or hair dryer once the heating has completed, use a suction cup to create an opening between the frame and rear cover. Next insert a plastic card pry tool or something similar to cut the adhesive around the back cover. Take out the background as usable, there is water all around the phone next take out the main board frame by undoing screws, undo nine screws and lift the protector cover using a pry tool. Just a quick note: there is a hidden screw under the plate near the camera.
Module just make sure to take it out next, take out the shield and disconnect the flasher plug next lift and take out the wireless coil with the main board frame using a pry tool. Next, from the right hand, side disconnect the battery plug in OnePlus 9. There are three rear cameras and the white camera and depth camera comes as a two-in-one unit. However, the dev camera can take a note by applying little pressure on the top next disconnect and take out the white camera and the front camera on the board. Next loosen two more screws that are secure in the logic board.
Next, on the left hand, side take off the shield protecting the LCD connector plug next unplug, the top end on the charge port flex main flex and followed by the LCD flex, cable and next undo, three antennas on the board and make sure to loosen the adhesive under the earpiece. Next move aside, antennas and gently take out the logic board and, as you can see, the water has soaked into the logic board. Next move to the bottom section and undo seven screws to take out the PCB cover next, take out the shield on the main flex, cable and disconnect the bottom and on the main ribbon before pulling it out. Next disconnect the touch I'd flex, connector and two antennas on the bottom PCB and next undo, one more screw and pull out the bottom PCB, which includes the sim card tray. Next gently pull out the charge board, flex, cable and the speaker.
Module from the body next apply the heat and take off the tactic engine and touch ID camera flex. Next, move back to the top and apply the heat to take out the speaker and sensor flex: cable, be gentle and slowly pull out the parts next for taking off the battery first loosen the adhesive on the sides and then pull them by the red tap on both sides. Finally, disconnect the tail end of the LCD connector plug first move, the battery protective tape to the right hand, side and peel the LCD flex cable be careful. There is a sticky strip on the edge of the bottom PCB move aside and pull out the cable by applying little heat hope you have enjoyed the teardown guide for repairs on OnePlus 9. Stay tuned for the assembly process to see the phone will work or not after cleaning.
Let us know if you have any questions, please like share and comment on. Our videos hit the subscribe button for more videos.
Source : Geardo
Phones In This Article


Related Articles


Comments are disabled
Latest Articles


