iPhone XS Max - Tips, Tricks & Hidden Features! By Brandon Butch
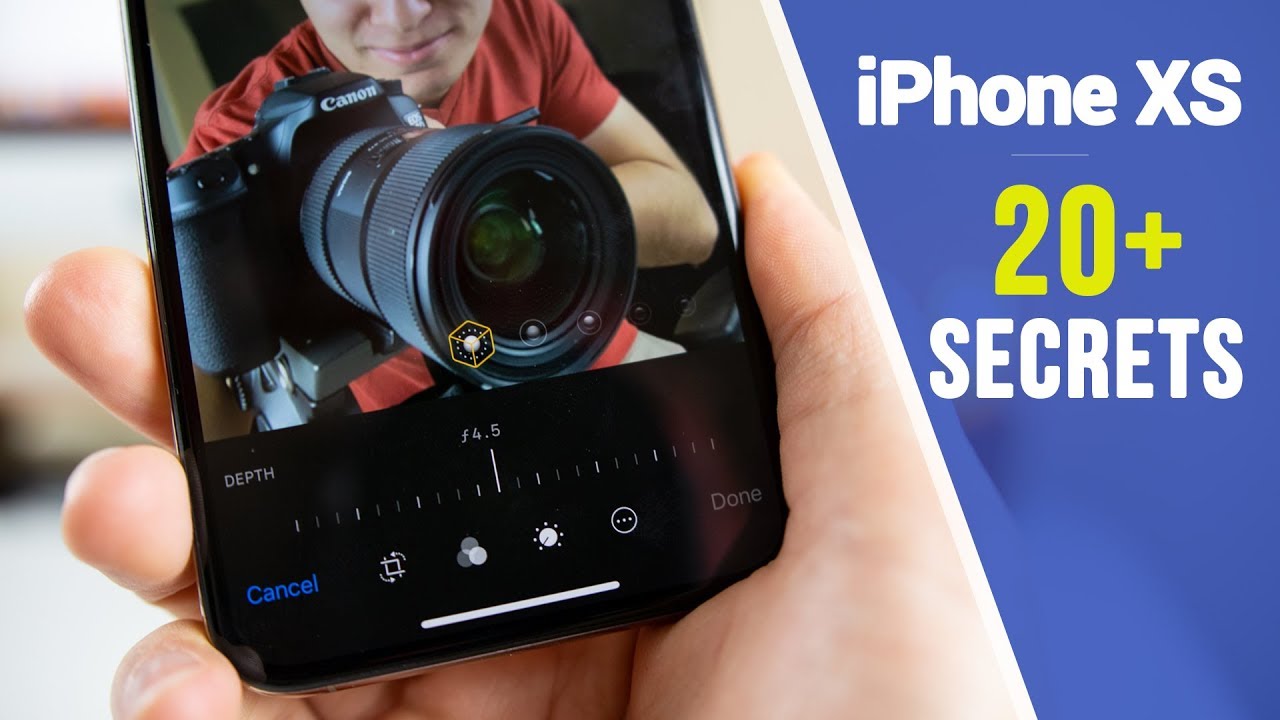
What's up guys, my name is Brandon, and today I'm going to be showing you more than 20 awesome tips, tricks and hidden features on the brand-new iPhone 10s and 10s Macs. Some of these you may know, but you are probably not aware of most of the ones in this video, especially if you did not have an iPhone 10 or, of course, if you haven't used an iPhone before at all, but even if you did have an iPhone 10, you probably will learn something new in this video. So let's not waste any time, let's get straight to it. Now, although the iPhone 10 S is very similar to the iPhone 10, there is an exclusive feature, and that is the ability to adjust the both after taking a portrait photo. So let's go into our camera on the iPhone 10 s max. Here, let's go over to portrait, let's switch it around to selfie and take a quick portrait, selfie, real, quick and now, let's go to that photo click on edit, and you can see down here.
We can actually adjust the blur or the both in the background. So this is very cool, and you also get different types of edit, so you can make to the actual portrait photo. So you can do contour light. You can do stage light which I actually really like. That was a terrible picture of me, but oh well, we got stage light mono, and you could just change between all of these different portrait modes and pair that with being able to adjust the both.
This is an awesome feature on the iPhone, 10s and 10s max and speaking of the camera. Let's go ahead out of here and into settings. Let's go to our camera settings and in here is where you're going to be able to change how you record video and slo-mo what quality you record it in. So you can see I might set at 4k at 30, but you can also do 4k at 60, and you can see right here. It gives you a little pop up saying that 4k 60 will only play on Mac, OS, High Sierra or later, so you definitely want to be recording at 4k unless you're just really trying to save space.
You want to record at the max quality, so you can get the best quality when you actually go to upload that video or just watch the video back, and then you also want to make sure that you have auto low-light FPS enabled, and if we go back, you want to make sure that smart, HDR is also enabled. You can also consider the keep normal photo enabled if you want to, but I don't like having duplicates and then, if we go down here to formats, you actually have the high efficiency and the most compatible picture format. So, basically, the most compatible format is just going to be a JPEG and the high efficiency is going to save the file as a Ha F file. Now I did use to use high efficiency with my iPhone 10, but I opted to go with most compatible here with a 10 s, and the reason for that is because, when I went to transfer photos to my computer, it actually transfers them since I had high efficiency checked off as a GIF, and some computers would not be able to read that file. So JPEG is most likely, which you're going here, unless, of course you don't have much storage space, and then you'll want to do high-efficiency, so ya configure the camera settings to your liking.
But that is where you change all of those settings. If we go back to our settings and go into battery- and we take a look at the graph here- you can actually pinpoint exactly what is using the most battery life at what specific time. So you can see if you see like a big drop, so it looks like right about here it's hard to zoom in you can't really zoom in at all. So it's hard to see really. But if you go to about right here, that's what my battery started to drop a little so now that I see that I'm going to go down here and look okay, so an tutu benchmark was running.
That's why my battery dropped so much. So the tip here is to look at the graph, see when there's little dips right there and take a look down here and see what was actually using the most battery life at that time, and it actually shows you the exact specific time right here. So 4:00 p. m. to 5:00 p.
m. I have my screen on for 49 minutes of those 60 minutes and 31 percent of the battery life. Was there taken away by a two to twenty? Two percent of my battery was taken away by an tutu benchmark. Twenty-two percent was taken away by asphalt, 9 and so on. You can also tap on this chart down here as well.
It's a little better because it is bigger and easier to tap on, but definitely pay attention to the dips and your battery life and see what was the reason for that dip. Another tip is that swiping from the bottom back and forth is an easy way to get in and out of applications here on the iPhone 10s. This is my preferred way to go back and forth between applications. I, don't like going through every single one, but if you just need to get back and forth between an application like if you copied something- and you need to go back to that other application to paste it, you can simply do so by swiping on the little bar on the bottom. This is super, super useful, I use that all the time with my iPhone 10, and you definitely need to know this with the iPhone 10s and 10s max now, I've seen a lot of people who have iPhones who still use applications to scan and sign documents and every time I see that I just scratch my head and the reason being is that you can actually scan inside documents straight from within iOS.
You don't need an application. So if we go into notes, create a new note, if we click on this little plus right here scan documents and say this is a document right here. Let's take a picture of the document and if we click on it right there, we'll just click, done we're gonna, save and now that we have the document. Let's click on it. Let's click the share.
Icon up in the top right go to mark up click on the plus, and this is where you can actually add in a signature, so you can see. I have mine preset in there. I can actually add my signature to the document, modify the size of it and everything, so I use this all the time when I need to scan and send documents, no third-party application necessary. So you guys may know about the control center, but you may not know about a certain toggle inside of control center. So if we go into our control center customized controls, if we go all the way down and do text size, this is a very underutilized tool in the control center.
So we can actually change our text size straight from within the control center. So if you maybe hand your phone to somebody who can't read small text, this is a quick and easy way to change that text, size and speaking of the control center. You can also 3d touch on most of the platters on here to get more details. So if you airdrop things, you can 3d touch on this platter right here, and you get access to airdrop you get 3d touch on the music. Like you saw you get 3d touch on the brightness on the volume you get 3d touch on, do not disturb, and you could 3d touch on most of the toggles inside the control center.
So you should definitely play around with that, because it is a quick and easy way for more quick actions within these toggles. The next tip is using face ID for Safari autofill. So if we go into our settings face ID and passcode, you want to make sure that password autofill is enabled. This is gonna, allow you to go into Safari and actually enter in passcodes by simply putting in your face ID. So, for instance, if we go to developer.
apple. com, you can see. I have my password saved right here. If I click on that it'll scan my face and voil? I am signed in just like that. So using face ID for Safari autofill to autofill, your passwords is a quick and easy way to log in very quickly and face ideas.
Also used all over the OS for banking applications, and things like that, so it's very important that you do have face ID setup and these settings configured properly for it. Now, if you're new to the iPhone 10 or the 10s, you will not have a home button, so you're probably wondering how do you get reach ability? A lot of people actually think that reach ability is missing in the iPhone 10 and 10s, but that is not true. If we go to Settings General, accessibility and all the way down here, we have reach ability. So if we enable that go back to the home screen and swipe down, you see that we get reach ability and vote, so it may take a little to get used to, but just swipe down you will get the hang of it, and this is a quick and easy way to pull down control center as well, if you're, maybe just using one hand or if your hands just aren't big enough to reach all the way up there all the time. This is a quick and easy way to do so and reach ability just has so many use cases.
I, don't use it that much because I do have decent-sized hands, but some people use reach ability a lot now, if you web browsers a lot which I'm sure most of you guys probably do. You're going to want to block ads in Safari, because I'm sure that advertisements get on your nerve every single day, and it's actually really easy to block ads in Safari I haven't seen an ad and who, how long inside of Safari I see him all the time on Facebook on YouTube, but in Safari I, don't see him that often because I do block them, so I just use AdBlock I will have any link for this down in the description below and once I have that enabled. If I go back to settings, if I go to Safari content blockers and make sure I have this set, you can see I use one blocker and AdBlock a combination, so I definitely do not get any ads in Safari. So I would definitely recommend doing that because ads are very annoying and very intrusive, sometimes so that is a good way to block them and Safari for good now. Another interesting feature on the iPhone 10s max is that you can get a sort of dark mode.
So if we go to our settings, go to general accessibility display, accommodations, invert, colors and smart invert is kind of like dark mode here on the iPhone. So you can see our icons do look a little different, but if we go into our applications, you'll see that a lot of them are actually dark. Themed, especially the settings actually looks perfect, and you can see it describes it as smart. Invert colors reverse the colors of the display, except for images, media and some apps that use dark color styles. So this is pretty cool.
It's kind of like a system-wide dark UI, although it does make the home screen look a little weird. Some of these applications, just the colors look off, but it is there if you do want to test it out a really cool feature on the iPhone 10s Macs and iOS 12, and the next tip applies to those of you who did also come from an iPhone with a home button. You probably always try to press down there were the home button used to be, but now you can actually get a virtual home button on the iPhone 10 s. So if we go to our Settings General accessibility, scroll, all the way down to assistive touch enable that you can see. We now have a virtual home button, and you can move it wherever you want on the screen.
Most people would probably opt to put it right where the home button used to be, and if you tap on it, you can see it does. Take you home just like a home button, and you can also, of course, change with the single tap the double tap. The long press and the 3d touch do as well. You could change the opacity you can customize the whole top level menu. There are just a lot of things to change in here, which makes this really cool and very useful for those of you that actually want a virtual home button.
Now me personally, I don't like it, because it just doesn't look clean. It just takes away from the cleanness of the UI, and I'm just used to having no home button and I don't like having a home button, but you may want to use this. The next tip is another one that I've ranted and raved about, and that is Siri shortcuts. Now I've made a full video, that's over 10 minutes, long on Siri shortcuts and how to create your own shortcuts, but basically the gist of it. Is it's going to allow you to automate certain tasks and what it's going to do is plug into series.
So you can tell Siri custom commands, and it will do whatever you want. So the one I always show off to people are to calculate tip shortcut. So if I click on that say, we went out to eat in our bill is 30 to 85 and I. Have this set up so the menu shows? How much I would like to tip so say, 15 percent, then it will give you a pop-up showing what the tip and the total will be, and I know. This is just a very broad explanation, but serious shortcuts are extremely useful, and I highly suggest watching that video, like I, said if you go into the settings here, go to this button right here, and you can set the phrase right here so when I say calculate tip, and we'll pop that up and ask me how much and everything like that- and you can also go over to the widgets panel right here, and you can see all the shortcuts once you add it.
I would definitely get familiar with serious shortcuts because they are going to be a big part of iOS in the future. I mean they kind of are right now with iOS 12. Now speaking of Siri, did you know that you don't actually have to talk to Siri? You can actually type to Siri so say you're in a quiet place like a library or something like that, and you have a lot of people around you, and you don't want everybody to hear you talking to your phone, but you also want to use Siri. So if we go into our settings, go to general accessibility, scroll, all the way down to Siri and type to Siri is right here. So now, when we invoke Siri, you can see it pops up a prompt to actually type instead of talk.
So if we say what's the weather, you can see it pulls up the weather just like that without actually having to talk to Siri. So once again that could be very useful in certain situations. Now, once again, if you came from an iPhone with a home button, you use the home button in the past to take a screenshot. So now, how do you take a screenshot on the iPhone 10 s? So all you have to do is press the volume up in the side button at the same time just like, so we have a screenshot. Now it's down in the bottom.
We can either slide over to save it or tap on it to edit it, and inside here you can actually mark up the photo as well. You can crop it as well. If you want to so, you can see, we could just circle things if we click on the little plus right here we can add in a signature text or a magnifier. We could also add in shapes like arrows and circles, and if you click on this little circle right here, you could actually change the color. You get a full color wheel.
So if you wanted to circle something in a red, we could do so just like that, and there are just a lot of different ways you can mark up and edit your screenshots and once you click done, you can either save it or delete it. Another cool new application with iOS 12 is the measure application. So what this does are it uses an R to measure things, and I've actually used this a lot to measure things in the house, and it's actually very accurate. So all you have to do is the phone. You can actually start measuring things, I'm, not gonna, do it just because I don't want to move my phone, but you do also have any level which is pretty cool, so you can see my phone is not completely level, let's level it out there, so that is pretty useful for me and my videos as well.
So if we go back to measure you can do that right. There just check it out and play around with it. It's actually pretty cool, there's, not really a tip inside the measure. Application I just wanted you to be aware that it actually exists, and it's actually on your phone. Now, if we go to our keyboard and we 3d touch on the emoji icon down here in the bottom left.
You'll see you get new options here and on here are two options for a one-handed keyboard, so for right-handed you can see we could go over here, and we have a one-handed keyboard and once again this is very useful if you don't have big hands, or maybe you're laying on your side, and you want all the keys to be over. On that side, you can do so and once you click on the arrow right here, it goes back to normal. If we go back in 3d touch, you can see you could change between different keyboards as well, or you could do it to the left side if you want to so just a very useful tip for the keyboard there. The next tip is probably one that you don't know, because you probably still hold your power button when it's booting up. So when your iPhone, 10s or 10s max is completely turned off.
All you have to do is simply tap on the power button right here or the side button. Whatever you want to call it, and it will turn on you don't have to hold it, you don't have to hold it and wait for the Apple logo. You just simply tap it and that's it and the same does apply for the iPhone 10 as well. The next step is about another setting that I just want you to know about, and that is emergency SOS now, of course, I hope you never have to use this, but it is very useful for certain situations. So, basically, you can call emergency services aka the police by simply tapping on the side button five times rapidly and of course it will have a countdown sound if you do have this enable to you know what you are doing, but this is a quick and easy way to do so, discreetly, if you ever need it to, but of course, if somebody did break into your house, and you want to call police without them hearing you definitely turn the countdown sound off because it is very loud and that person that broke into your house will definitely find you sorry to put that image in your head, but I just had to say it.
The next tip is that you can move multiple applications to a different page at once. If you start moving something around, and you tap on all these icons, you can see you can move all of these to a new page. If you wanted to, so this is a quick and easy way to organize your home screen, and once you get into wiggle mode, you can either click done at the top right or you can just swipe up from the home button at the bottom or the home bar I should say, and the final tip is a way to get to the very top of the screen or the top of your feed and any application like Safari like Twitter and the sentence. So you can see I have a lot of tweets up there, I'm not even close to the top, but if I tap on the top left, you can see I go all the way up to the top of my feed and if I scroll down click on the top right, you can see it does the same thing now. Let's just try it inside of Safari.
So if we go all the way down here, tap on the top right or left you can see it takes me to the top of the webpage super useful feature again: I use it every single day, and you definitely will to want to start getting the hang of it. So there you have it guys. There are more than 20 tips, tricks and hidden features for the iPhone, 10s, 10s Macs, and also some for iOS 12 hope you guys enjoyed the video if you did make sure to give it a thumbs up also make sure to leave a comment down below with what your favorite feature was, and if you have any other features, your think could be added to the video also make sure to subscribe for a lot more iPhone, 10s max coverage reviews all that fun stuff. But thanks again for watching guys, and I'll see you soon.
Source : Brandon Butch
Phones In This Article
Related Articles


Comments are disabled
Latest Articles


