iPad pro 9.7 Not charging - Faulty Tristar & Battery connector replacement By NorthridgeFix
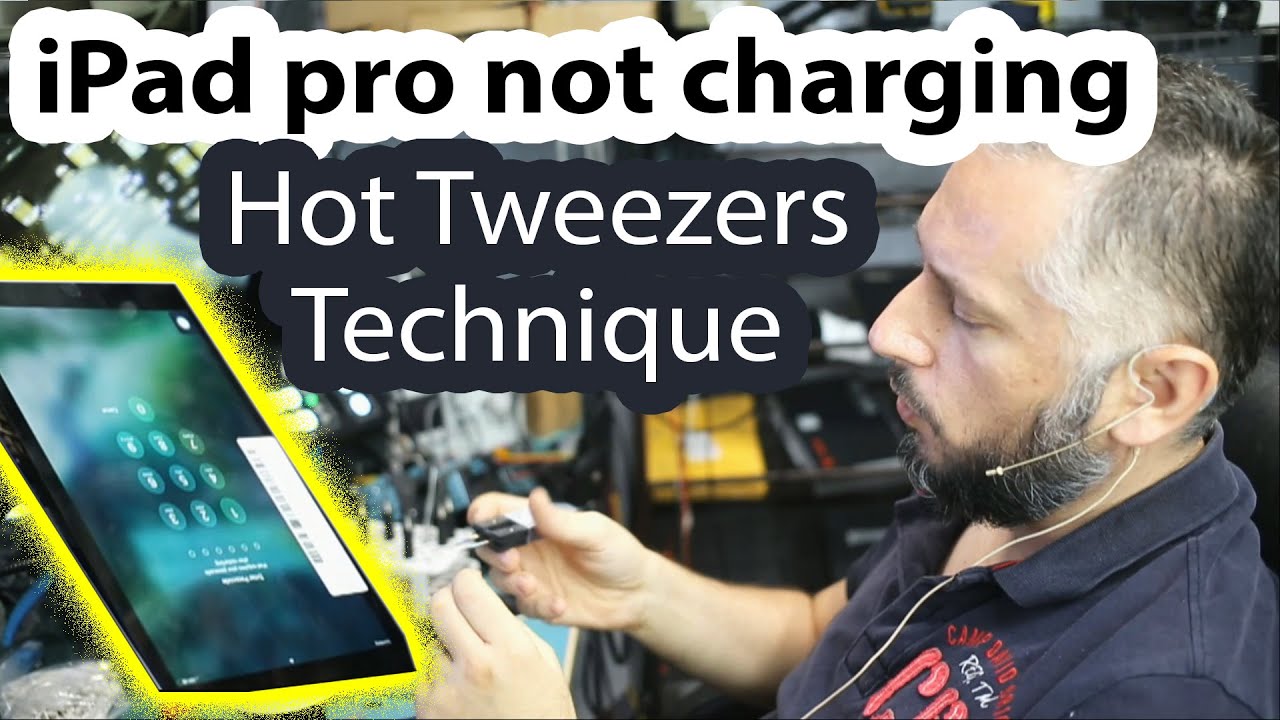
Here we're going to be working on an iPad. What appears to be an iPad Pro 9.7 inch, and this was mailed in because not charging. Let's read what the customer wrote issue will not charge battery and still no charge double-checked with the iPad charger that works on other iPads still no charge tablet came in like this, and we can tell that there's been work that was done here because of the scratched plate here, and we can tell the battery was tempered with let's go under the microscope and inspect the board. Let's start with the FCC area. Right here just want to see if we have anything blown, maybe a damaged, FEC, connector or whatever. The case may be, I'm going to test this filter here and this one here just to make sure they are good.
Let's start with this one. This is good, and this one is good. These two filters are known to blow when screen is disconnected without disconnecting the battery first, so the two filters are good, and I do not see any reason to be concerned about this area here. Just want to do quick physical inspection and see if there is anything obvious on the board. Now, charging could be due to Tristan chip, which is over here, or it could be due to the charging flex cable.
But right now I do not have a reason to believe that it's a charging flex, cable, mailman, just came in with a lot of packages a lot of packages and, like I said I did not have a reason to believe that the problem is the flex cable. Let me look inside the charging port and see if we see any damaged pins. Maybe the pins are good mint, no problems at all- and the next thing I want to do is test using the Tristan tester, so we're going to plug it in and look at this as soon as I plug the tester in it shows us a warning sign triangle: let's test anyway feel uh more information. I put this under the microscope, so you can see what it says. Everything is fail, except for pp, 5, v 0, so 5 volts is being supplied to the tablet, but everything else is failing and everything is pointing to the Tristan chip being the faulty component.
A lot of you are asking: if we sell this device in our shop, I contacted the company before, and I told them that we want to resell their device, and they said currently they're not accepting any resellers. So I contacted them again and let's see if we do, if we are able to get this device I'll, let you know- and you can purchase it from our shop but for the time being, it's not available. So let's go ahead and remove the Tristan chip. The next thing we're going to do is apply leaded solder on top of unleaded, so we can lower the melting temperature of those other balls. That way, it's easier to make those solder balls of the board right now.
If we try to wick the unleaded solder balls with a wick, we're going to end up ripping a lot of the pads or there's a higher chance of ripping those pads off the board. Let's apply. Let it solder what we're going going to do is we're going to use a technique. I went over in a previous video where we use a wick, and we hold the wick with hot tweezers. Hot tweezers are gonna heat up the wick and the wick is gonna disorder the balls off the board, and I've been using this technique.
Since I discovered it first, it was a trial thing, but after I discovered that it works, I've been using this technique since so right now I grab the wick with our hot tweezers and, let's see look at this, as you can see, the braid is only the soldering balls of the pads, it's not affecting other components on the board, because those components still have unleaded solder, and it takes a higher heat. It takes more heat to the solder unleaded than lead it, and that's why we apply leaded solder onto those solder balls. So we can lower the melting temperature and right now, even if we touch components nearby, we're not going to knock them out by mistake and perfect, perfect, clean up and solder the new chip. Let's add some flux, and we're going to grab a try, start chip. You can find those chips for sale on our website in lots of five and the chip should work on most versions of the iPad and iPhones pin one is on the bottom left.
We're going to secure it down like this. Just hold it for a few seconds: release: okay, and now we're going to reflow it down airspeed up and the job is done. Let's wait until the board cools down a bit grab our Tristan tester again and see if we still have that triangle that showed on the tester- and we do not so that means the problem is fixed. Let's test, let's go under the microscope. Maybe we can see it better.
Pass fixed problem is fixed. Do more check all the lines they all pass past pass awesome, so the no charging port is fixed. Okay screen is connected. Let's plug the cable here, and we're going to look at our amp meter. I just want to see something on the screen that will indicate that the screen is functioning.
Oh yeah, right there problem is fixed and as far as the charge tablet is currently charging upper logo came on few seconds at one off. I think we have to secure the battery down in place before we can properly test this. So let me grab the screw and screw the battery in screw the connector we're going to screw the connector instead of me trying to hold or press down on the battery connector right now. The tablet is turning on, but then it goes back off turn on goes back off. I screwed the connector, the battery connector, and it's still doing the same thing.
We could have a problem with the actual battery connector. Maybe when the customer tried to separate the board from the battery, he ended up damaging the battery connector pins. That's a possibility. Amp meter is showing 0.1 0.5, 0.6, 0.7 and now zero. It went off yeah, uh, there's, possibly something wrong with the battery connector.
You see as soon as I disconnected the cable look at this watch. As soon as I disconnect the cable battery is gone. So battery is not making a good connection with the board that could be because the battery connector is bad. So not only do we have a charging issue with this tablet that we fixed, but we also have something else going on with the tablet I mean I knew something else would be wrong with the tablet based on initial inspection and the way it looked okay. So what I'm going to do is let big boss remove the board, so we can inspect the battery connector, and we'll take it from there I'll be back big boss, remove the board and I do see damage onto the battery connector, which is the back of the connector, so the back has pins and the pins are damaged.
It looks like when the customer shoved something in to separate the board from the battery. He ended up damaging a lot of the battery connector pins and when those pins are damaged, battery cannot make a good connection with the board and tablet is not going to work. Look at this look at this people, shove in whatever they find in their pockets. Quarter. Dime nickel credit card.
Look at this. We have one broken, pin two three four we're going to have to change this connector we're going to apply low-mail solder here here and here. So, let's watch the magic of using low melt solder. Okay, a little goes a long way just a little of heat. We should be able to remove this connector done.
Let's take the solder off. Wake is amazing. Amazing I've tried so many weeks throughout the years. This is the best one. I've worked with.
We now buy this week in bulk from the factory, and we have it for sale on our website. The wake is not one of the cheap ones that you buy. It has a lot of braids. Look at this look at how thick this weight is. It's not a flimsy cheap one.
I mean that's the thing when you have the proper tools, you have the right tools. You do the job faster. When you are not using the proper tools, then the job takes longer to get done. We're going to flip the board, that's the connector right there! Now. What I want to do is I want to lay the board flat down, so we can solder.
The back. We add flux, flux and soldering is like oxygen for humans. You cannot live without oxygen, and you cannot solder without flux and just one more. So that's what we did the battery connector. We put the captain tape over it, and I'm going to give it to big boss to reassemble, and we'll test the big boss, reassembled the board, and I also asked him to put a new battery.
He was leaving and I thought I'll. Let him put a new battery in case there was something wrong with the battery. I do not want to have to go back and forth back and forth. Now we're going to install the screen and test it should work. Okay, the screen is connected, as you can see, we have a new battery here and the battery should have some charge in it.
Let's remove the separator between the board and the battery and test, I'm gonna press and hold on the battery connector and let's power it on screen. Connector should be in good unless I'm missing something here. Let's try one more time disconnect remove the battery separator press and hold and anything yeah right there, let's wait and see if it loops before it was not detecting the battery, because the battery connector was bad, looks good, come on right. There awesome. Now we're going to have to see if it's charging I do not want to let go of the battery connector smile.
Can you please hand me this? We have a new employee. I did not introduce him to you, yet his name is Ismail and look at this, as you can see, tablet is charging at 0.95. Amps, perfect, awesome, that's it. I hope you enjoyed the video don't forget to like and subscribe leave a comment. If you have any questions, and we'll do something else in the next video you.
Source : NorthridgeFix
Phones In This Article
Related Articles

![Samsung Galaxy S20 FE 5G [Cloud White] Unboxing & Impressions #Bigtymer110 #S20 FE 5G](https://img.youtube.com/vi/-ukQmwe_pOg/maxresdefault.jpg )


Comments are disabled
Latest Articles


