iMovie for iPad Tutorial Part 1 By Bit By Byte
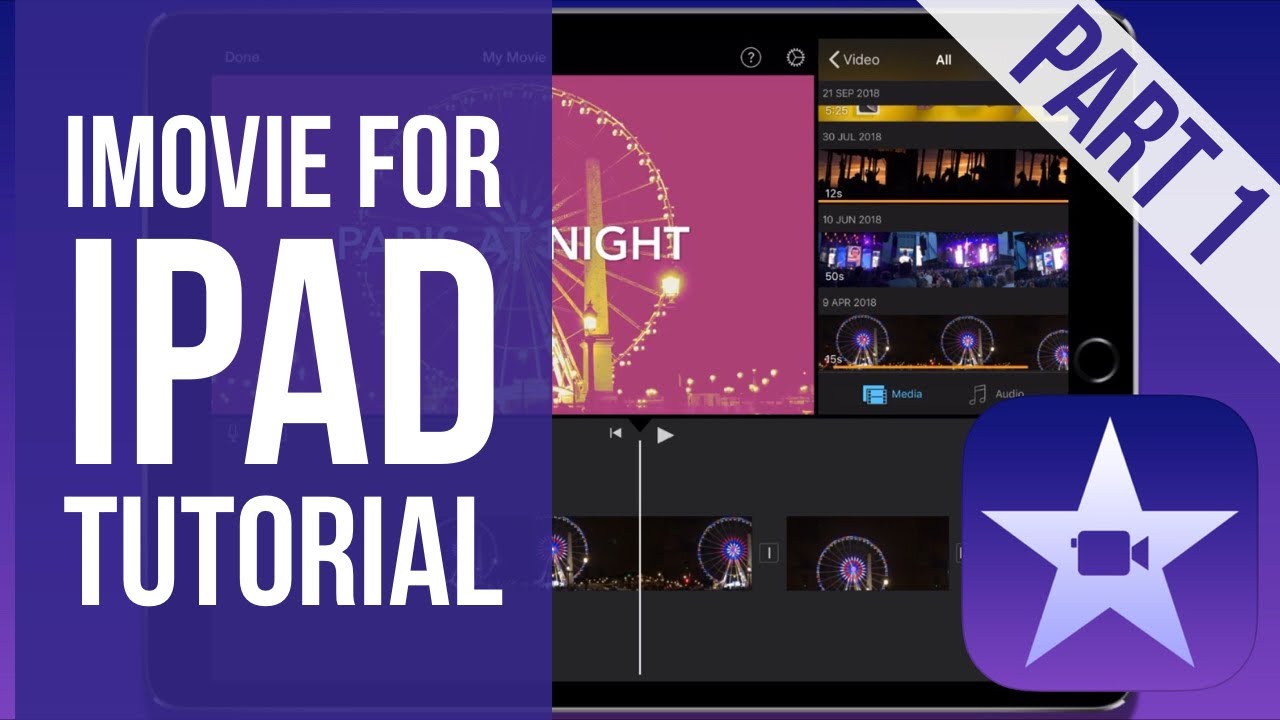
This video is a tutorial for iMovie for the iPad iMovie is Apple's own video, editing, app and once it doesn't have all the features of some other apps out there. It is a very capable piece of software, typically for Apple, its user interface is built on minimalism. This means that many of the key features are hidden behind different menu options. That's what we're going to have a look at in today's video when you open up iMovie you're, given a few different options along the top. We can see video projects and theater project is currently selected from here. I can create a new project or open an existing one.
The next option, along is theater exports that I've made from iMovie can be put in the theater and, if I want, I can sync this over iCloud as it can appear on other devices. ? such as the Apple TV. The first tab is for video. This shows the videos that are currently available on my camera. Roll I'm going to go back to the projects tab and create a new project when I tap on this.
It gives me two options: I can either create a movie which gives me a blank canvas to work with, or I can choose trailer, which relies on inbuilt templates to create a short project for now I'm going to choose movie. The next menu allows you to choose clips to import into your new project. If I tap on a clip and menu appears if I tap play, I can get a quick preview of the content of that clip. If I'm happy I can tap on the tick icon to select it, I can make multiple selections before I create my movie once I'm happy of the selections I've made and a bottom I can tap on create movie. This automatically imports all the clips onto our timeline.
The user interface of iMovie is split into three different areas in the top left. I can see a preview of the project that I'm working with to the right I have a panel where I can add extra videos, photos or audio and at the bottom I have my timeline with a play head. That shows me where I am in the project. Let's have a look now at some visible elements of the user interface in the top left corner. I have the word done and if I tap this it takes me back to the project's overview.
I can tap Edit to get back inside along the top just past. Halfway I can see a circle with a question mark inside this gives me prompts of some different aspects of the user interface. I can turn this on or off next to that, I have a Settings icon. This is for project settings, meaning that any settings I change here affects every single clip in the project. I could choose a project filter and there are several of which to choose from below that.
I can choose a theme. A thing contains different styles of music transitions and text. I have several options to choose from such as news travel and modern for now, I'm going to put it back to simple below that I have options of whether I want the theme music to be played throughout if I want a fade in and fade out at the beginning and the end of the movie, and the last option allows me to choose whether the pitch of the audio changes if I change the speed of a clip. Now, let's have a look at the timeline along the bottom of the screen towards the left. I can see a microphone icon and, if I tap on that, I can record a voice over in my project next, and that is a camera icon.
I can record video or take photos directly into iMovie towards the center of the timeline. Furthermore, I can see a rewind button and the play button by tapping and holding on a blank space in the timeline I can move to a different part of the project. Furthermore, I can also make use of pinch to zoom to change the size of each clip within the timeline. Now here's a couple of Handy hints to get very quickly to the beginning or the end of your project. If I tap and hold on the left part of the timeline, it takes me all the way to the beginning of the project.
If I happened on the right of the timeline, it takes me all the way to the end. If you have a physical keyboard attached to your iPad, you can also make use of keyboard shortcuts. These would include things like the space bar to play and pause, or the arrow keys to change frame. If you would like to see a list of the keyboard shortcuts available to you press and hold the command key now, the clips on my timeline are in this order, because that's what I movie did when I imported them all together, but if I want to change the order of the clips, this is very simple: if I tap and hold on a clip, I can drag it to a different part of the timeline to rearrange. It is also possible for me to trim a clip from the beginning or the end if I tap on a clip.
I can see it's now selected with a yellow border and there are thicker handles at the beginning and the end of the clip if I tap and hold on one of these handles and drag inwards. I can change the starting point and the end points of the clip. It is also possible for me to rotate a clip after I've imported it in the preview screen at the top, if I tap and hold on the screen with two fingers and then turn them like I'm telling a dial. This is how I can rotate the clip. It is also possible for me to split a clip into multiple segments if I tap on a clip.
A menu appears at the bottom. The first option here we have is split. As you can now see, the clip I had before is now separated into two sections. I can also split a clip by moving the play head to where I'd like the split to occur, tapping on the clip and swiping down over the clip to create the split it's at this point, I'll show you about undo and redo at the top right of the timeline. I.
Can see the undo icon by tapping this I can go back various steps if I've made a mistake, if it's happen hold on that icon, it also has the option to redo as well. Now, let's have another look at that menu. It appeared when I tapped on a clip. I have many options here. Next to split I can choose if I want to detach the audio.
This is useful if I want to work with multiple clips, but have the audio from one clip overlap onto another. We'll have a look at some audio editing options later on, along from there, I also have the option to duplicate a clip as well below those three options: I have different categories. Currently, we were under actions. If I go to speed, I can change the speed of a clip. You can see a slider in between a hare and a tortoise if I drag this slider to the left, the clip will slow down and if I drag it to the right, it will speed up just to the right of that.
I have three options: freeze, add and reset freeze will create a freeze-frame and hold it for as long as you choose. The next of that is added, and that's a really important option, because this lets me create speed ramps in my project. If I move my play head, it's what I'd like a speed change to start, select the clip and tap add you can see that the yellow selects on the clip has moved forwards. It's from this point that I can change the speed of my clip, so I'm gonna. Have it sped up if I move the play head a bit further along tap on the clip, and now I'm going to tap.
Add again, it's created a new section, and it's here: I'm going to have the clip slow right now, let's preview it and see what it looks like at any point, I can tap the reset button to reset everything back to its original speed. The next one of our five icons along the bottom is for volume, and this is where I can change the volume of my clip. Next to that, I have titles, and this is where I can add. Different titles in different places, in my film with text selected, you can see I have a number of different animated title templates to choose from I'm, going to choose pop-up right at the end. You can now see title text here appears on my video and, if I tap on that, once I can change what the title says below this I have a few different options as well, currently is set to center, but if I choose lower, it will put the text in the bottom corner instead further along from that, I can choose whether I want the sound effect.
That's attributed to that particular text style to be played or not. Let's get a preview of what my title looks like now, as you can see that science will last for the entire length of that clip and that's not something I want to change the amount of time that text is displayed for I need to create a split in my clip to do that. Just like before I can tap on the clip and swipe down to create my splits. Now, as you can see, the title appears on one part of the clip, but not the other. Even after I've edited my text, I can still change the animation, that's attributed to it.
If I choose one of the other templates, you can see. My text still remains as well as the split. The final option is for filters instead of filters being applied to an entire project like we saw at the start. I can do this on a clip by clip basis. I have a number of different filters to choose from.
If I would like to delete a clip from the timeline, I can tap on it and, in the bottom right-hand corner you can see the Delete icon. This removes it from the project. Now you might notice, in between my different Clips I have a small square icon. These are my transitions. A square with a vertical line indicates there is no transition present, but a square with two triangles.
Next to it says there is, if I tap on that icon. I have options for my different transitions right at the bottom. I have six different icons: I can choose between none, which means there's no transition. Whatever transition is part of the theme that shows that the starts I can choose to have a cross, dissolve a slide, a wipe or a fade above these six icons are some settings to. Let me change how long the transition lasts for these go up in half second increments, along from that, I can choose whether I want the sound effect attributed to that transition style.
To be heard, I can do this by tapping on sound effects off or on now, you'll notice, with the transition selected below that I have two yellow arrows one pointing up one pointing down now. This allows me to change the placement of the transition in between the two Clips. If I tap on those two arrows, you can see that I have a big yellow box and, if I tap and hold on those yellow boxes, I can choose the start and end point of the transitions for the different clips. To close, this I can tap on the yellow arrows again. Another very well hidden feature of iMovie is the ability to overlay clips or make use of split-screen to do this.
I need to use the panel in the top right-hand corner of the screen. If this isn't visible, you can tap on the plus icon right at the top and then choose to add another clip when I tap on a clip and menu appears the first option, which is a circle with a plus sign inside, and ask me to add that clip straight to my timeline. If I don't want to add the entire clip, I can change the start and end points by dragging the yellow handles. Next to that is a play icon, and this will play a preview of the clip in the panel next to it and then the last icon is three dots, and this is where we're going to be looking at overlaying clips or making use of split-screen if I tap on that I can change how this clip is added to the timeline. The first option allows me to just add the audio from this clip into the timeline.
Next, to that, I have two overlaying squares and, if I tap, that the clip is added over the top of whatever Clips I have in the timeline already. The next option along allows me to place a smaller version of the clip in one corner of the screen. And finally, the last icon allows me to make use of split screen. Now I can change how this split screen is viewed. If I tap on the clip that I've just added, you can see the menu with the five icons appear.
One of these options is now different. The fourth one along says, overlays, if I tap, that I can choose how this clip works inside the project, six icons appear at the top. The first one is a basic overlay, or I can add a small segment of the video just like you saw before, and then the next one allows me to change the positions of whether the clip is on the left or the right or at the top and bottom I'm now going to show you some different audio editing options available to you when you're using iMovie on the iPad. Now, if you have a look at the timeline along the bottom in the top right corner of the timeline, I can see an audio button. Now, if I tap on that, I can get a preview of the waveform of the audio for each clip.
This is very useful when I want to make very specific cuts in the clips and not impact the audio that can be heard now. If I tap on a clip, I can choose to detach audio. It also now gives me some audio editing options just like with clips. I have two handles at the beginning and the end and I can tap and drag these to change the length of the clip on the menu that appears below I can split the audio just like a can with video and to the right of that. I can duplicate best the option in the media, where I want to take a moment of just explained in iMovie audio can be in the background or the foreground.
Currently, this audio clip is set to the foreground. If I tap on background to change it, the color of the audio changes, you'll notice, the audio clip is moved background. Audio cannot be moved from different part of the timeline. It's stuck in place and designs, a play throughout if you've imported audio and that audio clip is green, and you can't figure out why you can't move it to a different part of the timeline. This will be it tap on the audio and choose foreground.
That way, you can move the audio to any part of the timeline you choose now below these three options. I have my five icons that appear, but only three of them are active. Currently, actions is selected, but I can also choose and change the speed and just like with video clips. I have a slider in-between a hare, and a tortoise and I can change the speed of that audio I also have ads and reset options as well. The last icon that also allows me to change the volume of that clip.
Now. Next, to that, you can see the word fade and if I tap on that, you can see the handles at the beginning and the end of the selected audio clip have changed to yellow triangles. These. Allow me to add, fade ins and fade out to the audio and by tapping and dragging I can change the length of the fade in and fade out if I want to delete an audio clip I can by selecting it and then tapping the Delete icon in the bottom right corner, I'm now going to exit this project by tapping done in the top left corner and then tapping projects again to go back to the original screen. I'm now going to show you how to make use of trailers in iMovie, trailers are templates that I've built inside iMovie to help you create a quick project if I tap on the plus icon and choose trailer I'm now, given many templates to work with, the templates are based on different styles or genres of film each one of these templates will have different music and text styles as well as different animations.
If you would like to preview a clip, you can tap the play icon to see what it will be like I'm, going to choose superhero now, if I tap create in the top right corner. I have a different workspace on the left. I can see a preview of my projects and to the right. If I have the different editing options, the panel on the right is separated into two tabs outline and storyboard outline allows me to change the title of the movie. The cast members, as well as various other credits, to change the movie name or one of these other options.
I can just tap on the field, delete the text, that's already there and type in what I wanted to say. Now. If we go to the storyboard tab, this is where I can insert different video clips to form my trailer. The storyboard contains different clips. That I will need to insert to create this project to insert different clips.
I can tap a different part of the storyboard to choose where I'd like to place it and in the bottom left panel I can choose which video I'd like to insert when I tap on a clip. You can see that the beginning and end parts are already selected. This is because I can only insert clips of a set length to change which portion of the clip I'm going to adds. I can tap and hold on the yellow box and change the start and end point. I can tap on play to preview the clip and the plus icon to insert it if I go back to outline and press play, I can see a preview of my trailer so far.
Once you finish, creating your trailer, it will be ready for export, and it's these export options. I'm going to look at now, I'm going to tap Done in the top left corner and once again and let's have projects to go back to the main screen here we can see different projects. I have available I'm going to tap on my original project. This screen gives me an overview of the contents of the project. I can tap on the play icon to get a preview and below that where it says my movie, I can tap and change the title of this project if I want to edit this footage again, I can tap on edit to take me back into the project.
Then, at the bottom, I have three icons. The first one is a play icon, which will give me a full screen preview of the project, but it's the one in the middle that I'd like to talk about now. This is the share icon and when I tap, this I can send my project to another. App or I can choose save video to save it. To my camera roll depending on the clips you've imported into iMovie, it will give you different options for the resolution of the video I can choose from a low resolution.360P all the way up to 4k in 2018 Apple released an update, I'm moving. This allows you to make use of external displays if you have a newer iPad such as an iPad Pro, as well as a lightning to HDMI adapter.
You can connect two iPads to an external display and when you do this on the timeline, another icon appears to the right of the audio icon. We can see the external display toggle when I tap this. It will send a full screen preview of your project to your external display. This allows you to make good use of multiple screens when creating your video project. So that's the end of my tutorial for iron movie for the iPad.
If you found this video useful, please like comment and subscribe, and I'll be back soon with some more iPad tutorials. You.
Source : Bit By Byte
Phones In This Article


Related Articles


Comments are disabled
Latest Articles


