Huawei P40 Lite Disassembly Teardown Repair Video Review Nova 7i / Nova 6 SE By PBKreviews
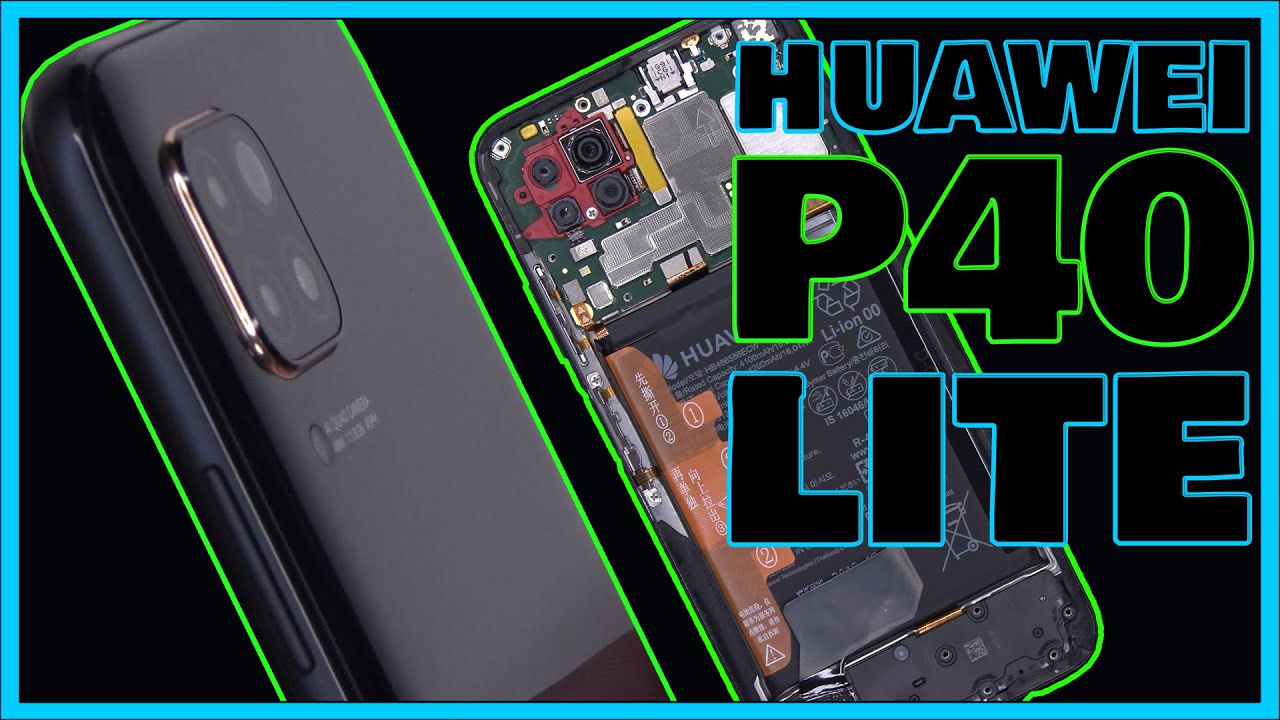
You're watching the Huawei P 40 light, disassembly I want to start off by saying this is one of the more premium looking and feeling device that I've seen on a lower-priced model phone. Usually when a phone has three models, the higher end, the mid here and the lower end device, the highest end model seems to have all the bells and whistles, along with the more premium, look and feel of the phone. However, with the Huawei P 40 light, it looks and feels just as premium as the rest of the line of the P 40 phones, even though it doesn't support all the high-end hardware, the way they have the middle matte and the borders on both sides glossy it's really nice. Let's go ahead and dive in and take a look at the inside. First, let's pop out that SIM tray now we're going to apply heat with either a hairdryer or a heat gun to loosen up the adhesive on the backplate, and then we're going to pry the backplate off using a plastic pry tool. So here's the backplate definitely feels more like plastic to me or might be a possible mix of plastic and glass.
A glass wouldn't Bend like this first thing, I got to say. After taking the backplate off I'm very relieved to find out, there are Poole taps for the battery. This will definitely make it easier to pry off the battery. If you need to replace it, there are 18 Phillips screws in total holding down the top and bottom plastic covers once the screws are removed. We can remove the covers.
Here's. Your top plastic cover. It's called a craft I'd film, going over it. Here's other side. After this connecting the battery, we can go ahead and disconnect the rest of the cables.
Let's go ahead and remove the front-facing camera. Here's a better look at your front-facing camera. There's one wire cable over here pop that up. There are two more Phillips screws holding down the main board one by the camera assembly over here, and you have one right underneath this cable right here once the screws are removed, the motherboard can be pulled out. So here's the front of your main board and here's the backside of the main board you ever Amrita right here now.
As far as the cameras go, it looks like they really wanted to keep the connectors connected in order to disconnect them. You have to pop off these metal plates. You remove that, and you'll be able to disconnect this camera. Now on the front side, you got another metal plate right here. You have to pop that off, and then you have access to disconnecting the rest of the cables over here, and you got one right here now, one more thing to point out on the backside of the main board.
You have thermal paste right here, which makes contact with the mid-frame and transfers the heat. Removing the removable shield reveals more thermal paste underneath, as for the front, you've got some more resistors and chips underneath, but no more thermal paste time to pry off the speaker assembly, either speaker assembly, you got some graphite foam right here. You also have your vibrator motor down here to remove your charger port board, there's one wire, cable and one flex, cable that need to be disconnected and then there's a really strong adhesive strip. Underneath the charger port board, you have to pry that off use your charger port board, your charger port on your headphone jack. Both have rubber gaskets around them all right on to the battery.
You have three pull tabs labeled one two and three: let's go ahead and mix those up. I want to try to keep the pull. Tab is intact as much as possible, so I'm just going to apply heat to the battery and just pry it off the old-fashioned way, so the pull tabs can be used later on. If you need me you so at this point you have your mid-frame, your cable, which connects your main board to your charge report board this flex, cable right here you have your screen, cable right here, which runs through this lid over here in the mid-frame every earpiece speaker up here. You have your power button volume key cables over here.
There are also two Phillips screws holding the power button down and over here. On top, you have a small board that has gold contacts on there. That's gonna, be your proximity sensors. So if you wanted to replace your screen, you'd have to pry your screen, cable off the mid-frame over here, and then you'd have to heat the front of the screen up. So you can loosen up the adhesive underneath, and you'd pry.
Your screen off you'd run your cable through the slit, and then you take your new screen. Run the cable through this lid apply it back to the front and just reassemble the phone. So overall it's a fairly easy phone to repair, especially with those battery pull tabs. It makes it easier to pull your battery off. It's got a pretty sturdy, mid-frame, I mean I, don't want to break it, but I think you should hold up on their certain pressure before bending, but don't take my word for it literally because everyone's strength is different, and I'm pretty sure some people would be able to bend this phone in half.
Let's go ahead and put the phone back together. Once all the screws are back in place, go ahead and place. The back cover back over apply some new adhesive. If needed, flip the phone over power it on, and you're done. Hope you guys enjoyed the video and if you guys want to see more videos like this make sure you subscribe and click on the notification icon, so you'll be notified.
The next time I upload a video thanks again for watching guys, and I'll, see you guys in the next video.
Source : PBKreviews
Phones In This Article

Related Articles


![Mi 11 Ultra INDIAN RETAIL UNIT:Unboxing & First Impressions[NO 67W CHARGER IN THE BOX]](https://img.youtube.com/vi/6xBsXodqH7U/maxresdefault.jpg )


Comments are disabled
Latest Articles


