How To Replace the Battery in your Samsung Galaxy S8 By iFixit
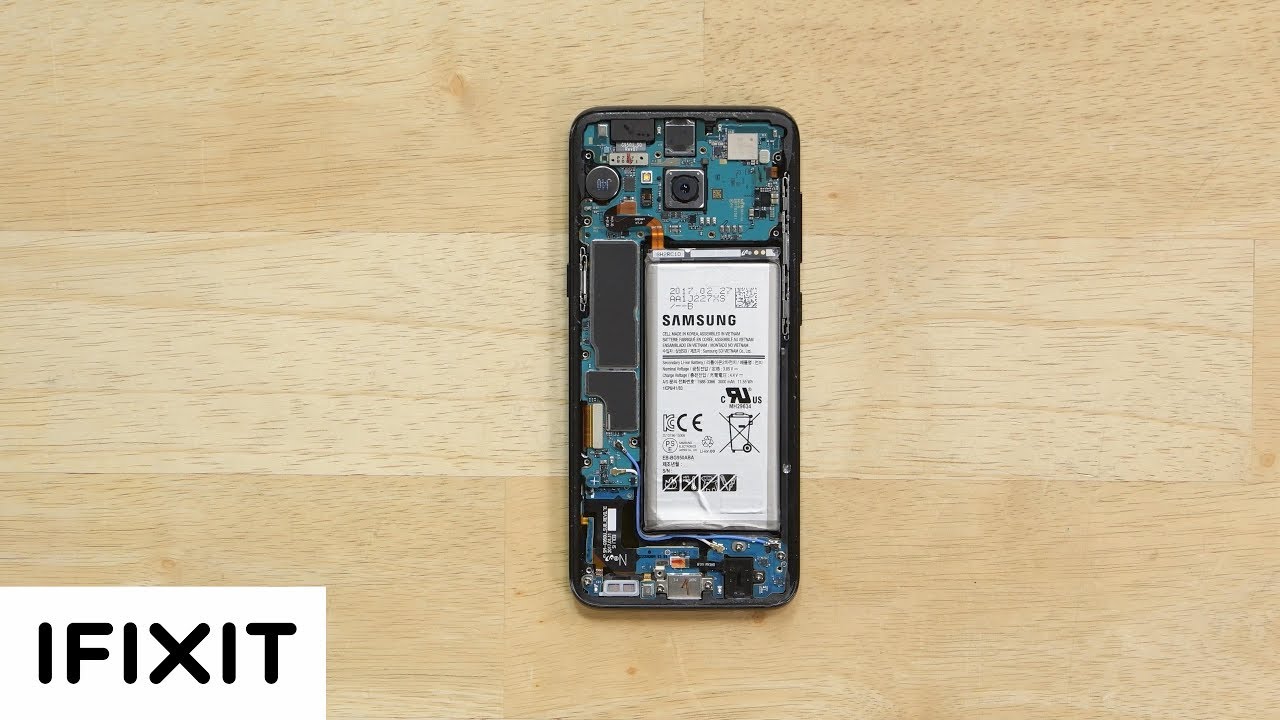
Hey everyone I'm Chelsea with fixity, and today I'm going to show you how to replace the battery in your Samsung Galaxy S 8 for this repair you'll need an eye: opener, a Philips triple-zero screwdriver, a suction cup, a Halbert's Pledge, a set of fixity opening pics an opening card in a standard spider I'm also going to use my magnetic mat to keep all my screws organized and prevent them from rolling away during the repair. Now this video is an overview of the repair process. When you actually start your repair, I suggest you head over to ifixit. com to check out the full length repair guide. Not only will it give you detailed instructions on the repair process, but you'll also be able to use helpful photos and see comments from users that have done the repair before so with that being said, let's get started after getting your eye. Opener, nice and hot lay it along the edge of the SI for about two minutes, we're going to be softening up the adhesive around the edge of the rear panel.
The adhesive is the thinnest along the center edge of the rear panel, so once atop to the touch, apply your suction cup, close to the edge and begin prying upward. If you don't see a gap, opening up just reapply the hot opener for a couple more minutes, this process does require some patience as soon as you see a gap insert the cutting edge of your halberd spider and slide the blade down the side of the phone cutting away the adhesive. If you're getting lots of resistance, just reapply the hawk eye-opener for a couple more minutes, don't worry! This is the hardest and most time-consuming part of the repair. Just take a deep breath and take your time once you've separated a portion of the panel insert an opening pic to prevent it from resealing and repeat the process of heating and cutting the adhesive around the other sides of the fund. Once you freed all four sides lift the rear panel up just a little.
The fingerprint sensor cable is connected to the motherboard, and its delicate use the point of a standard spider to disconnect it before you completely lift it up and off. There are a total of 11 Philips triple 0 screws, holding the NFC antenna and charging coil assembly place. Once you remove them, the pieces will lift right out. The loudspeaker assembly is next, and it's held in place by three more screws with those pieces out of the way we finally have access to the battery connector and can disconnect it before we move on with our repair we're going to need our eye-opener again. This battery is firmly leaded in place.
After leaving your eye-opener in place to warm up the adhesive gently begin prying from the bottom of the battery, if you're having difficulty prying the battery up, hit it again with a reheated Ida program, widen opening, picks up the side of the battery opposite the motherboard and then lift the battery up and out of the case. That's all for this repair to see more repair, videos and tear downs, be sure to click that subscribe button. I'll see you next time.
Source : iFixit
Phones In This Article

Related Articles


![Samsung Galaxy Z Flip 3 & Samsung Galaxy Z Fold3 [RESERVE YOURS NOW]](https://img.youtube.com/vi/v8qVnQ7LJDw/maxresdefault.jpg )
Comments are disabled
Latest Articles


