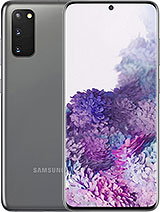
How to Install Ultra Clear+ screen protection on Samsung Galaxy S20, S20+, S20 Ultra By ZAGGTV

Today we'll show you how to install invisible shield on your phone in the box. You'll find instructions and information on the limited lifetime warranty a wet wipe to clean the screen, a microfiber cleaning cloth, a dust, removal sticker, an installation tray, a squeegee and the invisible shield screen protector before you begin be sure to remove any protective materials that may have come pre-installed on your device screen, remove the invisible shield and the rest of the contents from the box. The bottom piece of the clear container is your installation tray place your phone in the tray, aligning the camera with the camera cutout in the tray, your phone should fit snugly. You must use the installation tray to ensure proper alignment and installation clean your screen using the wet wipe to remove any smudges and oils follow up with the microfiber cloth and finally use the dust removal sticker to pick up any debris that may have settled back down on the screen. Turn the installation tray with your phone in it 90 degrees to the left, so that the top of your phone is on your left now you're ready to install your invisible shields peel away the protective backing using the tab, marked number 1, put the invisible shield on the installation tray by placing the holes in the top tab marked number 2 over the pegs at the top of the tray and the holes on the bottom. Tab marked number three over the pegs at the bottom of the tray turn the installation tray with your phone in it 90 degrees to the right, so that the top of your phone is facing up, run the squeegee lightly up and down the invisible shield screen protector.
Two to three times this activates the built-in static dust removal layer place your squeegee in the middle of the screen. With your other hand, use tab 2 to lift the edge of the protective layer at the top then run the squeegee from the middle of the screen up to the top be sure to lift the protective backing over the pegs at the top of the installation. Tray doing so will push off the top half of the protective backing turn the installation tray 180 degrees, so that the top of the tray is now at the bottom place your squeegee again in the center of the screen and lift tab, 3 run the squeegee up to the top. This will apply the screen protector and simultaneously remove the protective backing. Labeled 3 use the squeegee to gently press out any micro bubbles that may have appeared in the middle of the screen.
Take the phone out of the installation, tray and use tap four to peel away the top protective layer use the microfiber cloth and your thumbs to smooth down the sides of the invisible shield around the curved edges of your phone and gently press out any micro bubbles after you've installed the invisible shield be sure to set up or reset your fingerprint scanner. You can find fingerprint settings by navigating to settings then biometrics and security, and then fingerprints enter your PIN and follow the prompts on your phone to set up or reset your fingerprint scanner. Any micro bubbles should disappear within 24 to 48 hours and there it is now you've got protection from impacts and scratches.
Source : ZAGGTV
Phones In This Article
Related Articles


Comments are disabled
Latest Articles


