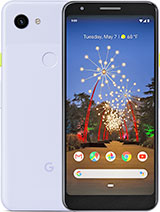
Google Pixel 3A Screen LCD Replacement Tutorial By The Explorer

Okay beer, so we are going to change the LCD screen for Google Pixar 3a, and we will show you how you can do it. It's pretty easy, but you have to be patient, and you have to be very careful when you do change that screen because it is very sensitive. So, let's start so. First you will take the phone, and then you will warm the screen so that the clue can come off. The adhesive blue is very strong on this phone, but if you do heat it up, you can take off the screen very easily, so we are setting up a temperature, and we do have a heating pad and let's warm up the LCD so guys you have to heat up the LCD and that way you can take off the house CD securely from the phone. So it's about time we gave it about 5 to 8 minutes to warm up the LCD.
So let's take off the CD LCD, so you start from the top, and you use the blade to come all the way from the top to the bottom. From the right side of the phone. Be careful there are some cables in the bottom. Be patient. Give it some time picture time, while you're appealing of the LCD so be careful.
There's still, so many things left, but they just try to pull it off and there you can see a ribbon cable attached to the board. It's only one ribbon cable that connects the LCD to the board, and we carefully take the ribbon off. There is a tape on the top to remove the tape. Mr. screws- and there are two screws holding the cable together with the boat I, take your screwdriver and unscrew the two screws.
These are holding the ribbon cable, so the plastic prior tool. You can use this tool to pull up the ribbon cable, and now you can see the LCD is separated from the board. So now you just clean up the rest of the adhesive tape that is still attached to the body of the phone make sure there is no residual, because you will be attaching a new screen, and it comes with the tape. If it doesn't come with the tape, then you have to use your own adhesive tape. We just double-sided tape.
You can also use the glue if you don't, have the tape but be careful to apply the glue on the right place. There's once you clean up the residuals tape, adhesive tape and glass from the body, you just make sure that your LCD is working. So you, just in the beginning, connect your ribbon cable to the board. That way you can see if the LCD is working or not, okay, guys. So we have pushed the cable inside the board and now, let's check to see if the LCD is working and just power up the phone, and here you go so successfully- we have installed the LCD for Google, pixel, 3a and the phone has started.
The LCD is working, and now we will turn off the phone and put the two screws that are holding the ribbon cable to the board together and let's check to see if the touchscreen is working properly and as you can see, you're all know: darling pad. Okay, perfect, alright guys. So we have put together two screws that were holding, and now we will just apply pressure and put this LCD on and, as you can see, the phone is fully working. So if you do like this, video do subscribe. Our channel for more info check videos in the future and do not forget to Like and thumbs up the video.
Source : The Explorer
Phones In This Article
Related Articles

![Samsung Galaxy A20 unboxing & initial review.[Red colour]](https://img.youtube.com/vi/u4rfdXQA0TU/maxresdefault.jpg )
Comments are disabled
Latest Articles


