Galaxy Note 9 Camera Tips | Best Portrait Shots By VickGeek
What's up guys welcome back to another video, as you guys know, I make a lot of interesting videos related to mobile photography or even DSLR tips and tricks videos. So, in this video I'm going to show you how you can take really awesome images, using your note 9, we will be focusing on capturing really nice portrait charts. So usually, when we talk about portrait charts, the most important thing is lighting, so how the environment is how it is lit, how you can control, actually. So if you have got DSLR camera there, you can actually control with the aperture setting. So with the mobile cameras, like Samsung Galaxy note 9, as you guys know, it has the up 1.5 aperture pro camera. That means even in situation like this, even if there is a lot of shadows over here- and there is not so much light going on here, but still you can capture great looking images portrait.
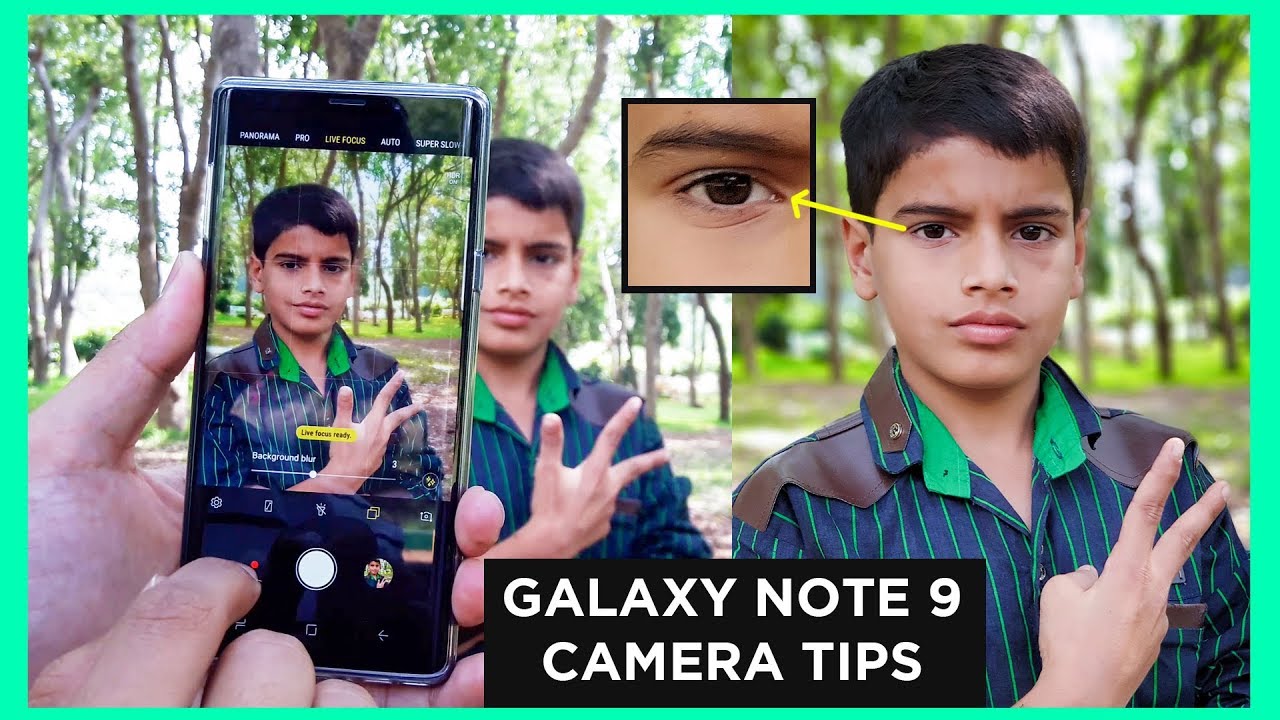
So that's what I'm going to show you so meet Mr. Jay over here. So he's the model, and we'll be capturing. The pictures of this guy, so I'll show you how you have to actually frame and what are the settings you need to keep in order to get some really nice-looking portrait shots. So, let's take a look at the camera settings of the Samsung Galaxy note 9 to capture really nice, looking images so guys, as you can see now, of course, the trees are the background, and he's standing over here.
What I'll do is make sure you are actually holding your mobile phone around 1 to 2 feet distance from the person itself. So, as you will see now, I'm bringing the Samsung Galaxy note mains camera and since it has wide-angle as well, you can use 2x zoom, see how close he gets from the same perspective. You can also use the wide-angle usual angle camera. Now. How you can actually set is the first important thing to note here is to enable the grid lines and make sure framing is proper, so how to actually set proper framing most important thing here is to actually make the person's eye look in to the camera's lens.
So make sure the person you're trying to capture is actually look into the cameras' lens, not anywhere else, so even if he is looking somewhere but make sure that this camera lens is actually in parallel to his eyes. This is really important. A lot of people don't tell you this thing. This is a very, very professional trick, so make sure the mobile you're holding is actually in parallel to him, not on the top. You don't try to capture this way, or rather you don't try to capture this way unless or until actually it is particularly needed till.
Then you don't capture impaired angles like this. Of course, you can change the angles in this way, so this doesn't hamper the proper the portrait shots, but then still make sure that you are using the grid line so how to enable the grid line just go to the settings and inside the settings you will find the grid lines so tap on that use, 3 cross, 3 grids, so once you enable you will find these lines with the help of these lines, see how I'm holding the camera actually so make sure the two lines that meet on one of the boxes make sure that it is pointing to his eyes. So this is really important. This is how you actually frame the pictures, no matter how close up you go, make sure that horizontal and vertical lines are actually meeting his eyes. So if you are ready with his pose, and then you try to click a picture, this is with Auto mode, so I have not actually changed any setting, except enabling the grid lines right now what you can do with the node mind's camera is used it to exhume and once you use that see how close up he gets and how much background blur is happening, because this 2x zoom gives you f 2.4 aperture. That means there will be little background blur as well and make sure you are tapping on his eyes again using the grid lines.
Then click a picture see how beautiful the portrait shots come from the node 9. This is how you capture accurate portrait shots. Now this is with the auto setting. Now just look at how the note line performs here. Use the live, focus pretty much in all the Samsung phones.
You have the live focus and once you enable that boom there you go background blur so much soft glow radiance. You have in the background and look at his face pack sharp so make sure you're holding at least two feet away from the person's and ensure that you tap on his eyes. Ready Jay another pose so make sure you are holding it properly. According to the person's view and again I'm using the grid lines tap on his eyes, then click a picture boom. There you go now you can actually control the background blur as well in this image.
As you will see now. That is our just background blur over here. So if I click on that, you can actually make heart-related background blur. You can keep the stars now just see the magic I will increase the background. Blur number three to number five: six: seven boom.
What more you want guys? The mobile camera is so much capable and has the ability to get some really nice-looking portraits just look at it. So I'll keep the flower one. Then I click on this tick mark over here and once you actually tap on that boom there you go the ultimate looking portrait photography using the Samsung Galaxy Note 9. So this is how you actually frame and compose the image. You can also use this wide-angle if you want to see how wide he gets with the normal camera that is enabled from this setting over here.
So if I tap on this one, you can actually capture dual pictures, so this is live focus again. What you can do is inside the live focus. If you tap on this one, you have this skin tone. So if your skin tone is not the bear you want, then you can actually make it a little warm or even a little cooler. So it all depends on different person's skins and skin color.
Otherwise, you can always capture it. This way. Of course, it is recognizing that there is a face over here when you hold it properly and again, read each eye, smile, yeah, smile, smile, peace, so use always tap to focus. So once you ensure that the image is in focus, then you can use the background blur. Of course, you can change it to another Bay, then click a picture so guys.
This was just a quick video on showing you how you can actually capture nice-looking portraits with the Samsung Galaxy note 9, if you enjoyed watching this video hit that, like button share with your friends, don't forget to subscribe, we'll be making a lot of interesting videos from this mobile and pretty much any mobile that comes out in the market. Alright, guys see you all in another. This.
Source : VickGeek
Phones In This Article

Related Articles


Comments are disabled
Latest Articles


