Alcatel One Touch Idol 4 Teardown, Back glass & Screen Repair From Start To Finish. By Fix It Planet
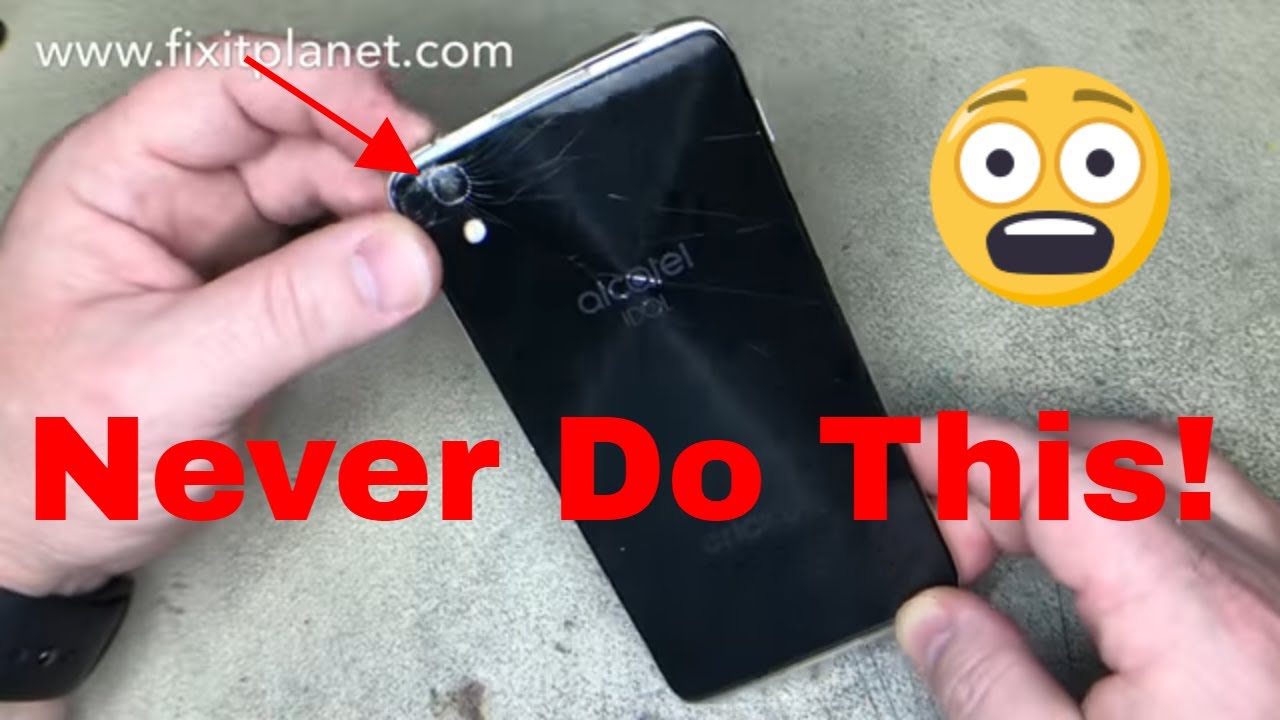
Hi this is Jim with fix-it Planet. Today we've got an Alcatel idol 4, and it has a cracked back glass. It's got a busted frame. It's got all this damage up here separated, so all of this has to be replaced. Obviously the display is damaged. The sim traits missing customer has it, so we won't be making a test phone call, and it's got more damage on the frame down here.
No good. So today we're going to replace the entire frame, the back glass, the display everything, so this going to be a full complete teardown, and we're going to have to swap out all these components from the inside and the back glass did not come with the NFC antenna, so we are gonna, have to very carefully remove the NFC antenna from this original back and put it on the new one, and that is something that you need to take your time with. That will be included in the videos. So it's not exactly exciting, but we're going to do it anyway. So this will begin to open it up.
You'll be able to see the NFC antenna on the back of the glass there, which actually just connects to two little pins that are sticking up there. You can just see them now, I'll point them out again later, when we put everything back, so there's the NFC antenna right here and the connectors the little copper pads there. Those actually touch the, and then they're going to go over here. Transfer that to there we're also going to transfer this little plastic bezel right here, and this little of adhesive around the camera lens actually keeps light from shining through and dust from getting in behind there. I guess more than anything, it's probably more for dust.
So, as you can see here, we've got an entire disassembly display with frame and all, and so what we're going to get started here is getting these caps off the bottom on the top. All these screws are exactly the same size. So that's nice. These slide underneath the frame, and they include the speaker, so there's actually one on the top and the bottom. Now this metal bracket I'm taking off here, actually has to go underneath that plastic cap that I just took off there and when we go to put it back, I actually forgot and put that down.
First, so we'll have to we'll end up taking it off again. You'll see that later on, so we're going to disconnect the battery first, and then we'll disconnect everything else. Another metal bracket be careful. Taking these pop connectors out there is, there are components around those connectors that can be chipped off a broken or whatever, when you're actually going to pop those connectors up. So watch out for that, and now this tape that I'm taking off is not really that big a deal.
It's not really important, they don't they don't really serve much of a function. I do put back the big one over the antenna, though just because now this cap actually does have I'm loosening it up a little, but it does have a little sort of clip, and I'll show that here in a second, if I can right in there, so why don't you get it hold on it? You can just pop that little clip on there and there's the other speaker this. This black tape is absolutely useless, doesn't serve any real purpose. She will not be putting that back, but we didn't even get it out of our way, because we are going to have to take everything out of here and transfer it over to the new one. So there's a little pull tab on the adhesive holding the battery in there's one of the on this end and two on the other end try to pull those out as much as you can and the battery will come out a little easier.
So I'm going to go ahead and start separating it on this side, and then we'll come down to the bottom, and we'll pull out the other tabs, be careful that you don't puncture the battery or cut into it. That would not be good, so we have a couple more tabs over here and, as you can see, I'm using metal tweezers. So by all means, if you have to use metal tool anywhere in the device, be warned that that is dangerous. If you were to puncture the battery or cut into it or anything like that, so you need to be extremely careful with any kind of metal tool. There's also a small controller board up here at the top of the battery, be sure that you don't break it trying to pry out the battery.
Sometimes the battery will come out really easy if the tabs pull all the way out, but in this case you can see they did not. You know just smooth out a little few of these wrinkles here and inspect the battery looks fine, there's the model case. You need to replace it and then the motherboard is its just laying in there, but you can kind of get a hold of it down here on the right hand, side where my, where I'm holding it- but you need to be careful at this point, because the rear facing camera is actually stuck down with adhesive, and it's pop connectors on the backside of the board. So we're not going to be able to just pull it out immediately. We need to we need to disconnect that pop connector, and it's going to be a little blurry here.
That's the camera and there's a pop connector right inside there I know it's its kind of hard to see. I'm, not getting a good focus on that, so I'm going to get that popped loose with my spider, and then I'll be able to shove it again there. It is right there sorry I know that's a bit blurry! Now the board will actually come all the way out. The front-facing camera can stay connected, and then this isn't just going to come out easily with a plastic spider, it's stuck down pretty, pretty good, so I'm using the metal tool to kind of get it started and get it pried up enough to where I can get the spider underneath it be certain that you don't pull on the cable and tear it. So you don't want to use the cable to remove the camera a little of copper there, and we're just going to smooth that out just to get back down.
Okay, so we're going to use a heat gun on low, and we're going to warm up. Just a little any of these components, these flex cables that are attached with adhesive to the frame, and we're going to help use that to help loosen that up loosen the bond a little, so we can get underneath there and get these out of there, and again I'm going to be primarily attempting to do as much of it. I can with a plastic spider or nylon spider whatever in any case, but at some point I do have to use a metal tool and once again the metal tool is, can easily tear cut damage any of these flex cables with just the slightest slip of the finger slip at the hand whatever. So you don't want to pull on these cables with either, so I'm just pulling it out of the way, but I'm not pulling on it to pull that out. So it also has this is the charge port connected as well as the vibrator, and it has adhesive underneath there as well.
So it's tucked down a little takes a little persuasion to get it out. Now, we've got these little rubber boots. They have channels and a small hole for sound to get to come in from microphones. There's, there's actually a couple of them, so those do have to have the right orientation to go back in, and I'll kind of point that out later at least with for them. So there 's's the second one and that's another microphone, that's right inside there and then a couple of sensors are attached to this cable as well.
There's a rubber boot for the hose which I also forgot to put back in, and we had to pull it back out. You know and that all comes later on in the video. So this one here right about where those the love right here I have to get in with some metal tool. So you have to be very careful if you use metal tools to get underneath any of these cables, so you don't cut or damage them, and this one here is really super thin, and I'm not gonna, be able to get underneath it with a spider. So I'm going to wind up using my tweezers again, so we're going to warm that up just a bit, and I'm gonna.
Try to get as much of this as I can with the spider, and ultimately we're going to end up using tweezers. Now this is little board here for the antenna, and it's stuck down with adhesive also, and it has two little pins that stick up from the frame now I'm going to slide my metal tool underneath this flex cable here very carefully and that's for the power button once I've got that loose, I'm going to go ahead and take out the rest of this board, because that cable runs underneath the board. So you don't want to try to pull it out with the board in place, or you're. Just going to tear it. Okay, I'm set that to the side, and now we've got our headphone jack.
It's the last thing we need to get out of there so making sure that all the flex cable around it is free and clear. So it's not sticking to anything, and then we can just loosen that up a little, and it comes right out. Okay, so we'll set that to the side, and all of that is part of the touchscreen and display assembly, and these buttons here volume and little I think that's a camera button on the side there and all of that comes with the new frame, so those are going to stay where they are and there's that last little boot for those two sensors sensor or flashlights or something I can't remember in any case now this is the new frame. We've got brand-new adhesive for the battery, we're gonna start putting everything back in, so basically we're gonna. Just start worry in Reverse.
So the last thing we took out we're gonna start putting in first. So we get our headphone jack, put into position, line up all the cables back where they came from get our power button put into place and here's where I should have put this little flashlight or since your boot or whatever it is in there, underneath that little metal bracket right there should be a boot. This one, as you can see, does have a little hole right there and that's going to face outward and there's a little channel right here that fits over the microphone, and I'm going to put it in there, but we're going to have to take it out again anyway. Because I forgot to put this other boot in I'm, calling it a boot. It's a little rubber, gasket grommet, whatever you want to call it.
So we'll put this board back in now for the antenna and make sure it's seated down. It has a new adhesive, so it should stick down nice and firm and right here and right, there's a couple little posts and those posts help to line that up, align that board up in the corner there. So here's right to take this back out, so I'm going to reseat that boot as we take it out, because it moved, and we're going to put this other one right here. It has little openings there for the sensors, and it goes right there. It has a notch right there, so you can't put it in any other way.
I mean you can try, but that's the way. It's supposed to go, so that's how you know which way it goes. If you forget, then we'll just tuck that microphone back in where it goes make sure it's seated properly in it's a little chubby make sure the sensors seated inside its little rubber boot. We have another one for the other microphone, as you can see again, there's a little hole there and a nice channel in there for the mic, and that, of course does need to be aligned properly. So the holes going to go to the outside and right there.
You can see it on the inside that little hole and that hole right. There's gonna line up with that other hole in the frame, then we're just going to make sure we push it into place. So it's seated properly and there you can see the hole on the outside. Okay, now we're going to put our charge port back and our vibrator this assembly now tucks back into it's a little home just check and make sure that it's its lined up properly, there's actually a couple of screw holes on either side of that you can. You can just see here that has that when the plastic caps are put back into place, those two screws go there and help to stabilize that charging port.
And now we want to put our rear camera back on the motherboard and since I do not wear gloves. We need to be careful that we don't touch the glass on the cameras and things of that kind of those sorts of things. You just have to really pay attention and make sure that you're not putting fingerprints in places where they don't belong. I've mentioned it before, but I'm allergic to the latex, gloves and stuff like that irritates my skin. So unfortunately, if you look at my ugly hands, so I'm just going to make sure that the cameras seated nice and flat and that the motherboard is seated nice and flat.
We don't have anything underneath preventing it from going where it's supposed to go. We're going to put this display cable pop connector in, and then we're going to smooth out this cable. So it's nice and flat go ahead and put all the other pop connectors in for the buttons now I connected the antenna here. But at this particular stage you really don't need to because it may, in my case, that got in the way when I went to put the plastic cap back on I just had to disconnect it again. So there's really no reason to do it any more than you have to so that was kind of an extra move that wasn't really necessary at this point just make sure the battery's lined up properly where it should go, and before you start to apply a little of pressure and because once it sticks down, it's tucked pretty good.
Now we're going to go ahead and connect the charging dock connector, and then these little tabs just fold over and stick down to the battery just like they were when we took them out. So here, I went to put this cap in and realize that the antenna was kind of in my way, so I would need to pull that out of the way. So there wasn't any reason to put that in until after I put that cap in no big deal just snapped back into place, and then you can reconnect the antenna and put all the screws back now on this one I needed to put the metal bracket in first, and I forgot and screwed it down. So we ended up taking the screws back out and so bear with me here, there's actually a little post that sticks up that holds that metal bracket in place underneath that plastic cap and if you put the plastic cap down, you cannot slide that thing. In underneath, after the caps in place, I mean I, you probably could if it wasn't screwed down, but in this case it is so yep I just realized it.
So now we're gonna. Take these screws out lift that cap back off, put our metal bracket back in now, I could put the screws back in the metal bracket, and then we have another metal bracket here and this one actually is sort of a tongue and groove type of things. So you're going to slip the two tongues into the slots put the two screws down, so that holds that into place, and I'm. Just going to put this black tape here over the top of the antenna here and that other piece can just stay where it is, it's going to go in the trash all right. So here comes the fun part yay.
We get to take this off. So we're gonna. Take this plastic bezel here off. First we're going to warm it up just a tad. We don't want to overheat it, or it will melt it's just made.
It does have actually a little of aluminum there, but there 's is some adhesive on there and I. Don't want to overheat that because I'm going to have to take that off to stick this back down again and then warm this up a little, and we're gonna. Take this little foam cushion from around the camera lens there. We're going to put that back down where it came from on the new back glass and again be careful that you don't put fingerprints on the backside of this glass and make sure before you put it back permanently on the phone that you do check that for any sort of lint debris or any other types of foreign bodies that may be in the way of the camera, so that you can clean it. If you need to and there's an another little of adhesive right here, that came off the underneath the bezel, so we're gonna, we're going to snag that put it back in that same spot, so that bezel will stick in place.
So this particular back glass did not come with any of that. All it came with was the adhesive to stick it down on the phone, and this also goes on a certain way, and there is one corner: that's kind of you have three normal corners, and then you have one that's kind of got an angle to it, so you can tell which way it goes. There's another little piece of foam here: I'm just gonna, take it transfer it on over I'm, not really sure how important that is, but we're going to do it, because we can now we're gonna, actually warm this back glass, we're gonna, warm it up a little on the side with the NFC antenna, and then we're gonna, really heat up the backside, get it nice and warm, and we're gonna start to remove this antenna flex. So we are going to use a metal tool here. This is my finished metal tool that I have, and so, if we slip now, I'm going to pull this a little, but just going to be really super careful, and then we're gonna use this metal tool.
We're going to go around the edge of this, and we're just going to break the bond around the edge first so that the edges are not sticking down, and we don't want this to be torn because if it tears you're done as well get another one. So we aren't just going to heat it up and try to peel it off, because if we do that, then it may very likely it does have layers and those layers may tear as well. So we're going to warm this something really pretty good, we're not going to overheat it, but we're gonna, warm it up real nice and toasty, and then we're gonna just kind of go one little at a time and just sort of gradually separate from the back glass. So, as you can see, if you pay close attention, you'll notice that we're not cutting far into we're just doing one little tiny strip at a time so that we minimize the risk of cutting or tearing into the antenna flex. I'm.
Sorry, the NFC antenna flex. Okay- and this is what it looks like underneath and periodically. We need to re warm it. So we want to warm this up from the back side so that we also minimize the risk of overheating or damaging the antenna from heat. So I, don't know why this back glass didn't come with one.
It didn't, so I was forced to have to do this. I would prefer not to have to do it, but in any case, what I have to go through. Okay, success: perfect, no damage whatsoever, no worse off, of the, where we'll be able to stick it back down to the new one, and it will be good to go now. Obviously, I'm not going to be able to prove that in this particular video, because I don't have a wireless charger. You'll just have to take my word for it.
Sorry guys, so we're going to smooth it out a little clean, clean the connector to the contacts there. So you can use your own adhesive. If you prefer this one just you know happen to come with the adhesive to stick around the edges, so I'm going to go ahead and use it, honestly. I'd prefer to use my own and pretty much every case, or at least most cases, all this, this black stuff that they send. You are really not very good.
So if I, if I put this on there and I, you know, and I'm not happy with it and I, don't think it's gonna. Stick then I'll take it off, and I will replace it with my own adhesive. That I know is gonna work, so all I'm doing is applying a little of pressure. So I can get this blue masking off now before we take that masking off I'm, just going to lay it over the top and that's how it's going to go. We're going to set to the side, and we're going to test this phone and make sure that all the available functions are working properly.
So first we're going to plug it in make sure it's charging and it is so we're going to test all the functions before we put the back on in case. We need to do anything different if we need to go back in and check the connection or there's something wrong with the screen. We might do it all over again. Furthermore, we don't want to put the back on until we know for sure the phones, working and since I'm doing this as a voice-over after the fact. You can't hear sound, but I can, so I do check to make sure this sounds working.
So all the buttons are working. It's charging touch functions, good yeah for the most part, I'm pretty satisfied with that. If I had a SIM card and service in there, we would also do a test phone call, and you can run through several other different variety of different tests. You know for your purposes. This is just pretty much for the sake of the video.
We just want to make sure that everything is functioning, but we're not going to go through every last single test that we could possibly do with it, because this video is already running about almost 40 minutes. So, as you can see, here's where the antenna connects. It just touches those little pins that are sticking up there, and we'll polish this thing off, and it's all beautiful again yay, thanks for watching guys, I appreciate if you like, and subscribe bye bye now.
Source : Fix It Planet
Phones In This Article

Related Articles

Comments are disabled
Latest Articles


