5 Amazing iPhone 7 Plus Tips & Tricks You Aren't Using By sakitech
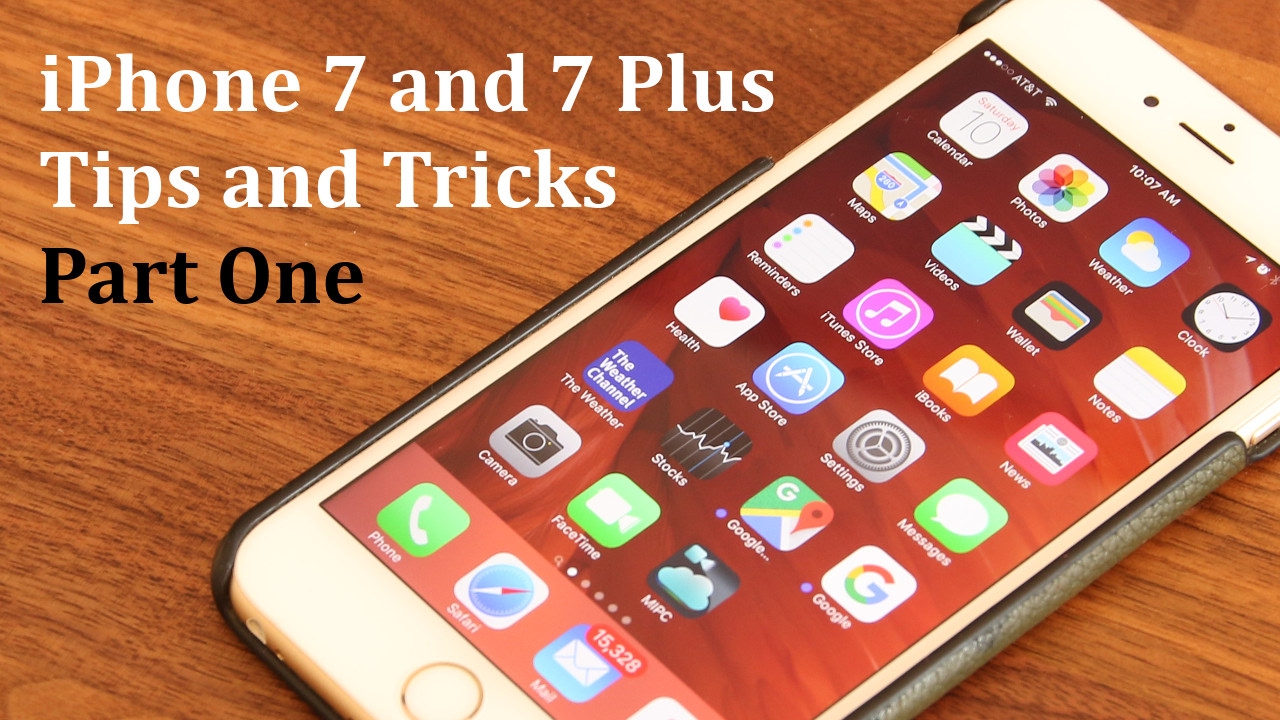
Hey guys Saki here from Saki Taken in today's video I, will be sharing five fantastic tips and tricks for the iPhone, 7 plus or the iPhone 7 that you probably aren't using now. This will be part one for these iPhone 7 tips and tricks, videos so make sure to subscribe to sake, Tech and stay tuned for more videos to come. These tips and tricks are sure to enhance the use of your iPhone. You paid a lot of money for it so might as well learn as much as possible. Anyway. Let's dive in and start learning alright, so the first tip I want to talk about, has to do with restrictions.
These restrictions enable you to restrict certain functions on your iPhone all right. So, let's see what we can do just go to settings and then scroll over to general and then simply scroll down to where it says, restrictions and, as you can see right now, it says off. If I tap this it's gonna. Allow me to enable restrictions now before even enabling the restrictions you can see. There's a lot of things here that say allows, but there's also a button right next to it.
That allows me to turn that thing off, so these things can be disabled from other people accessing it anyway, let's enable restriction and see what happens so, the first time you enable restrictions. It's going to ask you to set a passcode. This passcode is different from the passcode you used to unlock your phone. This is a different passcode you're going to set just 40 restrictions. So let's say for the sake of examples put in 0, 0, 0 0, it's gonna, ask you one more time, and now you're in restrictions, and they're in fact enabled.
Let's show you quickly if I go back out here, as you can see, we have the camera here. We have the Safari application right here, so let's go ahead and disable those. So when you hand your phone to somebody else, they don't have access to things. You do not want them to have access to. So let's go into settings one more time and, as you can see, we're back in restrictions now, if I try to go back into restrictions, it's going to ask me to put in the passcode, which makes sense okay, so only you can modify these settings, so now we are in so let's disable safari and camera and let's go back out and now, as you can see, the camera, which was right here, has disappeared and safari, which was down here, has also disappeared.
So far, so good, let's go back into settings. I'm going to show you a couple more things over here, and then we will move on to the next fantastic tip. Now we're back in here and as you can see, you can disable a lot of stuff. You can disable Siri, FaceTime, airdrop and even CarPlay, and if you scroll down you can disable iTunes Store. So nobody can buy music while you're not around.
You can disable the Apple Music connect service, and you can cancel all these things, but the most important things that I want to talk about are right here. These restrictions, if you enable them disable people from installing applications or deleting applications or even performing in-app purchases. Now this works very well. If you have a kid, and he's playing a game on your phone and by mistake, maybe he performs an in-app purchase which could cost you hundreds of dollars. If the kid goes crazy, so you can actually disable in-app purchases, and now the kid cannot purchase anything within the game and this application.
Actually this setting. This restriction is actually useful, even for yourself, because sometimes by mistake we click stuff in an app and then suddenly we purchase something and, of course, if you're, just giving your phone to your friends or something and if you just want to make sure they do not install applications or delete applications. This is just a nice way to safeguard the content in your phone and, if you scroll down a little more I'll, let you look into these by herself, but basically you can restrict allowed content, and you can even restrict some options relating to privacy anyway, once you know that restrictions is here and that you can enable them, you can go, and you can play with all these things which is gonna. Allow you to customize your phone and make it very secure. As you can see, you can restrict multiplayer games, you can restrict people from adding friends and also forming screen recordings, and this is in the game center.
Alright. So let's go back out and move on to the next tip, alright. So the next step is a quick and easy tip, and this tip only applies to phones that have 3d touch and, of course, the iPhone 7 plus is one of them. So let's go to Safari I'm, just gonna use an example here, let's type in WWF goal comm. So, as you can see, I made a typo I typed O three times, so not only what you would do is you try to go back here, and you try to delete that o, but, as you can see, I cannot go directly in on next to the O.
It's very hard to do so, and it looks like I cannot get in between words. Just by using my finger. It either goes to the at the beginning or the ending okay. Now here's what you can do, the keyboard that you're seeing over here can be used as a trackpad. All you have to do is do a firm press on the keyboard and the keyboards into a trackpad, and from here you can put the cursor precisely where you want it to go, and I can leave it right there, I can click, X and I can click go and, as you can see, that was very easy to correct the typo that I made.
So again, if you type in something wrong, let's go to amazon. com right amazon. com. There we go, we made a mistake. All I have to do.
Is press and hold do a 3d touch, put the cursor exactly where I wanted to go press X and then click go. That's how you correct typos! Now this trackpad option works anywhere. Okay, you could be editing a document. You could be writing a book on your iPhone. Whatever you do on your iPhone relating to text, the trackpad will in fact work now for this option to work.
You have to make sure 3d touch is enabled. Sometimes 3d touch gets turned off. Maybe somebody else turns it for you. Maybe you did yourself and you forgot about it. Just make sure that you go into settings, go to general, go to accessibility and then scroll down to recessed 3d touch, go right inside and make sure it is enabled, and from here you can also tweak the 3d touch sensitivity if you so desire.
Just read the block of text here. It explains exactly what you have to do. What these settings pertain to, but again I just show you this because I want you guys to enable this, so you guys can in fact use this beautiful little trackpad. That is a very, very, very nice and useful feature all right, so we get notifications all day, long on our phones, and we get these pop-ups and these banners that just pop on top of our screen- and it's only normal- that we understand exactly how we can manipulate the notifications. Okay, so you can actually do a lot of manipulation for notifications for each app now, what I will be doing is I will be using the messages' application as an example.
So, let's go into the settings and right off the bat you'll see notifications right on the top here. If you go inside, let's just scroll down to messages which is right here, let's go in and, as you can see, there's a bunch of options here now, first and foremost, you can allow or disallow notifications. If I do this I will never get notified. When somebody sends me a text message which is not a big deal, but that's that's not exactly what I want to talk about. What I want to talk about is when you go down here, it says alert style when you get notified.
So let me go ahead and send myself a text message and I want to see. I want to show you guys what it means to have a banner notification. So let's say hi and to send myself a text right now and, as you can see, I'm going to get a pop-up on top of the phone and then that pop-up is going to slide up and disappear in a couple seconds. That's the banner style notification and if I choose alerts and I say hi again to myself send one more text message: I'm going to get an alert on the screen, but it's not going to slide away. It's just going to stay there until I interact with it.
As you can see, it is still there. So I can slide that myself or just tap it, and it will take me into the message so just be aware that that's an option and one more thing when I send myself a message, as you can see, I can see the content of the message right there. It says hi. So what if I want to what if I, do, want to get the notification, but I want to hide what it says and that's just for privacy. So if I scroll down over here, it says, show previews tap on it and simply say off: let's slide it away and, as you can see, just changed to a text message, but anyway, let me send myself a brand-new message, so you can see exactly what happens and in this scenario, when somebody sends me a text message it says from whom.
But it doesn't give me the contents of the message which could be a privacy issue for some people. Finally, in the notifications, settings I just want to talk about repeat alerts, so you can actually repeat the alerts over and over until you actually click on the alert and go in, and you know manage it. So if I go over here, it says once so. What happens is when somebody sends me a message: I get alerted, but after two minutes, if I still haven't interacted with that notification, it's going to repeat itself once. Okay, so here says, alerts repeat at two-minute intervals, but if I want I can go twice, thrice five times or ten times so up until I actually interact with the notification up until I tap on that text, message is going to every two minutes remind me that I got a text message that is untouched, and it's going to repeat it ten times.
Alright. Until and after the tenth time, it doesn't repeat that anymore. So just something to be aware of: let's go back out and move on to the next tip. Alright, so next up I want to talk about the widgets I, get surprised every time. I realized that a lot of people that own iPhones don't even know that you have widgets and that you can edit that you can rearrange and all that good stuff.
So, basically, when you scroll the window down, these are all the notifications that we have, but if you scroll over, you go to the widgets screen now these widgets are and can be fantastic. Now these widgets here can be rearranged, deleted and gotten rid of, but some of these guys are amazingly advanced. So, basically, if I scroll all the way down at the bottom, there's an edit icon, if you click it, it takes you into the add and remove widgets screen from here. You can delete widgets just like that, or you can rearrange widget. So I can take the stocks' widget right here, just grab it and move it to the top, and when I go back out, it will appear on the top, and that could be that could simply mean that that's how I like to see it.
So that's the first thing I would like to see these stock information I would put that on the top. But anyway, let's go back out over here. Click edit one more time. I just want to show you guys how advanced some widgets are. Now these widgets actually come with a lot of apps.
If you look over here, these are the applications that I downloaded that actually have built-in widgets. The moment you install the application. The widget just appears right here. So here are the Citizens, Bank widget right here, there's a Dropbox widget, there's a Hello weather, widget and even over here. These are the active ones.
These are the inactive ones, so anything that has a green plus next to it is inactive. You click plus, and it becomes activated okay and if you click this, it gets removed and goes right back down to inactive section, but anyway, I just want to make sure that you guys go in here and check these widgets out, because some of these guys are absolutely fantastic. Let's go back here and just take a look at this. This is the Yelp widget, that's the weather, gods widget and at the bottom over here we have the camera widget so over here, I can take this widget and put it all around the top, and that allows me to quickly access camera functions based on the camera. App I'm using, so I can click to take a photo.
Take a selfie, take a macro shot or other functions that are available for that widget, and you can always click show more, and that brings up more information if the widget supports it. Okay, so make sure you go in there, and you tweak and customize these widgets they're easily accessible. Alright, you can scroll to this side there right, so it's really nice and nifty feature to have alright, and that brings us to the end of this video make sure to subscribe, to sake, tech for more iPhone tips and tricks, videos that will be released soon. Additionally, if you like the case I'm using for my iPhone 7 plus, which is a pure leather case, you will find a link in the description below to grab one for yourself. Thank you for watching give this video a thumbs up, share it with your friends family and have a fantastic day.
Source : sakitech
Phones In This Article

Related Articles


![SULIT BUDGET PHONE? | SAMSUNG GALAXY M12 [FIRST IMPRESSIONS]](https://img.youtube.com/vi/rWNsLi1HurU/maxresdefault.jpg )


Comments are disabled
Latest Articles


