25+ Tips and Tricks for the iPhone 8 / iPhone 8 Plus By sakitech
Hey there Saki here from sake, tech. You can find me on Instagram and Twitter at Saki tech online. In today's video I will share 25, plus tips and tricks for your iPhone 8 or the iPhone 8. Plus these tips and tricks will highly enhance the use of your new and shiny iPhone 8 so that you can enjoy to its maximum capacity. Now before we do dive in I would like to let you know that this video was sponsored by a rhino shield. Rhino shield is known for their incredible impact protection cases that far exceed military drop, test standards, but rhino shield is now introducing the same level of protection in a customizable, iPhone, 8 and 8 plus case known as rhino shield mod, it's basically a dream-come-true modular case that allows you to customize your case, so you never get bored.
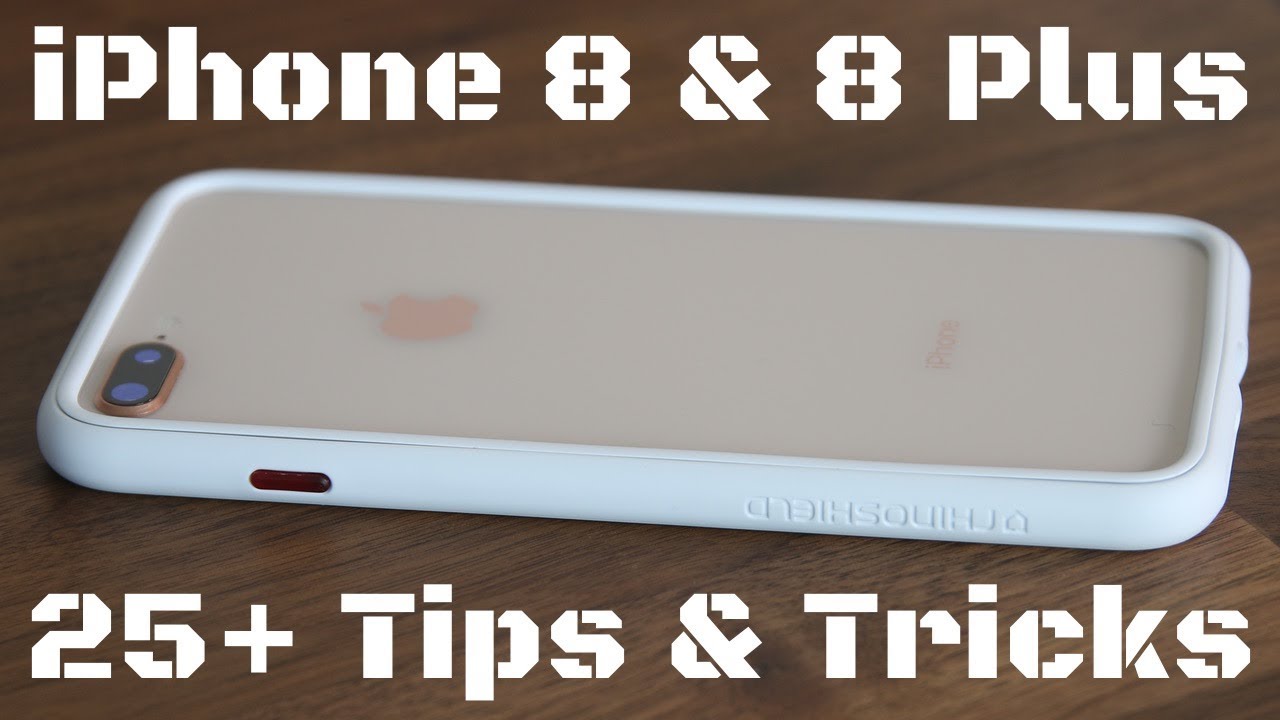
So, basically, the case has three components: a frame or rim and a backplate, and you can either use it as a bumper case by combining the frame and the rim or a regular case by combining the frame and the backplate and when you click the link in the description box below which you should do to see exactly what I'm talking about. You will see all the different color options and design options of every component so that you can create a customised case that fits your sense of style. However, it doesn't stop there. This mod has a unique lens adapter that you can plug into the rear of the case right where the iPhone lens openings are, and within seconds you can add all kinds of add-on lenses to your iPhone 8 to enhance the cameras capabilities beyond its limits. Now, as you can see, rhino shield, provided me with four lens adapters that add wide-angle, super wide angle, fish eye and macro capabilities right, your iPhone eight.
It's a brilliant idea to have it built right into the case, so click the link down in the description box below and go check out. Rhino shield mod cases, if you want to protect your iPhone eight Na+ with maximum protection and the ability to customise it, and, of course, if you do decide to order, use the discount code, sake, tech for 10% off and now, let's dive in and discover the iPhone 8 and eight plus and I just want to show you how easy it is to screw an add-on lens to the backplate with the lens adapter, and that's it you just screw it right in and the lens actually comes with a lens cover, so the actual lens doesn't get dirty. So take a look at this case. Take a look at how custom-built it is. You have the see-through backplate.
Then you have the white frame again. You can pick any color for the frame, and then you have the actual buttons red color in this case that can also be acquired in any color for maximum modularity. And then you have that beautiful lens and then over here we built a bumper case with a black frame, a white trim on the back that holds in the iPhone and the yellow buttons that I added myself. Just pop them right in, so you can see how great these cases are, while still offering total protection click the link below check them out. Alright, so the first episode with your keyboard.
So basically, what you can do is you can use the keyboard with one hand by simply minimizing the keyboard and left or right justifying it. So let me pull up my message and, as you can see, the keyboard is in full force. So let's say you either have small hands or you're holding the iPhone in such a way that you do not have full access to the entire screen. Okay, assuming you're, doing one-handed use. All you want to do is press and hold on the emoji or the globe key in this case it's emoji press and hold, and it brings up a menu that allows you to leave, justify the keyboard which minimize it and makes it easier type in one hand, giving you full access to the entire keyboard or, if you're, holding the phone.
With your right hand, you tap and hold again, and you can right, justify it alright and when you're done doing the one-handed mode, you tap this thing, and it's back in business, alright, so the iPhone it comes with the capability to record in 4k at 60 frames per. Second, that's the highest quality. You can get on a smartphone right now, however, when you launch your camera, and you scroll over to video, which it is at right now, you're not gonna, have that option by default and if you want to tweak it, it's not going to be in the camera app. There is a little reference point on the top right here. Right now it says HD 60.
So that means this is set to record at 1080p, which is high-definition at 60 frames per second. So let's go and change these settings and see also how it reflects over here on the top right. So what you want to do is go to the settings and scroll down until you find where it says camera, which is right here, you tap on it and once you go inside at the middle here, it says record video. When you tap this, you get all the different recording options now 4k at 60 frames per second is right here at the bottom: didn't get 4k at 30 frames per second 4k at 24 frames per second, and you can also do 1080p at 60 or 30 frames per second, and this one over here is sold such a low quality. You do not even want to use this now.
One thing I want you to be aware of, is when you look over here. It tells you how much space one minute of video takes. So when you record at 4k at 60 frames per second one minute of that, video is gonna record at 400 megabytes, I meant to say it's going to take 400 megabytes of space. So let's pick this up. Let's go back out, go to the camera over here and then let's go back into the video and now when you look on the top here, it says 4k, and it says 60, so that's 60 frames per second at 4k resolution.
Alright, so just be aware of these little things, the same concept applies to slow-motion video. So if I go over here, and I scroll over to slow motion on the top right now, it says nothing when it says nothing is the most default option. So let's go and modify this because you do have the option to be able to record in 1080p at 240 frames per second. So let me go back out here. Go to settings we're back at that camera.
Setting we'll just go right back at the bottom. It says record slow-motion tap if you're going to get two options. You can either record at 1080p at 100 a frames per second or 1080p at 240 frames per second, and this is the option you probably want to keep. It's going to make sure when you record slow-motion videos that time slows down even more than 120 frames per second. Alright.
Now again, when you pick higher frames per second you're gonna waste more space on your phone, just people- where of that, so one minute of that video that you record at 1080p at 240 is going to cost you 480 megabytes on your storage space for one minute now. The next thing I want to talk to you guys is at the bottom here. It says formats when you go to format's. You've got the high efficiency mode, and you've got the most compatible mode. The biggest thing is when you choose most compatible, and you go back out, and you go back into the record video the 4k at 60 frames per second actually disappears.
So I just want to be very clear with this. Some people have complained to me that they are not seeing that option, and that was the reason so make sure if you want the 4k at 60 frames per second enabled go to format's and keep at high efficiency mode. So just keep that in high efficiency mode quality, wise you're, not gonna, see any kind of degradation. It's going to be just as high quality as most compatible mode. Alright, so 4k 60fps is now enabled just keep it at that.
Let's move on to the next tip, alright, so the next tip has to do with you being able to record everything. That's happening on your screen right now, so let me pull up the control center and, as you can see, there's a bunch of controls here and that's great, but the recording option can be added here when you go in, and you customise the control center. Alright. Meanwhile, while I'm here, real quick I just want, let you know if you tap and hold on these icons, it actually expands that option and gives you a full music player with this guy when you tap and hold it expands that also and gives you more options to toggle on and off, and you can do the same thing with these sliders here. So if I tap on this, that's the brightness slider from here I can enable night shift and also a true tone if I really desire- and you can do the same thing- with the volume tap and hold to get the volume slider up and down, you can reduce and increase the volume just like that.
But anyway, let's add the recording function and show you how that works. The control center is fully customizable. So let's go to the settings. Let's go back to the main settings all the way to the top, and we're here. You're going to see control center, tap this guy and tap on customise controls.
When you do that on the top here, it shows you everything that is already included in your control center and at the bottom. Here it shows things you can still add, and this is the one that you want to talk about. The screen recording feature when you click plus. It goes up here now when I go back out and pull this up, then recording feature is right there. So, basically, all this allows you to do is record the screen so tap and hold it.
Do a 3d press on it, and you get a menu at the bottom. It says start recording. You can start recording. Now it's going to do a countdown, and it's actually recording the screen. So let me go back out here.
Go back down swipe around a little. You see the red bar on the top. That means it's being recorded. The screen is being recorded. Let's go back in here when you write an end press and hold and tap on, stop recording, and it's going to say it's been saved into the photos and, of course, if I go into the photos, you're going to see that video saved into the gallery.
When you tap it, you can play that and, as you can see, it's doing exactly what I just recorded on the screen by myself. So it's one way to share things to show your friends or even on for troubleshooting. So if you don't understand something to record it, you can send it down. Somebody can take a look at it and tell you what exactly to do it's just great to have a feature like this now. The other feature I'm gonna talk about in the control center is this car symbol.
When you tap this, it enables do not disturb, but it is only applicable while you're driving, so the iPhone senses that you're driving, and it makes sure that you do not get any notifications that are going to distract you as you're driving your car. Alright. So again, if it's not here, you can go back to the customise and add it alright. So the next thing I want to talk about is the true tone display, that's built into the iPhone 8 and the 8 plus. What you want to do is you want to go to the settings you want to go to display in brightness and at the top over here, you'll see the true tone display.
Basically, when you enable this, it says it right here exactly what it does. It adapts iPhones display based on the ambient lightning. So it looks around you. You know it measures the ambient lightning, and it adjusts the display to make the colors appear more consistent. It simply looks better than when you're looking at your phone like this.
Now, it's probably perfect for reading. So, if I enable this you'll see a shift in color, okay and the display actually softens and looks a little better okay. So a true tone is a fantastic option like I said, especially for reading, so just enable and disable this as you please compare and contrast and see if you like it or not, and if you do like it, which I think you will just keep it on at all times, and it's just going to adjust the screen automatically every single time, giving you the best, giving you the best viewing experience all right. So that's the true tone and display alright. So the next tip has to do with the alright, so the next day pass to do with the keyboard.
Let's say I'm typing something in let's just say: I type in what are you doing so, instead of saying what I'll just add a couple extra days just make a mistake now, I made a mistake here and what I want to do is I want to delete some ace normally. What you would have to do is tap here somewhere, and it's a little hard to get to the right place like it's hard for me to get to that a just with my finger, so I can start deleting them one by one. In this scenario, what you can do is you can use this entire keyboard and subtract that what you can do is you can use 3d touch basically by pressing and holding on the keyboard. It transforms that into a touchpad then I can swipe exactly where I want and start to delete those extra A's to fix. My typo all right, like I, said it's very difficult to do with your fingerprints, but when you use the keyboard as a trackpad, which is a great option, you can put this anywhere.
You want with laser precision alright. So that's the tip using your keyboard as a trackpad. Let's move on to the next step now the next feature has to do with your home button. Now, as you know, this is not a physical button. It's actually a flat button that gives you feedback when you press on it.
So when you press on you get a vibrational feedback, giving you the illusion that you're actually pressed on it, what you could do is you can change the intensity of that feedback just to suit your needs so go to the settings, go to general and then go to the home button and, as you can see, you have three options and right now it's set to option number three, which gives me the greatest feedback when I press on the home screen. So what you can do is you can press one and that feedback becomes a little lighter, or you can do two and that feedback becomes in the medium all right in the middle, so just I'll make sure when you press one test the intensity on the fly. So if I tap here, and then I put my finger here, it will give me the kind of feedback I'll be receiving all right. So I do like to keep it at the maximum, but you can change yours according to your needs. The next thing I'm going to talk about, has to do with the screenshot.
So normally, when you want to take a screenshot, you press the HOME key and press the power key at the same time and that will take a screenshot I like to do something a little different I like to go to the settings and again in the main settings, go to general and then go to accessibility from here, just scroll down a little and go to assistive, touch, tap it and enable this menu. The moment you enable this many you'll see this floating icon. You can put anywhere on the screen now when you first enable this icon. It's got a lot of options in it. So let me go back over here.
Let me just tap on reset, so you can see what I'm talking about so basically, when I click on this thing, it expands to give me a full menu from here. I can tap on this home button, and it acts as a home button. Just like this. One takes me back home. If I tap it again, I can actually invoke Siri I can go to device.
I can actually volume up and volume down over here. Let me go to more, and you have all these different options all right, and you can reset that if I tap it, it pulls on the notifications and if I tap it again, it takes me back home, but here's what I like to do, I like to go to customise top level menu and I like to remove all the options from it. Just leave one over here: tap it and then scroll down toward says, screenshot. Then click done and then go back home. Now, when you do that, and you tap on this icon, he serves as a single click screenshot button.
Now, after you take a screenshot, you can do a lot of things with a screenshot. So let me show you that one more time again, you can do the screenshot anywhere that you want I can be in the clock, application, take a screenshot and that's going to save the screenshot right there. You can tap on it and here starts to customization. So you can resize that screenshot alright for your own purposes, just like that, you can crop it and then, if you want, you can use this highlighter and highlight certain points on it. Okay, so all the screenshots are customizable in this new update and then click done, and it's going to give you the option to save the photos or delete the screenshot all right and then, of course, if you don't want this thing anymore, all you do is go back to the settings, and you go back here, and you simply disable it, and you don't have that anymore, but it's nice to have for single click operations and remember you can go in here, and you can assign anything you want here.
It doesn't have to be a screenshot tap. It and choose anything that you want over here: fantastic, let's move on to the next tip, all right, so going back into the settings and go to general and go to accessibility. I just want to get a couple tips at once here. The one thing you can do here is: you can actually change the size of the text on the iPhone itself. So if you tap this guy, you get this slider at the bottom and, as you can see, you can increase the size of the text that you can see on the screen for your community.
So that's one option. The other thing I want to talk about actually has to do with Siri and 3d touch. So when you go to a 3d touch, first and foremost, you can disable that, or you can actually change the intensity. The sensitivity of the 3d touch. So basically, if you keep it at firm, it would take extra amount of pressure to peek in to items okay.
So it's firm right now. It's that firm. You have to press down if you're gonna pop into something you really have to press down on it. I like to keep this in medium, so you get a medium amount of sensitivity to your pressure-sensitive touch screen. Now, when we go back out here, we go to Siri.
You have a couple options. First, you can type to Siri. So normally, when you bring up Siri, you have to actually talk to it, but sometimes it doesn't get what you're saying, so that's when you want to actually type it in. So if you enable this- and if you go back to Siri over here, you do have the option to now type to it. Instead of talking to it.
Alright, just remember that, so that's that, so let's go back out and move on to the next step. The next thing has to do with are restricting people from making modifications to your iPhone. If you hadn't done to them, so sometimes you'll give your phone to somebody, and they'll just go nuts with it, or they'll. Download stuff, they'll delete stuff they'll, look at everything they want to look at. So what you want to do is you want to go to the settings? Let's go back to the main screen here: scroll down to in general, go to the restrictions over here and then Irene able my restrictions, but when you enable it for the first time, it's going to ask you to create a password I just made one where that's very easy and, as you can see from here, you can restrict access to these apps.
You can disable Safari camera Siri, FaceTime, airdrop and CarPlay. You can disable all these apps, but here's what I'm really interested in right here at the bottom. Let me just show you an example here. So here's a camera app if I go back out the camera app is right. There go to settings again, go to restrictions, it's gonna actually put your password and every time disabled camera.
When I go back out that camera icon is gone, so nobody can access your camera any more okay. So that's how restrictions work, let's go back in enable that here's a big thing so installing deleting and in-app purchases can be disabled. So now, if I give my point to anybody, they can't install apps, and they can't delete apps. So, for example, let me try to delete one app here: they're going to wiggle, but it's not gonna, have that X symbol, so you can X out of it, meaning you can uninstall or disable it alright, so restrictions are absolutely fantastic. Let me just for now put everything back where it belongs, which you can go, and you can play with all this stuff.
The next step has to do with increasing your iCloud storage. So, basically, when you buy an iPhone or any Apple product, you get five gigabytes of iCloud space. So what you want to do if you want to increase that space is go to the settings tap on your icon here, that is your User Profile and then simply go to iCloud and tap on manage storage and from here. One final thing you want to press is change storage plan. Again, five cakes is free and, as you can see, a lot of that is being used already, and you know it goes up really fast.
It goes away really fast. So when you tap this, you get the option to purchase 50 gigabytes for $1 a month. That's nothing! You also have these two options, but they can get expensive. That's three dollars a month for 200 gigabytes. That's ten bucks! That's a lot of money unless you're some special business.
You don't need that. But this is perfect for a regular person. It's a dollar a month, and you get 50 gigabytes of storage. Alright, all you do. Are you tap this, and you tap on Buy, and it's going to ask you to authenticate which you don't have to do, but that's the option? Alright, let's move on to the next step.
Next thing you can do we can customise the equalizer off you our music player. Now it's not the kind of equalizer customization you see on a computer or some other phones, but let me show you what I mean so go to settings and go to the main screen scroll down till you see music, all right keep going till. You saw it, and you see music, which is right here on the top tap it and then all the way at the bottom. Here it says: EQ tap on it from here. You can choose preset equalizers, so you can go for dance, deep, electronic hip-hop, whatever you're listening to other time, you can actually modify alright.
So that's one way to do that and the other thing I'm going to talk about is the volume limit. If you tap this, it allows you to limit the maximum volume just in case it doesn't go crazy. Sometimes this is a very useful option. If you have been in a scenario where you think that voice just became too loud, you can use this limiter. Alright, alright, the next tip has to do with the compass application.
So if you look for the compass application, and you launch it, this is what it's gonna look like. It looks fantastic, but whether you know this or not, you can swipe over, and it gives you an electronic level that you can use for leveling applications. Alright. So, as you can see right now, it is perfectly level well. Thank you for watching this video make sure you subscribe to sake tech and give this video a thumbs up.
Also follow me on Twitter and Facebook at sake, tech online, for which links are in the description below have a fantastic day.
Source : sakitech
Phones In This Article

Related Articles


Comments are disabled
Latest Articles


