Xiaomi Redmi Note 10 Pro Camera Review! By Nick Ackerman
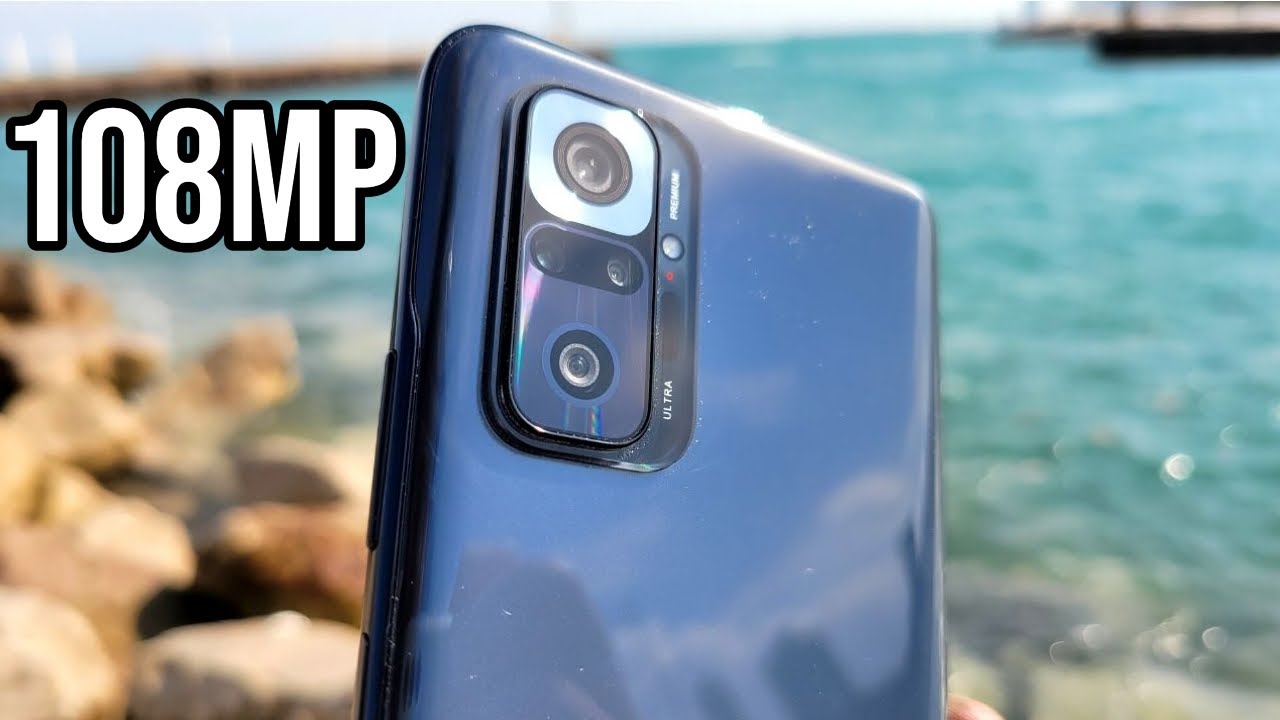
So, what is up guys nick here, helping you to master your technology, Xiaomi Redmi, note 10 pro makes its way back to the channel in the form of a camera review. So by the end of this video you're going to know if this phone is for you and camera. Let's begin by talking about the hardware, so we have a 108 megapixel camera right here. That's an f 1.9 aperture capable of dual pixel phase detection autofocus. So the autofocus is not trashed on here nine to 1 pixel binning. To give you the crispest results, you can get out of a smartphone camera right here, at least in this budget arena.
This is probably one of the best you're going to find in this price range. Then, over here down below, we do have ourselves a two megapixel depth sensor. You can see the flash right there down here. We do have ourselves the eight megapixel ultrawide that has a 118 degree field of view and then over here on the left side. There's another camera right there.
That is the five megapixel tell macro lens. So, basically, you can get super close with that lens on items which will show in this video. Now this front camera right here and this punch hole is a 16 megapixel and the results are pretty sharp from this thing, but it's an f 2.45. So when you get into the most extreme light, it's not like an f 1.8, you might get some. You know artifact you're not going to have the best.
Overall, it's super extreme conditions, 1080p 30fps! This is a little of a sacrifice. A lot of phones. These days can do 4k on the front this one. Unfortunately, you're going to have to sacrifice that, and I forgot to mention on the rear. You can record up to a maximum capability of 4k at 30fps.
So, unlike a flagship phone, you will likely get 4k 60, even 8k, on some phones, this one's going to give you 4k, 30. , okay, so we'll get to the samples at the end of this video, but let's go ahead and open up and show you how we get into this camera. So, of course, you can obviously click the icon. In addition, within the app drawer there's a photography section, you'll always be able to get to your camera from there as well. In addition, there's another way to open this camera, you can go ahead and swipe like so to get into this camera, and the last way is to double-click like this to get into the camera.
So pretty neat, you have multiple different ways to get in the camera. You can also talk to the Google Assistant and tell it to open the camera open, a photo and stuff like that. So, let's head in there and show you what you're working with here now it's a pretty simple layout, but where most of the features lie is in the more section we have video photo up here, you got flash HDR AI for kind of recognizing algorithmically. What that photo is going to be, for example, if it's a ROG it might recognize, that's a ROG and try to optimize and take the best picture of a dog. For example over here you have beautified filters and there's a ton of filters in here to play with.
So if you're into filtering out your photos, you got a lot. You can do right there now over here. You can go ahead and use the Google Lens right from this camera itself. So let's go ahead and open that up we'll hit, allow all the time allow, and you can go ahead and use. Google Lens in this camera now over here is where you're going to find yourselves your settings.
Now you can change. The aspect ratios, that's something that gives you kind of pro feel here. It's not the most professional camera, but it gives you that feel you do have three seconds timer five seconds time or ten seconds. Now you have a movie frame, so this could change the aspect ratio to let you shoot kind of like you're shooting a movie here. So let's get the super Lego right there, and you can see right there.
You can kind of shoot this thing like you're, shooting a movie, so very cool angles right there. You can get very creative with that. Now. If we go back to the settings you'll see you can show the grid lines. If you want to be a little more pro, you have the super macro mode.
Now, that's where that macro camera will come into play, so we'll go ahead and go to the super macro mode and let's get close to the engine bay here on this Lamb, so you can see right there. Look how close you can get. You can even see the text there right on the engine bay itself. So take a look. You can see.
Labor and naming will be behind there, but you can see that super macro allows you to punch really, really close into onto objects, very cool there as well. Now you have tilt shift as well and a timed burst photo as well, but you can also go 16 and if you want 69, if you want to go the full aspect ratio you want to take up that whole screen. You can go ahead and do that as well. Now, let's go ahead and change that back to the 16 9 you'll see there is an ultra-wide angle. Here, it's a pretty nice 118 fields of view.
That's not the widest out there, but it's still pretty good. You can also punch in 2x and if you click that again, you can go 5x and 10x digitally. So you are going to have some digital zoom there. It might not be perfect, but it's a pretty acceptable zoom for the money you're paying I mean. The iPhone 12, for example, is like 700 bucks and that thing only has a 5x zoom.
So that's pretty acceptable in my book. So let's go here back to more, and you'll see all the features. Now I'm going to switch it over to the easy mode. So you can see what we're working with here portrait mode short video, the 108 megapixel, the pro mode, where you can tweak things like white balance. You can tweak ISO eV the lens.
It's I mean you can really play around with this. To get the exact shot you want to get now we'll go back to more you'll, see the night mode. So if you go to night mode, it will take a longer exposure, helping you to lift that you know make it brighter at nighttime. So, let's go back to more again, and you'll. See panoramic modes are available document mode.
So if you like, taking a picture of documents and stuff like that, you do have vlogs moments: age, film, cool activities, lots of filters. So if you're in the filters you're going to love this Xiaomi product right here, we're going to go down here, slow motion time-lapse, dual video and a long exposure shot. If you want to get like those trail shots on here. This is a pretty cool feature because a lot of people wonder how do I take those photos like a star trail or a light? Painting oil painting these type of things, you're gonna need to do a long exposure. That's the only way to get it now.
If we go down here, you'll see that we have a clone mode as well and an edit mode here now we can tweak it back to look like this, and you can see it kind of looks kind of traditional, like what you're used to but tons of features in here to play around with one of my favorites, though, is done a video where you can record the front and the rear camera. You can also bring that down. You could bring it like. So, in addition, you can flip the sides of the camera, so pretty neat stuff overall here in terms of feature, this thing is loaded with features. Now back into the settings menu of this camera.
You'll see you have watermarks, you have live tips right here. You can notify about dirty lenses. Furthermore, you can notify about the orientation. Smart suggestions, you can correct face. Distortion on group photos enhance image, quality picture quality.
You could change between high standard and low. You can see right here, volume buttons functions, so you could change it between a shutter countdown, a zoom volume. There's a lot of customization in this camera press and hold, but they laid it out. Very simply. I think a lot of people could easily understand this.
We'll go to customize you'll see feature layout. We can also change how we want this laid out as well. In addition, if we go to camera modes, you can take this out of the more panel and just kind of do a swipe up from the camera. I'll show you how that works right really quickly here, so you can go like this. Instead of having it over in that more section, but we'll go over here to settings, and we'll scroll back down there you'll see customized camera modes.
You can go back to the more tab if you want it like it came out of the box. Now here's a neat thing: you don't see in a lot of phones, you can customize the color of the camera settings. So let's say you want the purple one, for example, because not many phones are giving you that, let's head back out of camera settings and now look all your settings will be highlighted in purple. So neat little customizations, making this a pretty fun and enjoyable camera to use and bringing over the philosophy of android by allowing you to customize pretty much everything you can also even change the sound of how this thing sounds: let's go ahead and hear them out. You can hear that little bubble on the modern retro default and my favorite film just sounds more like a real camera on the film now heading down, say, location info, say previous mode, you can do anti-banding, you could save to the SD card, because this phone does come with SD card support and that's about it on the camera settings going over to video a little disappointing that you can only do 4k 60.
We talked about that in the hardware, but overall it's going to look pretty good. In addition, you can go ahead and use the steady mode if you're going to be taking video, where you know you're going to be a bit shaky. One of the things I notice about this phone is that it's kind of not the most steady phone, so you might want to use steady if you know you're walking and taking video, but if it's on a tripod you can take it off of that. The only problem, though, is when you go into steady mode, and then we go back to our video settings. You'll see it knocks us down to 1080, so you can't do the steady mode in 4k.
Now, if we go ahead and flip it over to the front you'll see, our video resolution goes down to a maximum 1080 at 30 on the Xiaomi Redmi Note 10 pro, so you can see we're not getting the highest quality, but again I'm willing to make some of these sacrifices. Considering this thing is not you know much money at all to get your hands on one of these now going over here to photo you'll see right here. It backs way out, and you can start taking a lot more control of that front camera, and you can even do a palm shutter. So, let's bring it back here, we'll show our palm three two one boom takes the photo real quickly and easy for you, and it gives you a little timer. Pretty nice shows the grid lines and again more timers up here, five seconds ten seconds.
So let's switch it over here to ten seconds, we'll bring that palm back. You can see it'll switch to 10 seconds again on that front-facing camera. You do have slender big eyes, and you can clear these out and reset them. Furthermore, you can beautify yourself if the pimples are bothering you today, you can go to filters right here: sky, blue, there's, a ton in here. Like I say, even on the front camera lots of tweaking you can do now.
If we flip this over to the back one more thing: if we hold this down, it will take a burst right there. So pretty neat! Overall, now I'm done talking about the software we covered. Basically everything you need to know about the Xiaomi Redmi Note 10 pro camerae. You know it's a pretty darn baller camera. I took over 90 photos with this thing because I was not happy with the results that I was getting in my full review, so I took over 90 samples with this camera, and I'm gonna.
Let you guys go here. The video is going to end after these results. If you found it helpful entertaining and farming thumbs up before you guys leave, and I'll catch you all in the next episode. Nick here, open you to master your technology, enjoy the samples I'll catch you on the next one peace. So so you.
Source : Nick Ackerman
Phones In This Article


Related Articles


Comments are disabled
Latest Articles


