Top Tricks for SAMSUNG Galaxy Note 20 Camera – Best Camera Functions By HardReset.Info
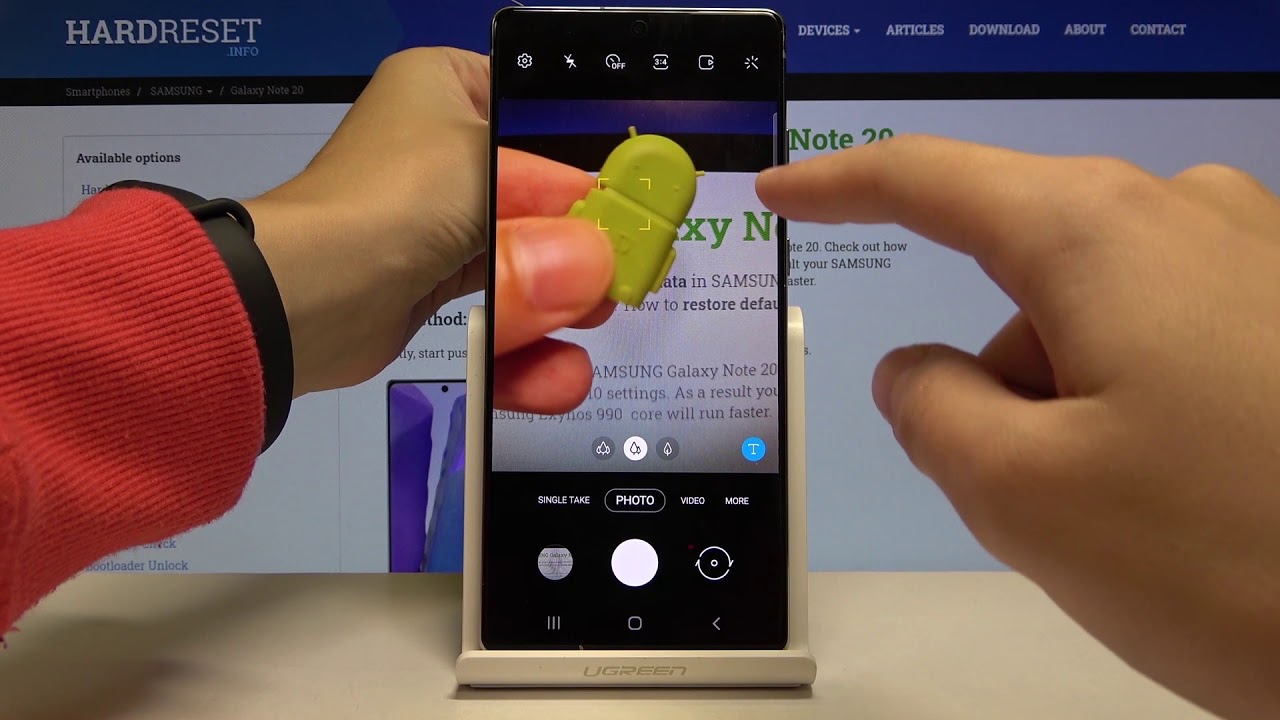
Welcome here I've got Samsung Galaxy note 20, and I'm going to show you the top tricks of it Camilla, but first we have to tap on the camera button here to open it and, as you can see for now, we are in the standard photo mode. So let's see what we've got here and let me start by tapping on the screen like that anywhere. As you can see, we have access to this ring connected with this slider. So the ring is refocusing, and we can focus anywhere we need, and by using the slider we can adjust the exposure compensation. So we can manage the light of the picture by going to the right, we can make it more bright and by going to the left, we can make it more dark. So this is how it works here.
Now, let's have a look at these three buttons. We can change the lenses here. As you can see, this is how it works, and this is connected with the zoom. We can get closer to the subject and also get access to the ultra-wide lens, and we buy using this sorry these buttons here also that they appear they are connected. We can manage this more in more advanced way.
As you can see, we can also zoom in the standard way by using two fingers like that, and when we do it, we get also access to this extra slider. So the effect is the same. So this is how it works. Now, let me focus on this settings bar by going to the left or right. We can change the modes of this camera.
We can pick the single take mode photo video mode and more modes. So this is a lot we have here. Promote panoramic food night live focused life focus, video pro video super, slow motion, slow motion and the hyperlapse. I'm not going to speak about all of these modes now, because I don't have time for this, but I suggest you to make an experiment with that and just have a good fun for now. Let me stay on the standard photo mode and let's focus now on this settings bar here.
Let me start from the right. The first one button here are the filters, so we get access to this slider, and we can make our picture just more beautiful before we take it. As you can see, this is how it works. We have also decider with intensity of the filter, so we can easily adjust it like that. Also interesting thing here are the face filters here.
When we tap on this, we can turn it on like that, and we cannot just when we take a portrait, so this should be better to show on the people. I don't have a model, so you should try. We can add just the smoothness by using the cider, also the tone jawline, as you can see and the eyes, so you have to just experiment with that and for now let me go back to the standard photo mode and let me turn off this filter and stay on the original one. And now, let's move to this button hear hear, we can turn on and turn off by just one tap the motion photo. So this is also really cool option, because when we have the motion photo turned on, we can get at the same time the photo and the short video.
So let me try to do it by taking a picture and now, let's move here to the left corner at the bottom. When we tap on this, we get quick access to the gallery, and this is our picture. As you can see, we have here option to view motion photo, so let me- and as you can see, it also has the sound. So this is how it works. Now, let's go back to the camera, and let me turn this off and let's move to the next one button here so here we can change the ratio of the picture.
As you can see, we have three and four ratios in the standard option or in the option with 64 megapixels. So this is the best possible quality of this camera. We can change it also to 9 and 16 ratios. So this is how it changes it's a little longer one the next one here is one and one. So this is the square one ratio, and also here we have access to the full screen ratio.
So this is how it works. Now, let's go back to three and four and let's move to the next one button here is the camera timer, so we can change the delay of taking picture, and we can pick from 2, 5 or 10 seconds of delay. Let me pick 2 seconds of delay for now to show you how it works and let me take a photo and, as you can see, the picture was taken with two seconds delay for now. Let me keep this turn it off and let's go to the next one button, which is the flash here we can turn on the outer flash, so the camera recognizes when it's needed. We can turn it on every time we take a picture, and we can also turn it off here.
So this is how it works, and now let's go to this button in the left corner. When we tap on this, we can open the advanced camera settings. As you can see, we have a lot of settings to manage, so let me show you a few of them which are really useful so for now let me stay on the intelligent features here and in the last position here we have this concur codes option. So by using this button we can easily turn it off and turn it on like that. This is how it works, and I suggest you to keep this turn it on, because this option allow the camera up to scan carrier codes.
So you don't need any other app to do it. You can scan qr Mrs by just using the camera. Now, let's slide a little down to the useful features, and let me focus on the first one option: auto HDR by tapping on this. We can turn it off and turn it on. I suggest you to keep the sternum on, of course, because the HDR helps to improve that details in the brightest and darkest areas of our pictures, and this is really useful and make our pictures just more beautiful and now, let's focus on the tracking autofocus by tapping on this, we can easily turn it on and turn it off.
This option is useful when we photograph the objects that are in move. So let me keep this turn at on and let's go back to the camera to show you how it works. So this is a is my object when I tap on this like that, and when I move this as you can see, the focus is following me. So this is really useful option. So now, let's go back again to the settings and again to the useful features and let's focus on the grid lines.
Now, when I tap on the second turn on and turn off the camera grid lines. So let me keep this turn it on and let's go again to the camera. As you can see, it shows us these lines. This is useful when we want to use the rule of thirds in photography, making experiments with composition also remember that these lines are not visible at the real picture. So when I take a photo and go again to the gallery, we can see them, so these lines are only to help us to take better pictures and, of course, we can easily turn it off by going again to the settings sliding to the useful features and tapping on this.
So for now they should come now. Let's focus on the location tags, as you can see here, we have also this button. We can turn it off and turn it on like that. So we can save the location of our picture, and here also the important information is that to make it work correctly. When we really want to save the actual location of our picture, we have to be connected with the internet, for example the Wi-Fi, and we have to turn on the location of this device, so remember about these two parameters to make it work, and now let me keep the stern net on and let's go back to the camera to take another picture and again to the gallery here.
So this is our photo and to check it location. We have to just simply slide a little up and, as you can see here, we have the more details about it with the map with the location and the full address, so greetings from Krak?w. This is how it works and let's go again to the settings of the camera and to the useful features, and let me focus I'm for a minute on the shooting methods. Not now. When we tap on this, we can manage the shooting methods.
We can pick the press volume keto, so the volume keys are here in this standard, smartphone usage, and they allow us to control their voice in the camera. We can pick from take picture or record video, zoom or system volume, so let me take picture or record video and let's go back to show you how it works, and let me try to pick this now and, as you can see now by tapping on this, I can easily take a picture. So this is how it works. The next one shooting method here is the voice control. So by tapping on this button you can turn it on and turn it off like that.
So this is really cool option also, because when we have this turn it on, we can take a photo without touching the screen by just saying one word: for example, smile g's capture shoot, and we can also record video by saying records video. So let me keep the starlet on and let's go back to try to use this, for example, smile and, as you can see, the picture was taken, so this works. So now let's go to the floating shooter button. This option is also really cool. So by tapping on this we can turn it on and turn it off like that.
Let me keep this turn it on when we have this, we get this button and then- and we can manage this anywhere at the screen, so this is kind of shooter and by tapping on this we can take a picture anywhere at the screen we need. So this is how it works with shooting methods, and here we have also the touch vibration, so this is kind of parameter and after turn it on all of these settings. Sometimes we want to go back to the auto settings. We can do it by using the option with reset settings here so reset this and camera settings will be rested. So that's all thanks for watching, subscribe our channel and leave that thumbs up.
You.
Source : HardReset.Info
Phones In This Article

Related Articles


![Samsung Galaxy Note 10 vs Samsung Galaxy S10 - EPIC CAMERA TEST! [Big Differece?]](https://img.youtube.com/vi/b3kDcDiniiU/maxresdefault.jpg )
Comments are disabled
Latest Articles


