Samsung Galaxy S21 Ultra Whitestone Dome Glass and Accessories - Install and Review By HighTechCheck
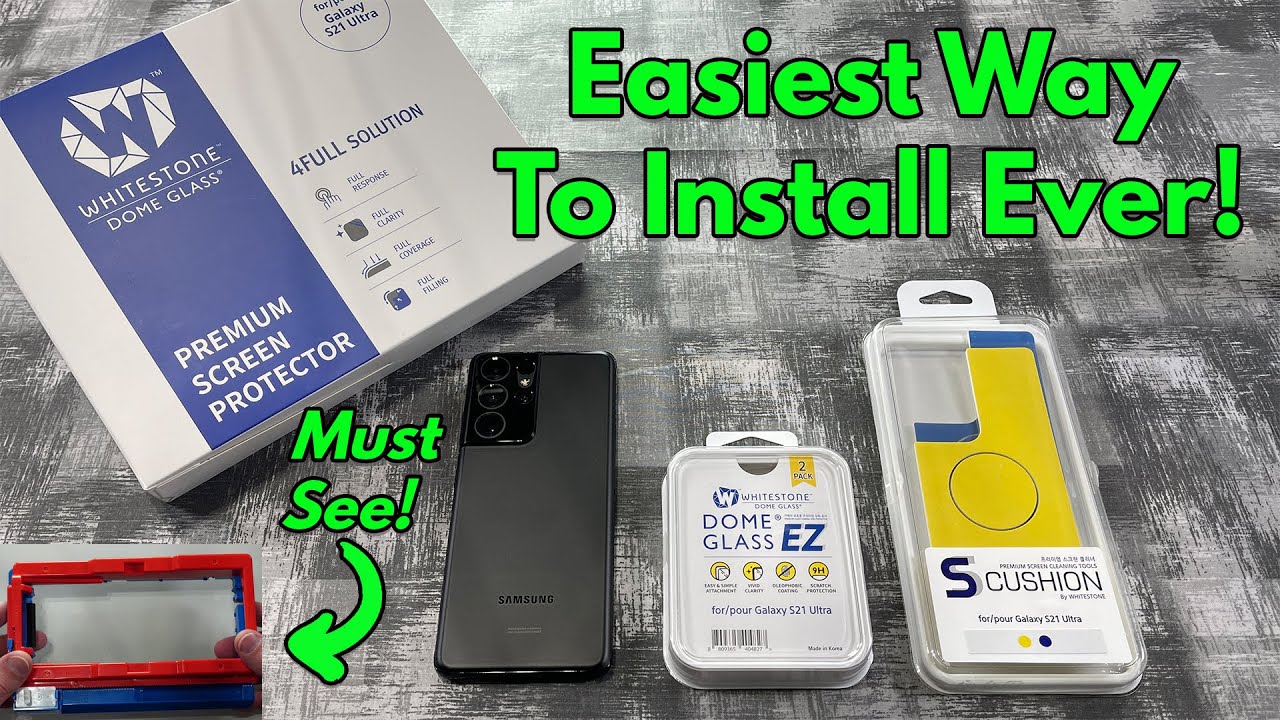
What's up everybody tony here with high-tech check, and today we're going to be looking at the white stone, dome tempered glass screen protector for the brand-new galaxy s21 ultra, as well as some other accessories and screen protectors for your back camera. Here now I want to thank white stone for sending me out all this stuff for you, so I could do this for you guys today and if you guys are interested in picking up any of these things you see here, I will be putting a link in the description and, if you guys like me- and you want to support my channel, please use those links because it helps me keep purchasing products with your reviews, for you guys. So I also did the best and worst screen protector for the galaxy s 21 ultra. I will be putting a link in the description for that video as well. In case you guys want to check that out too and again, I wanted to thank all of my subscribers for all of your support. I really appreciate it and, if you guys, haven't subscribed yet definitely consider subscribing and hitting the little notification bell to.
Let you guys know when I put out these new videos, because there definitely will be more, but first we're going to go ahead and install the white stone, dome, tempered glass screen protector, I'm going to go through the whole setup, then once we're done, I'm going to go ahead and do some fingerprint tests I'm going to test the s pen, then we're going to go ahead and put on the accessories. So let's go ahead and get started. So here we get a couple s cushions. Basically, what these do is stick onto the back of your phone. They kind of give your phone a little protection on the back as well as a little cleaner in the middle here that you can peel off and clean off the screen.
We will go ahead and install this once the screen protector is installed. You get a limited lifetime. Warranty our installation guides. You get two glass screen protectors. We have two vials of adhesive, all of our accessories, our button stickers to cover those up.
We get some alcohol preps, some dust removal stickers, some wipes get some more uh button stickers and then here's your speaker, grille sticker. Here we have this Plexiglas handle which is going to uh put pressure onto where your fingerprint sensor goes. Oh, we got three vials of adhesive. There was an extra vial in the box there. Here we have our jig, which is quite interesting.
Looking I've never seen that before. So here we have an USB a2 micro USB and then here we have our UV LED light. I do recommend using a power bank to power that up, but you can use pretty much anything you want. So here we have the LED- and here is my power bank. I just like to get everything all set up, because when it comes time to use it, it's ready to go so.
The first thing you want to do is get your little black stickers here, because we want to cover all the ports all the grills and the buttons on the side. So we'll go ahead and do that first. So one thing you want to make sure of when you're putting these stickers down is you don't want any of the edge touching the top glass, because, obviously that's where the tempered glass screen protector is going to go and then for the buttons here I would tell you to take like your fingernail or something and kind of just smooth down the front where the button is just to make sure that the sticker is flush with the button and the phone just so you know nothing can get in there and then once that's done, you're good to go so the next thing we're going to want to do is clean off this whole entire screen with one of the alcohol wipes, make sure you clean the screen, perfect, get all the fingerprints and oils and everything off of the screen and then once that's clean, we'll take one of the wipes here and just dry it off. So the next step that we're going to do is super important. If you take the jig you'll flip it upside down, and you'll, see this little plastic piece here.
Basically, what that is, is that's just covering the speaker grille sticker, so we need to just peel that off from the bottom very carefully. Okay, as you can see, there's that little black sticker there, which is going to go over the speaker grille. So the next step, we're going to do is press this on top of our phone, just make sure that it's lined up at the top. Here we have speaker at the bottom. We have connector and that lines up with the phone so make sure the camera is up by where it says speaker and then the USB port is down by where it says, connector, and we'll just flip it over press the phone in, and you should hear it kind of click into place.
Then what we're going to do is make sure that our little these little arrows here, they're actually touching the screen, and we have some of those up here as well. You want to make sure that those are making contact with the phone screen so once the phone is pressed in here, you're going to want to take your little wipe, and we're going to gently wipe down where the speaker grill sticker is just to make sure that it's properly seated over the speaker. The next thing we're going to do is we're going to hold the jig, and we're going to wind up this little thing right here until it no longer winds, we're going to go clockwise, okay, so it won't go anymore. Another thing before you let go to make sure that this little tab here is totally pressed over to the left here, because that'll keep this whole thing from moving. You can release it and it stays in place.
Okay. So the next thing you want to do is get a dust removal sticker we're going to remove any remaining dust that might be out left on the screen. You can remove the middle if you need to make things a little easier. Okay, so once you're confident all the dust is gone, you can then remove or put back the middle plate. If you've taken it off, then what you're going to do is get one of your vials of liquid you're going to unscrew the red cap be careful with this stuff because it can get messy we're going to push it down into the middle here until it won't go anymore.
Then we're going to unscrew the black portion now very, very important. Make sure that when the liquid comes out that it maintains its space in the middle and if it doesn't, you can kind of manipulate the jig to make sure that it stays in its place. Wait about 30 seconds for all the adhesive to come out once that's done, we'll put the black cap back on we'll, go ahead and remove the whole piece and put that off to the side. Okay, so, as you can see, it kind of moved, so I'll just take the jig and kind of move the bubble where I want it to go, you want it to be directly in between these two little spaces here: okay, and then we'll get one of our screen, protectors, we'll go ahead and peel off the underside, making sure that you do not touch the underside of the screen once you've, peeled it off we'll, go ahead and place it inside the jig here, then we're going to very carefully take the little plexiglass piece you can lift on this piece here, which is the handle to help you put it into place. There's a couple spots in the bottom of the jig that are square which match up to the Lexi glass piece here which will just fit into place and then make sure that's down evenly so now very important.
Make sure that nothing is blocking this area, because this whole tray is going to slide off to the right. So once we've determined that our little bubble is directly in the middle of our tray, I'm going to hold this whole thing with my left hand and, with our right hand we're going to push and release this little holder. We need to make sure that it goes all the way down clearing the top of the tray. Once that's done, we can release and the whole top of the tray will move off by itself. As you saw, I did have to make a little adjustment, because the little Plexiglas thing had moved.
You don't want to press down on it. You kind of just want to move it off to the side as much as you can without pushing down. So it should take about two minutes for the adhesive to fully cover the whole screen. What we're really concerned about is the adhesive getting into the corners and the edges, because that's where the lifting occurs so wait at least two minutes for the adhesive to get everywhere where it needs to be okay, so that's been two minutes. So what we're going to do is we're going to go ahead and hold on to the jig, and we'll pull this the rest of the way off just to remove it.
Put it out of the way then very carefully. We need to remove the little plexiglass piece, so we're going to have to just grab the little handle here and just lift without putting any downward pressure onto the glass okay, so once that's removed, we're going to cure the top and the bottom of the screen protector for 15 seconds each. Basically, if you look on here, one press of the button is 15 seconds and two presses is 60. , so we'll just press it one time for the top and one for the bottom. Okay.
So now that that's done we're going to very carefully push out the phone from the jig, I would probably push out from the top where the camera is versus the bottom, because that's where the fingerprint sensor is, you also might want to clean up any residual adhesive that is kind of gotten out. There's also some on the bottom of the phone as well, so just wipe that up a little, I like to keep a little bottle of alcohol nearby, just in case okay. So again, we'll very carefully push out the phone from the top okay, okay, so we're going to do is either get a brand-new alcohol prep or you can kind of reuse the one you had before, and then we're just going to kind of wipe down the front and the sides just to get rid of any residual. Adhesive, I'm not going to take off the stickers until I'm sure that everything's all cleaned up, because I don't want it to get everywhere. Just make sure you clean everything up, perfect.
You don't have to be super forceful, just kind of be pretty gentle with it. The alcohol should take care of any residual that had gotten around and if you get any on your fingers, make sure you kind of wipe it off because it does get everywhere, and you don't want to touch the phone again with that stuff all over your fingers. So once you're pretty confident that you cleaned up enough, you can go and take off all the button and port stickers. Okay, so once that's done we're going to cure again 60 seconds on the top 60 seconds on the bottom and then repeat that one more time, and then we'll do the bottom, and then we'll do the bottom. Okay, so once that's done we'll go ahead and remove the LED, and then we can go ahead and wipe off our screen all right.
So that is looking pretty nice. All the edges. Look like they're down pretty good. The adhesive has gotten pretty much everywhere. It needs to go.
There is a little edge on the top and the bottom and the sides, so it's case friendly. So let's go ahead and test out our fingerprints okay. So I have not re-registered my fingerprints, yet I just want to see what will happen. If I don't re-register, will it recognize my fingerprint? Yes, it will be beautiful seems to be working every time, nice, so you do, recommend that you do re-register your fingerprints and turn the touch sensitivity up. But if you're not having an issue, I don't think that you'd have to re-register your fingerprints, so fingerprints, weren't working beautifully touch smooth just like glass, because it is, but it's just like your phone's glass, it's nice and smooth yeah touch is working great, very nice.
Now, let's go and test out the s pen. So this s, pen, I have here, is from my Galaxy Note 20 ultra, but the other finger, the other s pen excuse me that you can buy what is made for this phone, but we can go ahead and use this. If you already have one touch, there do a little screenwriter nice. There is some resistance, because the little tip is rubber, but that will help you write, but it is smooth very nice. So s, pen is working.
Great touch is working great fingerprints working great. I think we have a winner here guys. This is a this. Is a nice screen protector? Another interesting thing is: how well does it work inside a case? Let's go ahead and find out. So I do have a case here we'll go ahead and pop that in beautiful.
So I don't know if you can see but, like I showed you before those edges, how there is's a gap kind of towards the bottom here that you can see, and then we also have one. We have a little gap at the top and as well on the side. So pretty much any case that you're going to use with this screen protector should work, and I say should because I'm sure there are some cases out there that may not work with this, but for the majority it should work because it leaves a gap at the top and the bottom and on the edges. So it does not touch the case, and then you won't have to worry about the screen lifting. So that is slick guys.
Um super, super impressed installation there every single time they come out with a new screen protector for a new phone. They come out with another solution, that's better than the last, and this one kind of pretty much is a no-brainer. It's super easy to do, and it comes out looking great, I'm very happy. So let's go ahead and look at the s cushion as well as some back glass for your camera. Okay.
So now let's go ahead and take a look at the rear camera tempered glass screen protector. We get a cloth, some alcohol, preps and two glass screen protectors. So basically all you need to do is peel this off and then stick it onto your camera. What we'll go ahead and do is we'll use one of the alcohol preps. First, we will clean the screen off just make sure that all the dirt and grease from your fingers or anything like that are off we'll go ahead and dry it off with our cloth here now, there's not going to be really any guide for you to use other than the edge of the camera itself.
So, as you can see there, it says the top and there's the bottom, and then it lines up evenly with your cameras. So just go ahead and lift this off the back here, and we'll go ahead and line it up the best we can, then all you need to do is take the wipe again and then just wipe down the screen. So it's so it sticks evenly to the camera and there you go. You are done, so now you have back and front tempered glass screen protection, so we'll go ahead and take a couple pictures to see what they look like. They should be crystal clear because that's what the tempered glass screen protector is so from what I can tell those pictures look perfect, so that is the rear.
Tempered glass screen protector looks pretty nice matches the black phone, very cool okay. So now let's go ahead and take a look at the s cushions okay. So here we have the s cushions, go ahead and use the yellow one. They come in a bunch of different colors, so the ways the way that it feels it kind of feels like these little things that you used to wipe off your screen. Basically, they just stick on the back of your phone like this.
It gives your phone some extra scratch protection, and it feels pretty nice in this little middle circle. Here you can peel off to use to clean off your cameras or the front of your phone, so super easy to install. If you have an alcohol prep, I would probably wipe off the back here just to make sure that it's nice and clean, and then you're just going to peel off this back sticker here and off comes a little center, which is fine, and then you're going to line this up the best that you can, and we'll just press that down it does feel pretty cool. It's got a nice little feel to it, and they do seem to come off fairly easy as well. The only thing is you're not going to be able to put a case on your phone, but that's for the people who don't like cases anyway, so there's the little s cushion feels really.
Nice does give the phone a nice feel to it. Nice soft feel and it protects the back and then again like. I said this little sticker here sticks in the middle and because it has the same type of material that this wipe does. You can just take it out of the circle, and then you can wipe off your camera, or you can wipe off the front of your screen. It's a nice, it's a nice idea, and it does work as you can see.
The screen is nice and clean now, so it does get rid of all the fingerprints. The only thing is like I said this doesn't have a lot of stickiness to it, so it can peel off very easy. So it is what it is. It's a cool idea. Will it work in practice? Yes, but, like I said it peels off really easy, so I think you'd probably end up uh, this falling off uh pretty easy, but it's pretty cool.
It comes in a bunch of different colors that you can pick up, and again I will be putting a link in the description for those as well and the one other thing that I am curious about is if the wireless charging will work through the s cushion. So let's go ahead and check that out. Yes, it will, but that is pretty much it for the tempered glass screen protector for your camera, the s cushion and the tempered glass for the front of your phone. Everything works. Great, definitely recommend white stone, dome I've been using their screen, protectors on my phones, for probably the past I'd, say three or four years now there are.
There are some other screen protectors out there that are good, but I think white, stone dome is probably some best. So again, I will be putting a link in the description in case. You guys want to pick this up yourself and if you guys like me- and you want to support my channel- please use those links because it helps me keep purchasing products to do reviews for you guys. So I hope you guys enjoyed the video if you did give me a thumbs up, don't forget to subscribe and hit that little notification bell to let you guys know when I put out new videos. Thank you guys for watching.
I hope you have a great day, and I'll see in the next one later.
Source : HighTechCheck
Phones In This Article
Related Articles


Comments are disabled
Latest Articles


