Samsung Galaxy Phones Pro Mode (S7/S8/S9/Note 8/Note 9): When, why, & How To Use It By Brent Hall
What's up guys welcome to another tutorial Tuesday today's episode, we're going to be talking about pro mode or manual mode, but specifically pro mode in the Samsung Galaxy series and more specifically in the series from s what seven from the Galaxy S7 ? now, which is the s9 +. That's what I have s9 of time plus 20 is a drift method, freaking incredible round up. Sixteen for that, all right! So I've done a lot of videos on the cell phone now, and I have done quite a few where I have used Pro Mode, but I haven't really explained the wins and wise in the house of using Pro, Mode, I've, just kind of said I'm using Pro Mode, and these are my settings. So I've been getting a lot of questions lately on how specifically to use a Pro Mode or when you would use it or why you would use it. So today, I'm going to go over that kind of stuff and just show you the basics of Pro, Mode and kind of show you around it in the settings of Pro Mode, then what you could get a feel for how it works and when and why you'd want to use it. It's like I, said I've already done quite a few videos where I've used Pro Mode, and you should definitely check those out in addition to this one.
If you want to see more on location scenarios of how I'm using it, but a few of the ways that I like to use it are definitely night stuff. So nighttime is where it excels, anything from doing cityscapes and light trails to stars and just ambient outdoor nighttime light stuff to long exposures, even at nighttime. The other most common time that I use the Pro Mode is during the daytime. What I want to do, waterfall, shots or anytime I- want to get long exposure shots during the day and the last time that I personally use Pro Mode is more for action stuff and, if I want to, there is an action mode or a sports mode in this. But if you just want a little more control and just to know exactly what you're dialing in then that's another time, you'd want to use pro mode anytime.
You want to really dial in everything yourself and have complete control over the ISO, the shutter speed, the white balance, the focus, and, in this case, with the s9 plus the aperture as well. That's when you want to use pro mode. So the last thing that I use pro mode for that is super important to me. Is video I use pro mode to make sure that I have my cinematic video settings and get that 180 degree shutter rule. If you don't know about that, and you want to learn more about making cinematic video with your smartphones check out this video I did here.
It's way more in-depth on that stuff, but using video and doing vlogs and all that stuff. In conjunction with my filters, if you want to know more about using filters, I've also got that video I'll link it in the description below on how to use filters with your smartphones, all right. So, let's jump into pro mode and just double tapping on my screen there. So by default, it's going to open me up in Auto, and I'm, just going to swipe that way, I've got it set to where one swipe left for me is my pro, so now I'm in pro mode. So let's take a look at some features in pro mode, we'll start at the bottom.
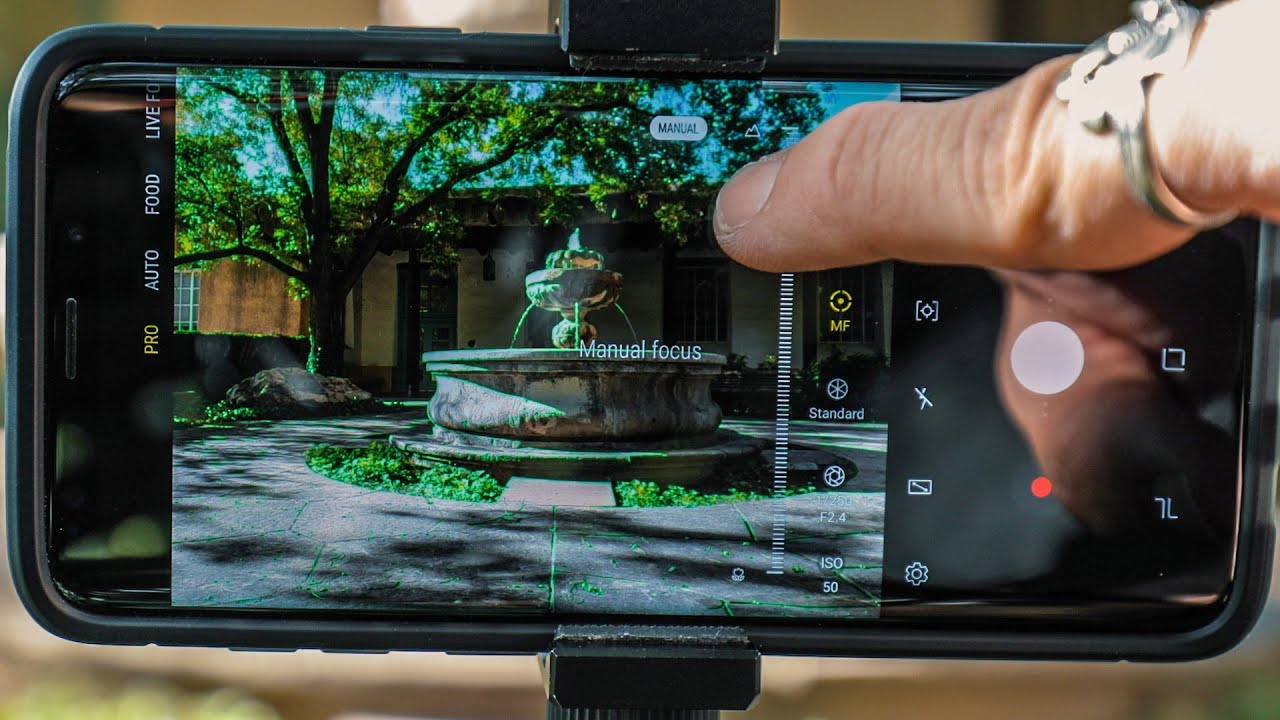
So the first thing I want to mention is in the settings and one of the reasons why we shoot in pro mode is so that we can have access to the raw images, but to enable those you have to go into your picture size, scroll, all the way down and make sure this save raw and JPEG files is enabled. So once that's done, then, when you enter pro mode, it will say this right here which says raw and JPEG. Copies will be saved on the phone, so you'll have both the raw and a JPEG. So let's start with the bottom. So the first thing you have control over is your ISO and ISO is your sensitivity to light.
So it's the same as on a DSLR or mirrorless, the higher the number the brighter it gets. So that's all the way up at 800 and also the higher the number the more noisy the image will get. So keep that in mind for your night stuff. Is that typically for a noiseless image, you want it as low as possible, which, on this is 50, so the next thing we have access to is on the s9 plus you'll, see that a little white F 1.5, if I click on that now I just change it to F 2.4. So I changed my aperture.
So now it's darker because I have a smaller aperture. So the next thing in the same area, we have our shutter speed. So this is our shutter speed. So it goes all the way to like twenty-five hundred or twenty-five thousandth of a second all the way up to ten seconds, and you can see if you shoot that during the day times and be pure white. So you want to find that balance where your highlights are not overexposed and that's not quite there, so I'm going to bring it down, probably right there, which is uh one 250th of a second.
So that's your shutter, and you can control your shutter speed. The next thing you have access to is your standard. Is your profile look, so you can change the image style, so that's a vivid soft, so they have some built in ones. I have a custom one for when I do video, it's a flatter profile that I've made custom. So you can control that in here and do all of your stuff, so I'm going to keep it on standard for now.
So the next thing we have access to is the focus. So, by default it's in autofocus, but if you want it to be in manual focus, we can come up here, and we can click manual and now, or you can just swipe it and when you swipe it down here it has a little picture of a flower and up here all the way to the top has a little picture of a mountain. The mountain means infinity. So that means the farther that means you're focusing towards infinity, which will hopefully get everything in focus. The little flower indicates macro so indicates super close to the lens.
So that's your manual focus, and you can adjust that it's really nice to do when you're doing long exposure night stuff so that you can manually focus in the green stuff on there. You see how its green that is indicating my focus peaking. So everything that split up green is in focus, so you can see even the lines down there on the sidewalk all around the fountain. All up in the tree are all green. That means that everything is in focus now.
All of that stuff is not in focus. So that's your manual focus. The next thing you have access to is your white balance. So by default again it's an auto, but if you click it, you can pick if it's a cloudy day, then it'll adjust it to 6500 Kelvin. So you can have it to bright, sunny daylight, which is right now, 5500 Kelvin, that's standard for daylight, or you can.
You can have it for tungsten. If you're in, like a super orange looking room, then it's blue. It's blue right now, so it'll balance the orange out, or you can have florescent. So if you're in a room with fluorescent lighting, it'll balance that out, or you can punch in your Kelvin with the K symbol and then slide it to where you want it, so I'm just going to go ahead and click back to auto. So that's basically all the settings for pro mode, all right! So that's how I use pro mode and that's a little insight to all the settings and everything what pro mode looks like.
So hopefully that'll help open up your creativity and get the most out of your smartphone. If you have any questions about the pro mode or any of the settings that I went over or didn't go over, make sure you leave those in the comments below, and I'll definitely answer them. If you like this, and you want to see more definitely make sure you subscribe to the channel I've got new videos every Tuesday and Friday make sure you hit that like button. If it helps you out, it really helps me out, and thanks for watching, and I'll see you next.
Source : Brent Hall
Phones In This Article

Related Articles


Comments are disabled
Latest Articles


