Samsung A8 2016 Not Charging | A810 Water Damage By MST
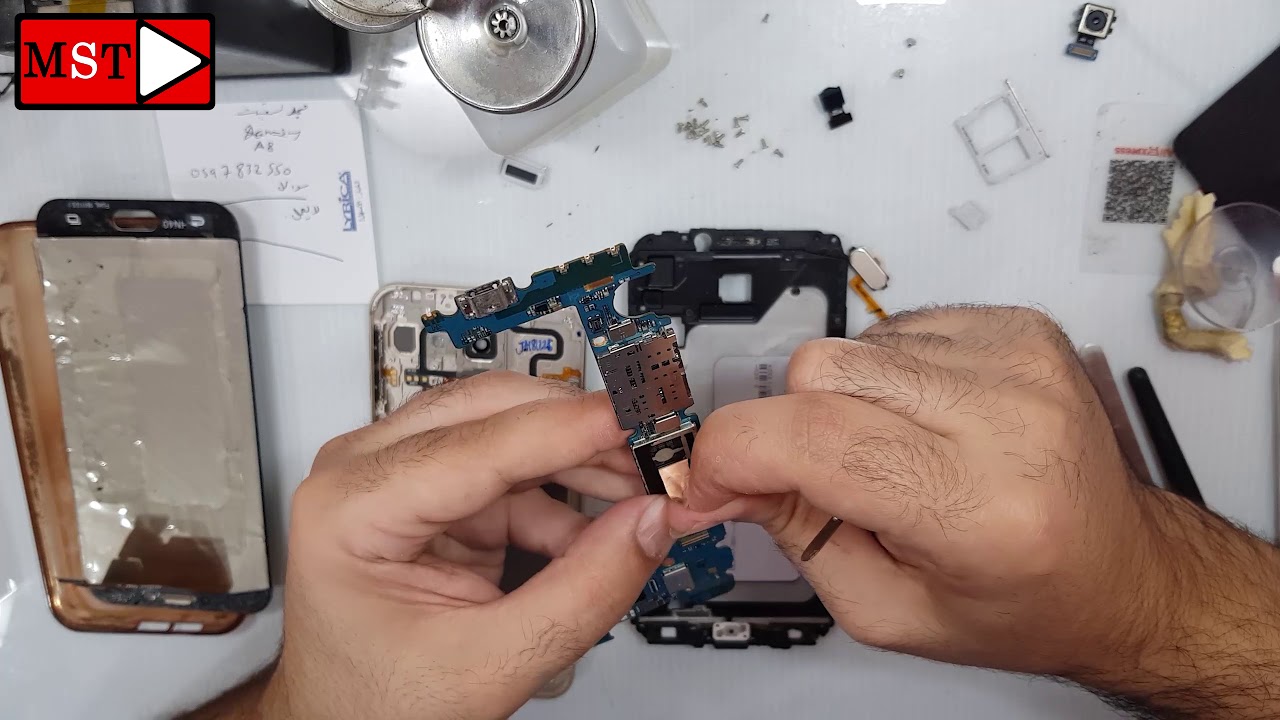
Use, you a gun at 250 siliceous degree to hit the screen and remove it with plastic tools like iOS and with one to push the screen out. Take your time while you're doing this, we don't need to break the screen or damage it or do anything to it. So take your time we will meet you and 2.8 minutes. Um. Remove the screen a little more now remove flux, cable, okay, remove all Scrolls from the board. After it, you will need to remove what you need to know: SIM card slot pushy the device from top and then to the bottom.
It's easy to push from top. First, okay, remove slowly, okay, remove battery and speaker, and there are two black screws we need to remove it after it, we are going to remove recent kids, looks, cable and a little camera and I forget something, and it's fingerprint flex, cable! It's from the backside! Remove it and see I forgot to remove the fingerprint flex cable, you need tremolo test, don't rock it! Okay! Every time when you water get lit into the device, you need to remove all shield to make sure the water is not inside. We need to make sure that water is not hiding inside the shield, so we always need to move it and the sport. The shield was easy to be removed and next generation you are going to use heat gun to remove the shields. Remember this now: let's clean an ear-shattering board and all components in IIT, because water, it seems just leaked into that place.
No more so we are going to clean it, and then we are going to use the multimeter to check the voltage of battery and then battery connector. Next, the components of the device the world I had to me to remove everything to make sure there is no water lead into Oh, blessed I, don't know, so I had to them to do what I'm going to do now, and you too, you have to do this. If you got any water into your device, always take your time and check all components of water or dust or anything and cause the device to be shut down. I can't see any water linked into there I see. So we are maybe in a small problem and easy problem to be fixed.
They are just now cleaning, and you can see now, let's measure the battery percentage, it's zero. There is something problem: I have an adapter connected to the pins, as you can see, to direct and to the blow the positive and the negative is called shock the battery to be working again. When you get zero to the batter, it must be less than 2.5. As you can see, it's 2.5 now we are going to charge in to 3.5, so the battery then can be recharged again now, let's check the voltage over there battery connector it's 2.4, and this is bad. Now we are going to check their components on the board.
Let's see, 1791, we are going to see it if it's 5 volt or not. It's 5, volt 4.95. This means that we have problem with charging board, and it's need to be replaced. I just had to check the battery voltage again battery connector again, it's two point: five, okay same problem. So now we are going to remove that charging board.
Let's do it put soldering — charging board legs now, put soldering paste to the shocking board, use your heat gun and soldering iron. This will help you to remove the old charging worth easy. Okay, now bring when you want and sit immediately. This will make your job easy. To do.
Sorry, I got no view. I didn't notice that, because the camera is up from me, I didn't catch that okay, once you're finished, you need to clean the charging board and then make sure the legs is connected. I think there are seven legs connected to the world. You need to make sure our legs are connected. Otherwise, we'll get some problem, its removal from charging- or maybe when you connect your phone to that computer, you won't be able to transfer your data now, both the charger again and now, let's check battery voltage.
It's four point: four congratulation: your problem now is solved. Now you can assemble your device and let the battery charge. Okay, we get the charger inside now, let's wait and see. If the battery charge or not. Okay, it's zero! That means they're Bethany charging, okay, it's one! This is good news.
Now it's 15 and then 37. Okay, the problem now is gone, and now we can assemble the device to fall a sample okay. Now we are going to put everything back, as it was remembered, don't forget anything and put the shields again. Don't leave the shields outside the device, it's better to be bolted, put it in its best for the board. Okay, but the two black screws were the Bronx.
These two screws are important to the board now, but the board to the frame and clean the frame from the water, okay and now was it again now, but four screws down put the screen again and a slot sim card. This is what's for today, I hope you got something deal and if you like my videos, please don't forget to subscribe for me, we will see you in the next video bye like and subscribe collective, a train to get all my videos stay tuned with the next problem.
Source : MST
Phones In This Article

Related Articles


Comments are disabled
Latest Articles


