Redmi Note 10 Pro Detailed Camera Review By TecworkZ
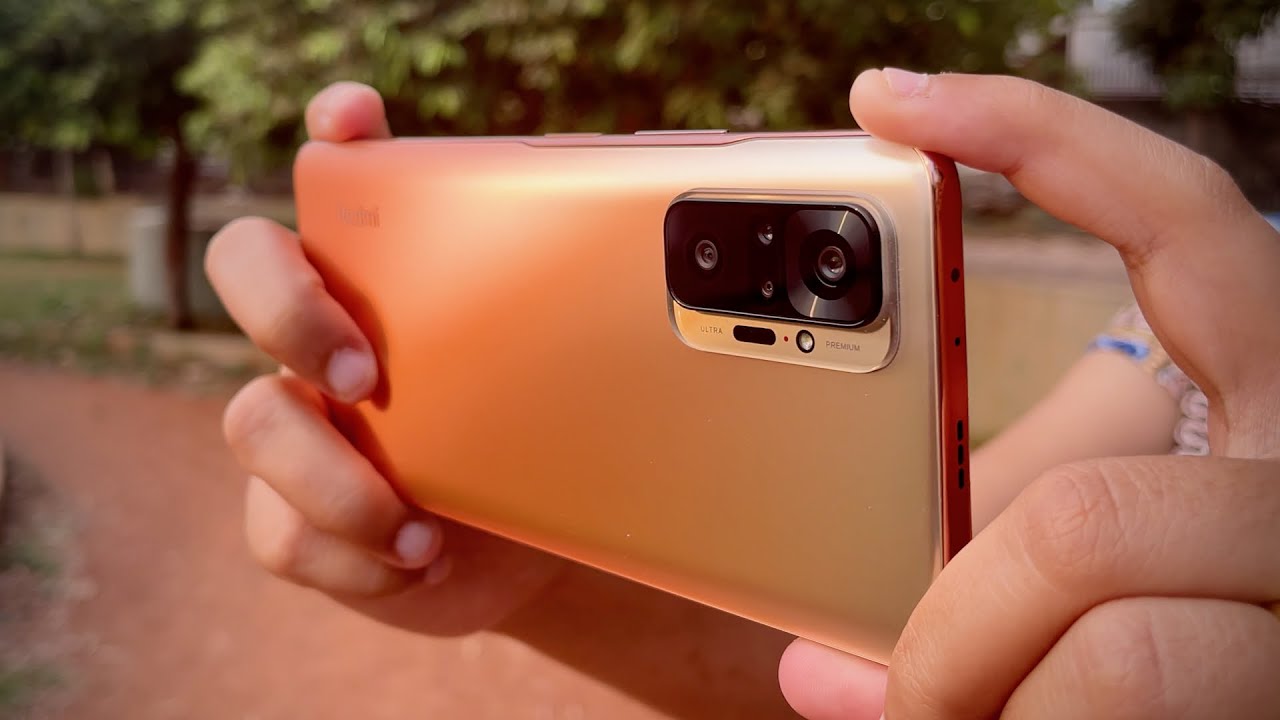
Hey guys its Sagar from tecworkz, and today I am bringing in the video that you all have been waiting for. The detailed camera review of the Redmi Note 10 Pro. The camera module on this Redmi Note 10 Pro looks exactly like the one on the Note 10 Pro Max. The only change is it has a 64 megapixel primary camera camera as opposed to the 108 megapixel one on the Redmi Note 10 Pro Max. Other than the silver ring around the main camera on the Redmi Note 10 Pro Max, Camera modules on both of them look exactly the same. Since the only difference between this and the Note 10 Pro Max is the main camera, many people want to know if the 64 megapixel camera on this phone is any good, or should they spend the extra Rs.3000 and get the Max. So in this video we will look at close to 100 image and video samples from all the cameras on this Note 10 Pro, and see if they are any good.
Now we are going to look at some of the camera specs and some of the key new features added to the camera app on this phone. If you want to skip over this part, you can head straight to the image and video samples from the timeline of this video. Primary camera gets a 64 megapixel Samsung GW3 sensor with F/1.9 aperture and 26mm lens. Next camera gets an 8 megapixel sensor with F/2.2 aperture and 118 degree ultra wide field of view. Then there is a 5 megapixel camera with F/2.4 aperture and a Super macro lens. And finally there is this 2 megapixel sensor again with F/2.4 aperture and this is used for sensing depth information for portrait shots. With the primary camera, you can shoot 4k un-stabilised videos at 30fps, 1080p videos at 30/60 and 120fps.
And 720p videos at 30/120/240 and 960fps.1080p 30fps videos get electronic stabilisation. At the front, we get a 16 megapixel camera with F/2.45 aperture. It can take 1080p videos at 30 fps, and 720p videos at 30 and 120fps. I found the interface of the camera app to be a bit confusing. I mean like with most other phones, you can swipe left or right to switch between various modes.
But if you want to take 64MP image or a slow motion video or the new clone option, you have to now slide to the more menu and then select the desired mode. I found it much easier to use these modes when there were laid out, and were just a swipe or 2 away. Now because they are hidden away, many people will just forget to use them. This is how the camera app is set out of the box, but fortunately you can edit the layout from camera settings, and add the modes that you use the most to the featured swiping. I think you should take some time to set this up according to your preferences.
You might want to add the new clone or dual video mode to your featured list, just so you are reminded that they are there, if you ever need to use them. This is how I like my camera modes, specially when I am taking images for camera reviews and comparisons. What you can’t add to the featured list is this new Super Macro mode. There is a dedicated camera for this, but this mode is hidden in the secondary menu. I had someone ask me in the comments that they got this phone on the launch day, and their unit doesn’t have the Super Macro mode.
Then I had to guide them to where it is hidden in the camera app. I think a feature this important should be laid out in plain sight. Pro mode on this phone lets you dial in all settings according to your liking for videos, just as you could do with images. Range for shutter speed in this mode is from 1/4000th of a second, all the way upto 30 seconds. And the range for ISO is from 50 to 6400.
Now before we move on to the image and video samples, if you are new to this channel, please make sure to hit the subscribe button and the bell icon next to it. That way, youtube will make sure, you are notified when a new video goes up on this channel. Normally I start with daytime images, but for this video let us change things a bit and start with video first.4K 30fps is the maximum resolution that you can shoot in. There is no electronic stabilisation at this resolution, but you can open the videos in the google photos app, hit the edit button and stabilise it from there. If you want stabilised videos out of the camera, you will have to lower the resolution down to 1080p and shoot at 30fps.
You loose out on some of the sharpness and details, but look how much better the overall handheld video looks. You can’t take 4K videos with the wide lens. This lens can only take 720p and 1080p videos at 30fps. If you are shooting them in well lit situations, videos from this phone can look good. There is an option to shoot dual videos with this phone.
What this means is it can simultaneously capture videos with the front and the rear cameras. While doing so, you can see a few stutters or dropped frames in the video from the rear camera. Coming to the images. Let us start with the ones that I took in daytime. These 16 megapixel pixel binned images from the main camera look really good.
Their seem to be good amount of details in these daytime shots. I just think there is a bit extra contrast in all of these shots. It makes the shadows appear a bit darker than they need to, making the overall image look a bit contrasty. Now it wasn’t exactly sunny when I took these images, it was one of those slightly overcast days. But even then, I think these images should appear a bit brighter.
Here is one of the images straight our of the camera and here is the same image with a bit of editing. I think image processing needs a bit of tweaking so these images show a bit less contrast. In most lighting conditions, the Note 10 Pro manages to capture pleasing looking colours, which are very close to how the actual scene looked. They are not overly saturated, but there is a natural warm look to these images, which I really like. If you like extra punch in your colours, you can use the pro colour mode, which adds in a lot more saturation and vibrance to the colours.
In some of the shots, like this one that we saw before, there is a slight green tint. This how the colours are supposed to look. I have adjusted the white balance on this one to make it look natural, but this is how the camera captured it. I don’t think its major issue, and it can easily be fixed with a software update. Here is a same shot with the HDR on and off.
While the shot with HDR did manage the bright sun slightly better. It did not do much with the shadows, if anything it made them even darker. Now this kind of shot looks great with the HDR mode turned on, because again, it managed the highlights really well. But in shots like these it doesn’t do too well with the shadows. There is just not enough detail in them.
I really hope Redmi fixes this and improves the dynamic range on this phone. I mean these images are not really bad, but over the years we have come to expect more out of Redmi’s cameras, specially from their Note Pro series phones. If you bring the shadows up and edit these images a bit, they can look good. These have all been 16 megapixel pixel binned images, but if you want to capture even more details and you are in well lit areas, you can switch to the 64 megapixel mode. Here is how these images look side by side.
From this far, you might not notice any difference in them, but once you zoom in, you can see that the 64 Megapixel ones have so much more details in them. You can use this mode when you are trying to capture a landscape or some architecture with lot of details. These 64 megapixel images having more details, but you will have to zoom in 4-5 times to notice the difference. These higher resolution images also don’t have very good dynamic range, and they are huge in terms of file size. They also start showing a lot of noise as the light gets lower, so for most of your shots, I think it is best to stick to the default 16 megapixel mode.
Now this is how much of the scene the main camera lets you capture, and here is how much more of the scene the wide lens will let you get in the shot. It gives you a whole different perspective of the scene. This camera doesn’t capture as many details as the primary camera, and you can see a fair bit of distortion towards the edges. It is also not as good at handling the dynamic range as the main camera, and there is fairly more noise in these wide shots. If there is plenty of light, images from this camera turn out really good.
There is 2x option on the view finder, but there is no telephoto lens on this camera. So all this button does is zoom in on the image from the main camera, and I don’t use it a lot. Coming to the close up shots, I really like how they turned out. The main camera is fast and accurate at setting the focus on any particular subject. Look at how amazing these shots turned out.
The are in sharp focus and thanks to the big sensor and wide aperture, the background is nicely blurred out. These are normal close up shots and not portrait shots, so the blur to the background is all optical. I love walking up to things and taking these close up shots, and being able to do this without the phone continuously hunting for focus saves me a lot of time. Now this is how close you can get to a subject and set the focus. If you move any closer, the main camera won’t be able to set the focus on that object.
If you want to get even close to your subject, you will have to switch to the Super macro lens, and it will let you take shots like this. Note 10 Pro gets a 5 megapixel Super macro camera, which can take much better images than the 2 megapixel macro camera on some of the other phones. And just look at how close it lets you get to the subject. It still struggles a bit when we try taking these shot indoors, but given ample light, we can take good macro shots with this camera. I don’t know how useful this mode is going to be for you, but I had a lot of fun trying to get all these super macro shots.
If you are a long time follower of the channel, you know that the portrait mode on any smartphone excites me the most, because more than half of the images that I take are portrait shots. Over time Redmi phones have got a really good at taking portrait shots. Thanks to the depth sensor, it does an excellent job of detecting the edges of your subject, and separating them from rest of the background. It is not perfect, and misses out on blurring some part of hair or glasses, but for the most part, these portrait shots look good. However, this mode doesn’t handle the exposure all that well.
If you have a lot of bright areas in these portrait shots, they will be blown out. Redmi just needs to work a bit on getting the dynamic range right in all conditions. Other than that, these shots look really good. Portraits of objects turn out equally good. the edges are detected and separated very well from the background, and the blur roll off also looks very natural.
While taking all these portrait shots, this phone does well to keep the white balance in check and colours looking natural. If you have never tried this before, do this the next time you are clicking images. Unless you are taking images of a landscape or some architecture, switch to the portrait mode, and look how much better your images turn out. As the light goes down, so does the quality of the images from most mid budget smartphones. Let us see if that is the case with the main camera on this Redmi Note 10 Pro.
Here are some of the indoor shots in artificial lighting conditions. Images look really good when there is plenty of light around. As light is reduced, you can see that the images still look good and detailed, but there is also a lot of artificial sharpening being added to these shots. It doesn’t look very bad, but it changes the look of these images a bit, and some people might not like it. Other than that, these images captured in artificial light look good, and most users are going to enjoy clicking images with it.
You can click wide images in these lighting conditions, but as you can see this camera isn’t as god as the primary one, so there is a lot of noise and less details in these artificial or low light wide shots. As we move to lower light, there is more and more noise being introduced in the shot. In most cases you will have to zoom in to see this, and the overall image is still usable. You can turn on the night mode in these situations, and you can see, it does brighten the images a bit. This mode captures light for a longer time, making it look brighter.
As you can see, these night mode shots also appear to be a bit more detailed compared to the normal shot. So whenever you are in a situation when you feel there isn’t enough light to take a decent image, switch to the night mode, it will make your image appear brighter and in most cases more detailed. It’s also good to know that the night mode images don’t take too long to capture. Now you just press the shutter button and in 1-2 seconds the image is captured. Now in some of the very low light shots, night mode might make the overall shot look brighter, but because there is barely any light around, it wasn’t able to capture any details, you can see this when I zoom in.
Due to this reason, I don’t suggest taking images in very low light. The wide lens lens doesn’t get night mode, and its images don’t look very good in very low light, so again I don’t suggest using it in these lighting conditions. Well, those were all the low light shots that I had to show you guys, so now let us move on to the front facing camera. The 16 megapixel front facing camera can take sharp and detailed selfies. Overall colours and skin tones are looking really good and you can see how sharp everything looks.
Its not the best looking selfie camera out there, but I still think most people will be happy with the normal selfies that they take in bright light. Edge detection is very accurate for the portrait selfies. Since everything in the background is blurred out, the faces in portrait selfies look even sharper. It doesn’t have any problem detecting and separating multiple faces from the background, so you can take portrait selfies with your friends. Again the colours, skin tones and overall white balance of these portrait selfies appear to be natural.
So overall I am happy with the performance of this front facing camera. Here is a video from the front facing camera of the Redmi Note 10 Pro. You can see how it handles the colours of the scene, exposure and stabilisation the I am walking around with it. You can also let me know in the comments, how do you think it is handling my audio. So after looking at over 100 image and video samples, I think the cameras on the Redmi Note 10 Pro are very good for its price range.
As you saw, it can take really good images in almost all lighting conditions. I feel with software updates , if Redmi can fix a few of issues that I mentioned like the extra contrast, improving the dynamic range and the slight green tint that I encountered in some of the shot, cameras on this phone will deliver better looking images consistently. So the answer to the question that if the cameras on this Redmi Note 10 Pro are any good, is a big yes. It has got a really good set of cameras of the price that it comes in. If camera is your main concern, I don’t think you should spend 3K extra and get the Note 10 Pro Max, this phone can take just as good images, if not better.
I will have to compare it with a few other phones in a similar price range, to see where it stands against them. But on its own this Note 10 Pro has a good set of cameras. If you guys want to see me compare its cameras with other phones, make sure you have turned on the notifications for the channel. What do you guys think about the cameras on this phone? Let me know in the comments. I am trying to get my hands on the Redmi Note 10 Pro Max, so I can how big of a difference there is, between their main cameras.
If you want to see that video happen, make sure to let me know by hitting that like button. And if you are looking to purchase it, I will really appreciate if you get it from the affiliate links in the description section. That is it for this video guys. Please hit the like button if you enjoyed this video, and subscribe to the channel for more quality tech videos like this. You can also check out some of the other videos from this channel.
This has been Sagar and i’ll catch you guys in the next video take care.
Source : TecworkZ
Phones In This Article


Related Articles


Comments are disabled
Latest Articles


