realme 8 Pro - Setup and First Impressions (+ camera samples) By Tech Travel Geeks
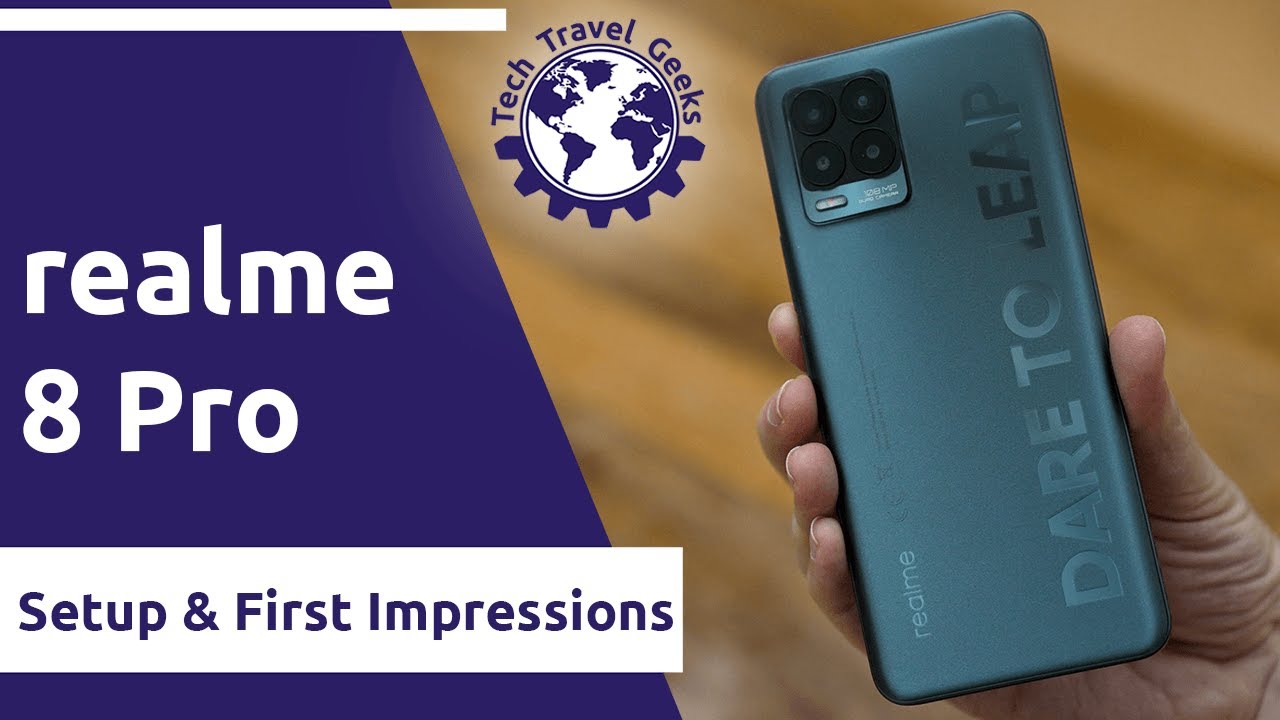
Hi there it's Lukas for the tech, travel geeks, and today I'll be going through the setup experience and the software of the realm 8 pro, and I'll be sharing my first impressions about the device. I've just unboxed it on our channel. So if you haven't already make sure to subscribe to be notified about future videos from us for the setup I'll be using my 3 UK sim card, as well as a SanDisk micros card in case, I run out of storage I'll also be using the sim ejector tool which came with the device, but you can use any you might have, or even a paper clip. It's really up to you. The sim card slot is located on the left hand, side of the device towards the top. It actually supports dual sim and the micro SD card, so you can use all three at the same time, which is fantastic I'll start by installing the SD card on the left side of the tray and well since the slots are not signed.
I installed the sim card in the middle. Spoiler alert turns out that slot 2, oh well. We can now just slide it in face up and switch the device on for the first time, as mentioned in the unboxing video. This is an AMOLED screen and having been using it for a day at the time of writing, I'm quite happy with it so far, including viewing it in bright daylight. The first choice we get during the phone setup is the language.
Interestingly, before I put the sim card in it pre-selected English, United States, but now it correctly recognizes that I'm in the United Kingdom then there's the usual user agreement which goes on for pages. Let's say for the record that I read it all: there's some more user agreement stuff next, including sharing information with realm. You can either agree or not. With those points I decided to skip them. The next question is about using mobile data and yes I'll, be using it later and have lots of data allowance.
So let's go with it and well. It turns out that, no matter how many of those phone setups I complete, I always forget to bring the Wi-Fi password with me, so I had to jump out and get it when you set your phone up, make sure you have it handy, there's a custom Wi-Fi assistant function, but since I spent most of my time recently just using the home Wi-Fi, I skipped it for now. Next, you have an option to either copy apps and data from another device or start fresh. Since I install rather random apps during my phone reviews, I always like to start from scratch to not copy everything each time. However, if you have your old phone handy, you might want to go with this option as it should be faster than starting from zero.
In the meantime, the phone did some software checks to see if I'm on the latest version. Next stop is to sign in into the Google account which is always recommended if you're using an android phone I'll sign in which will actually copy most of my device settings and even some passwords stored in Google's password manager through chrome. Since I have two-factor authentication enabled, I also had to use a different device to confirm. It's really me. Interestingly, I currently have eight devices active, which is getting quite crazy either way, I'm in thanks to my trusted, Huawei P30 Pro there's some more google terms of service, as well as a choice to back up to my Google Drive, use device location, allow Wi-Fi scanning and send usage diagnostics to google.
I skipped the last option, but I'm fine with the others. Next, there's a screen, that's specific to Europe, including the United Kingdom. We get the choice of the default search provider between privacy, wall, google, info. com and Microsoft Bing. I chose to google as that's what I've been using forever now, and I'm quite happy with it at this time.
You can skip the rest of the setup or continue, but I'll go on. Interestingly, I've gone through this setup quite a lot recently, but this time google decided that it needs a new sample of my voice for its assistant. Luckily, the only thing I had to do is to say one phrase three times, so it took no time at all once that was done. I could add another email account which I skipped for now or to pick a wallpaper. I decided to check realm's live wallpapers and picked one of the aurora ones, both for the wallpaper and the lock screen, we'll have to see if I get bored with it and get back to a static wallpaper later we're now getting close to the end, and it's the security setup, you can go with a password fingerprint or face unlock.
Furthermore, I started with the fingerprint, but before that I still had to add a 6 character. Pin once that was done, I had to teach the in-screen fingerprint scanner. My fingerprints, the sensor, seemed to recognize most of my touches, and it took 40 seconds in total. For now, I have a bit of mixed feelings about it. After using the phone for around a day as it didn't always recognize my fingers, I think I'll have to add a few other fingers and res can this one to see if it works better in the future.
Next I was asked if I'd like the device to update automatically overnight, which I think is a good option since I always update either straight away or the same night, and the very last question I promised was if I'd like to import data from the old phone, but I skipped it again and that's it we're all set up. We can see the Realme UI, 2.0, splash screen, and finally we're in with the live wallpaper and all excellent. Let's see what we have here, then I'm really glad to see that the phone has app drawer enabled by default. So you can see all the apps installed straight away. Luckily, there aren't too many pre-installed apps here.
Most of them are from Google like YouTube and YouTube music drive, google, one or less common ones like podcasts or keep notes. Luckily, if you want, you can uninstall them yourselves. What's even better is that there are no random games that you'll never play and that the only major app I noticed was Facebook. But then again you can uninstall it easily. If you don't want to use it.
There are a few reais me tools like audio recorder, compass calculator, clone phone screen lock and the weather, but all of them seem quite reasonable. For example, the calculator has not only the scientific mode but also a live exchange rate converter and the unit converter, if you're as confused as me about ounces pounds or stones overall, I'd say that if you like the device to come quite clean without too many unwanted apps, you should be quite happy. There's also the game space app, which is a game launcher and optimizer available on OnePlus and other devices. It tries to automatically recognize games. You have installed in my case it recognized 4 out of 6 games.
I installed plus the epic store, but you can add any missing ones manually. The app then helps to optimize the phone's performance, and you can also block any incoming notifications and phone calls to not get you out of your zone when playing some Call of Duty, mobile or Fortnite speaking of performance. I recharged the battery before filming this video and as advertised the super dart charger was really fast it charged from around 52 to 92 percent in around 20 minutes, so I was able to top it up quite quickly before my hike today, while we're here, I can also switch to dark mode since it's an AMOLED screen. This should save some battery life while being better for my eyes, a win-win speaking of the screen. It's also possible to adjust the color mode, either brilliant vivid or gentle vivid is the default with some richer colors, but I'll keep it on.
Since it's what the manufacturer suggests and since I like some vibrant colors as well, let's check for any software updates just in case there's nothing new, but I can see that the latest update made some changes to the camera performance as we'll discuss in a moment. I hope they released another fix soon when it comes to security as of 6th of April, I'm on the February update. So let's hope we get the march update soon. Ok, let's check one of my favorite screens on any device. The about phone screen.
I got spoiled by Xiaomi's mini, but this one is also good, showing even more information about the phone from software version, the processor storage memory to sim statuses. I like the Wii icons as well good job real me. Furthermore, I also added the face unlock on my first run after inputting my pen, the process took literally no time, so that's great. Furthermore, I also enabled the auto Brighton screen for facial recognition as it might help in darker situations. Finally, I had a look into the camera up before my heel.
Walk later that day, as mentioned in the unboxing, the phone has a quad camera setup with the main 108 megapixel shooter, an ultrawide, a macro and a depth sensor. The photos from the heel work came out quite nice. Overall, I took the photos with the main camera in the default 12 megapixel mode and the results in bright daylight were quite nice and with a lot of detail, you can also use the AI mode to enhance the colors and make it more vivid, as you can see, with those photos of this lovely waterfall. It's entirely up to you, though, depending on your preferences. There's also a three times zoom option, which apparently takes eight 12 megapixel photos and combines them to cropping without any loss of quality.
It's useful. If you want to see more detail of a waterfall or need to see some lamps in more detail, aren't they the cutest, the portrait photos seem good and the subject's separation is fine as well. I like the photos from the ultrawide lens. It allows to capture much more of the frame and the details are still there at 8 megapixels, so I'm really happy with it. So far, unfortunately, most of my macro shots didn't come out too well using the 2 megapixel camera, but that's the case with most 2 megapixel macro lenses.
I also found one software issue of the selfie camera. While I was able to take a nice selfie near a waterfall in normal mode, all the portrait mode selfies came out just as green files with no information. Interestingly, it even kept the watermark. In one case, it looks like a software issue, as I read online that I'm not the only person having this problem actually future workers here. The issue stopped happening.
Two days later and I managed to take some portrait selfies without the green issue, so it's all good. Now, interestingly, I didn't get a software update, so I'm not entirely sure what happened there. So what are my initial thoughts about the software and user experience of the realm 8 pro so far? I'm quite intrigued. The AMOLED screen is definitely a plus. The overall experience is smooth.
The camera performance is good thanks to the great Samsung hm2 sensor, and the charging speed is excellent, I'll, be evaluating other aspects like performance and battery life in the near future, so make sure to subscribe to the tech travel geeks to get notified. When we release more videos about the realm 8 pro you can also let us know in the comments below about what other devices you'd like this phone to be compared to or what to focus on for the review, as it would be really helpful for us. But for now, thanks for watching you.
Source : Tech Travel Geeks
Phones In This Article

Related Articles
![Xiaomi Mi Mix 4: All You Need to Know, Real PPT Leaks!! [English]](https://img.youtube.com/vi/s-9NY6VLZfE/maxresdefault.jpg )

Comments are disabled
Latest Articles


