Pixel 2 Teardown! - Its actually kinda cool... By JerryRigEverything
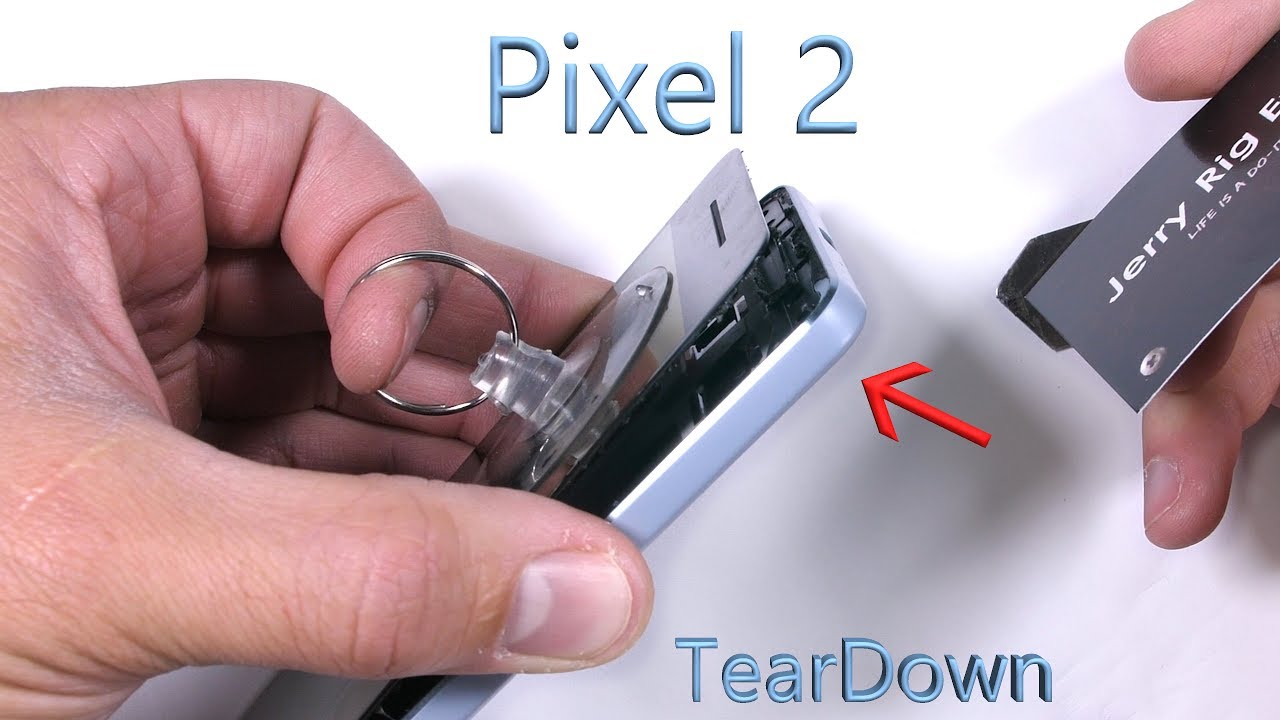
This particular Pixel has had a rough day, and it's not quite over yet. It's time for a tear down and a review from the inside. Let's see how repairable the Pixel really is. The Pixel 2 screen repair is very similar to the original Pixel from last year, and refreshingly easy compared to other flagships these days. A large suction cup is always helpful with phones that are glued shut. There's not a whole lot of glue under this glass this time around.
I was able to lift up and slide my pry tool under the glass without any heat, but it still felt incredibly tight and I was nervous about using too much force. A heat gun softens the adhesive under the screen, making it easier to lift off. Sliding my pry tool around the edge of the glass, taking special care not to touch the display under that glass layer – which is more fragile than a potato chip, and it will crack if the metal touches it. Now, if your screen is already cracked, you won't have to be as careful as I am. I just want mine to stay in one piece.
I use a thin little business card to keep the screen from re-adhering back down to the frame. The waterproofing around the dual speakers is pretty thick. Now that the screen is off we can see that there's only one ribbon cable holding the screen to the body of the phone. I would say the two most important things to remember during this screen removal process is to not bend or put too much pressure on the glass, and not not damage the ribbon cable along that bottom of the display as you're cutting through the adhesive. It's as fragile as paper.
I'll fold the screen over gently and unscrew the two T5 screws holding the silver bracket over the screen plug. It's a pretty tight connection, but it will unsnap just like a little Lego, allowing us to remove the screen and get a look at the 12 screws holding the mid-frame to the phone. Keep these screws organized and put them back in the holes they come from. All of them are normal Phillips head screws except for the little guy up in the top corner – that's another T5. I'll have the tool kits and parts linked in the video description.
There's also one little sliver of silver grounding the top under that camera. Remember this little guy for later during the reassembly. And now we can lift the whole mid-frame up and away from the phone, exposing all of the internal components. First thing we always do is unsnap the battery. The battery replacement itself is surprisingly easy.
I'll unplug the charging port ribbon cable and the volume ribbon so it won't get caught as I pull up the battery. Taking special care not to puncture the battery, I can take the flat end of my metal pry tool and pop it out gently on both sides. There is some adhesive, but it doesn't have a death grip on the battery like we've seen inside some other phones. It's a nice change and I prefer it this way. Thumbs up to Google for the easy screen and battery replacements.
This is a repair guy's dream. The battery is a 2700 milliamp and I'll leave the replacements linked in the description. The phone does have the same squeezing functions that we saw on the HTC U11 – grip the sides and activate the Google Assistant. Kind of a cool feature if you plan on using it. The grip sensors are down along the bottom half of the phone, so gripping down here will achieve the best results.
You can check out the HTC U11 video for a more detailed look at these grip sensors. I'm going to leave them intact on the phone this time around. It's time for the charging port. The port has one screw holding the board in place with two circular connected signal wires that need to be unplugged and detangled. And then the whole thing can pop up away from the phone body, revealing something surprisingly cool.
Google took an extra step towards water-resistance that I've never seen before. They added some kind of dielectric grease to the rubber ring around the charging port. This is the same stuff used to waterproof the electronic connections in a Jeep or other off-roading vehicle, and the same thing we saw in the underwater drone that I reviewed a few weeks ago. Pretty interesting stuff, and surprising to see inside of a cell phone. I'm impressed.
The rectangular vibrations motor has some adhesive holding it to the frame, which is smart. The bottom loud speaker is different than the top loud speaker and has the same style of connection that we saw inside my clear Nintendo Switch video. The little microphone on the other side has a little rubber boot around the edge that sits up tight against the white water-resistant screen, sitting over the hole next to the charging port. That helps keep water out. Jumping over there to the top of the phone we have the motherboard and the SIM card tray that needs to come out.
No expandable memory on the Pixel 2, but Google does offer unlimited storage until the year 2020. After that you'll still get to keep what you uploaded, but anything new you'll either have to pay for or it gets compressed into a lower format. I took out one screw along the right side of the motherboard, and another screw by the metal tape that I told you to remember earlier. And then the whole motherboard can lift up and away from the frame... still held in place by the fingerprint scanner ribbon with some yellow tape over the top.
I'll remove that tape and unsnap the ribbon. Then the motherboard is free for us to explore. The 8 megapixel front facing camera does not have OIS, and that's fine. Most smartphones don't on the front camera. But the back camera on the other side of the phone does.
You can see how it moves around inside of it's housing to stabilize the image. This can also be replaced and unsnaps just like a little Lego. It reconnects in the same way. Just make sure that little tab thing on the left side of the lens is under the motherboard, otherwise it won't sit back down at the right angle. Pulling down the copper shielding from the fingerprint scanner.
The scanner itself is glued very securely to the back housing. It has it's own layer of water-resistance, but I can't push it through from the back side, so replacements are an option if the software allows it. Also, keep in mind that opening up your phone, even for a basic screen replacement, ruins any water-resistance it might have had before. I'll fold the copper shielding back over the home button so it doesn't interfere with the motherboard, and I'll set the motherboard down into the frame so I can plug in the fingerprint scanner to the back. And then I'll lay it down into the phone, taking special care not to get any ribbons caught underneath.
There are 2 screws on the right and left sides of the motherboard. And then I'll snap in the bottom 2 squeeze sensing ribbons. Each of them have their own Lego style connector that plugs into the motherboard. The charging port is next with its dielectric grease, going back into the charging port slot. And getting the vibration motor and loudspeaker back in their own correct positions on the frame.
The one little screw next to the vibration motor on the board will hold it all in place for now. The white signal wire needs to be plugged in and then rerouted through the plastic that holds it in place. The black signal wire as well; plug it in first and then tuck it in the lines where it belongs. The battery goes in place next. I'm just reusing the same gentle adhesive that was holding it in place the first time around.
Then I'll plug in the volume and power buttons, as well as the charging port extension ribbon that comes up from the bottom of the phone over the battery. And lastly, the battery itself gets plugged into the motherboard. There's one little sensor array attached to the mid-frame that needs to come off. I'll push that off the frame with my tweezers and then plug it into the motherboard first, leaving the little niblet standing straight up and down so it can adhere to the mid-frame again after I set it down into the phone. Now that the mid-frame is in place, I will snap it into the lower frame.
There will be 12 additional screws sandwiching everything together in one solid piece. There are also two metallic grounding tape straps at the top and top left of the phone. The phone is probably fine without it if you don't wrap them around and touch the frame, but if you're actually going to use your phone, or doing this for a customer, make sure you get those back in place just in case. The replacement screens will probably come with their own adhesive, but if not, simple double-sided tape will do just fine. I'll have some linked in the video description, along with some of the other replacement parts.
The screen with it's silver bracket, and two screws is back into place. And it's good as new... mostly. Ok, not really, but at least it still works. Let me know if you have any questions down in the comments, and come hang out with me on Twitter – we have a pretty good time.
Thanks a ton for watching, and I'll see you around.
Source : JerryRigEverything
Phones In This Article


Related Articles


![Mystic Green - Samsung Galaxy Note 20 5G - T-Mobile [US] - Unboxing, Specs, and WHY I ordered it.](https://img.youtube.com/vi/EKQCxkMv_yU/maxresdefault.jpg )


Comments are disabled
Latest Articles


