Lenovo 11S Motherboard/Battery Replacement & Repair By Tech Tree
Hey guys welcome to the channel today we'll be focusing on the repair of a Lenovo 11's. This is a 2014 model. What used to be a pretty popular Ultrabook? So basically the problem is it's not turning on anymore, and we've gone through a little Diagnostics, and it seems like the motherboard is basically fried. So what we're going to do today is we'll be thrown out the old motherboard, putting in a new one. This new motherboard was bought on eBay for about a hundred and ten dollars, and we thought, while we're doing that, might as well change out the battery as that's starting to become an issue as well, and that was gotten off of eBay for about $40. So when you're looking for this motherboard on eBay, what you want to do is look for this specific model, number IdeaPad, yoga, 11 s and then make sure it's two zero, two four six and then that it says I 540 to ten, why the processor has to match what you previously already had on your laptop.
So we're going to go with this one. Another way to confirm that this is the right one is to make sure that on the die here, where the processor sits, that you see two separate chips, that's one of the defining features for this motherboard. This is the top of the motherboard and then the bottom of the motherboard make sure it's advertised as a functioning board and then, in terms of the battery, this is what I was able to find on eBay here's the model number for that, and you should be able to find this for around thirty to forty dollars. So first thing we're going to do is we're going to remove the 10 screws on the bottom. You'll need a t5 screwdriver to do this now for this one, we're already missing two screws, so we'll just remove the remaining 8 alright.
So after we've removed those 8 or in your case 10 screws, we will remove the rubber pads here on the bottom. Just these two should just come off like that, and then we'll have two Phillips screws here. You can see that now, after we've removed all those screws. Next thing we'll do is we'll flip. The laptop over open it up now using a Flathead, you will pry off the keyboard, should just pop out now.
You'll have a ribbon cable here and what you'll do here is just pop it out. Then it should just flip well, so now we can remove the keyboard set. That aside, the next two screws you want to remove are these two, but before we do, we'll be removing three more ribbon cables. So this one over here flip that black part up slip. The cable out do the same for this one, and then this one over here just like that, and then we'll be removing these two screws.
One of them will be underneath a sticker. All you need to do is peel that off, and then you can unscrew them. You'll need a Phillips for this. So now the next thing we're going to do is remove this entire black plate. To do that, we're going to fold the screen all the way back like so, and then we'll pry this off again using our flat-head screwdriver.
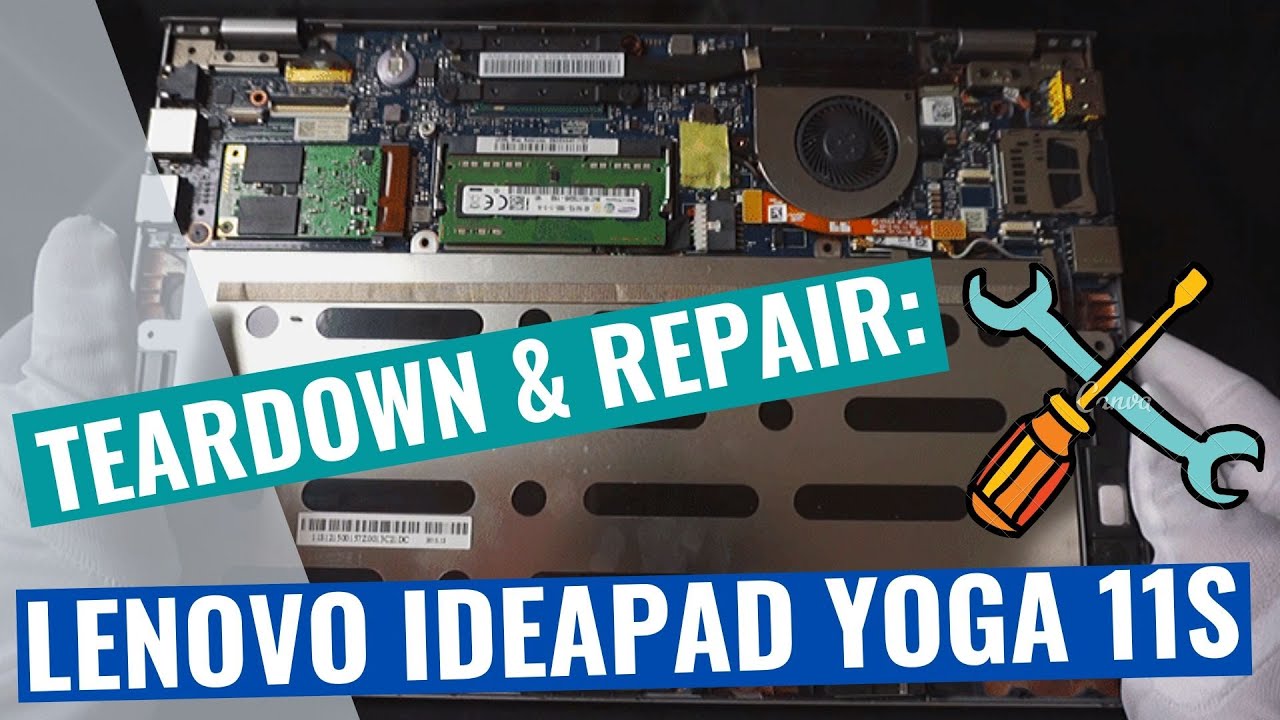
So you can pry it off at the corners here should come right up. Do that along the entire edge here there we go we'll put that aside. So what we have here is down here is the entire battery actually takes up most of the space inside and then this top portion here is the actual motherboard itself which we will be replacing. What we have here is the memory in this case about 4 gigs and then up here we have the mSATA SSD, which we will be keeping as well, so both these we will be removing from the board and placing onto our new board all right next thing. We're going to do is remove the battery so to do that, we're going to remove the memory first set that aside, then we'll unplug, this cable like so, and then we'll lift the battery set.
That aside next thing, we're going to do is remove the mSATA SSD and to do that, we're going to remove this Philips screw first, and then we're just going to lift it like. So then it should slide out we'll set that aside. So the next thing we're going to do is remove the LCD screen, and we'll do that by removing four screws by the hinges for this you'll need a Phillips, then you'll want to unplug two cables, this one being. The first will lift and peel off the sticker for now, and then we'll unplug, this cable and then unplug this one as well, so we'll lift the sticker off. You look back just enough unplug, the cable just like that and then remove the screen, and then we'll set this aside next thing, we're going to be doing is removing the heat sink and cooling fan and that will require moving, removing one two three and four Phillips screws, and then we'll lift this piece of tape here and remove the fan connector slowly slide it out to the right like so, and then we're gently gonna, lift this up starting here from the CPU, and the whole thing should come right off next thing.
We're going to do is disconnect some connectors here, starting with these here. These just pop up like that, and then you have another connector down here. This should slowly slide out like that, and then you have this screw here. This will be one of the two screws left holding down this motherboard, so you'll need a Phillips for that. The next thing is to disconnect the power connector, which is up here.
So you want to be gentle with this power connector when you remove it, it removes upward, so don't pull it out, make sure you pry it upward a bit, and it should slide off its pins. Next, we'll remove this small connector here like so, and then we'll remove this final screw, keeping the motherboard down, and then we'll pull out the motherboard, and now we'll begin the process of putting in the new motherboard and battery. Now, assuming your new motherboard doesn't come with these components here for the Wi-Fi they're going to have to remove this orange cable and also this chip here, which is just on there with an adhesive, so we're going to remove that now the cable itself should just pop off, and now we'll have to remove this chip here so to remove this chip from the adhesive. We're going to have to be a little careful and try to use a knife or a box cutter we're going to get underneath that he is severe once you get underneath the adhesive with your knife, just slowly, peel it away like so, and now you have your chip removed, how this will go on the adhesive of the new board in the same spot. So once you put the Wi-Fi chip back on onto the adhesive and then hook up, this ribbon cable, now you're ready to put the board back into the chassis.
So then we'll plug in these cables. Once you plug in these two connectors here and then this third one back here underneath these wires, you want to go on your left side of your board, and then you want to plug in this guy as well. So in preparation for the next step, in which we will be installing back on the heat sink and fan you'll need to make sure you have some thermal paste, something like this and then on. The fan itself. You'll have to remove any of the remaining old thermal paste and to do that, we're going to be using just regular alcoholic pad to do the removal with okay and once you get most of the thermal paste off.
It looks something like this, and we can continue on to the next step. So you want to take your thermal paste that you have, and we're just going to put a small dab on each one of these chips. Here, that's kind of a mess, but something like that, maybe ideally a little less well we'll go with that. Now, we'll screw these down using the four screws we removed. Next, we will be reconnecting the power cable over here.
Once you connect your power connectors, it should look something like this. Remember you drop them in from the top. They don't slide in horizontally, so make sure you do that correctly, once the four screws for the hinges are put in, then we could start plugging in both these connectors. Once we put back in the connectors for the screen here- and here next thing you want to do- is lay down the tape for the fan here. First, you want to plug that in, and then we'll put the tape back so make sure you plug that connector back in so next thing we're going to do is put in the new battery next we'll put in the RAM, and then we'll put in the SSD and make sure to put back in the screw for the SSD.
Now we can snap on the baseplate once you have the baseplate on that. The next thing we're going to do is to make sure to plug back in the three ribbon cables. It's this one and then these two as well. Next, you want to screw in these two screws. Next to the RAM chip.
Next, we're going to put in the keyboard make sure to plug in its ribbon cable over here. You want to make sure you slide it in from the bottom first and then push down the top part, so the final step will be putting in the screws on the back, we'll start off with the black screws that go underneath rubber pads all right. So now we'll turn this laptop over and make sure everything works and there you go looks like laptop is functioning again, so that was how to fix a Lenovo 11 s laptop thanks for watching.
Source : Tech Tree
Phones In This Article
Related Articles


Comments are disabled
Latest Articles


