iPhone XS Max Battery replacement By How-FixIT
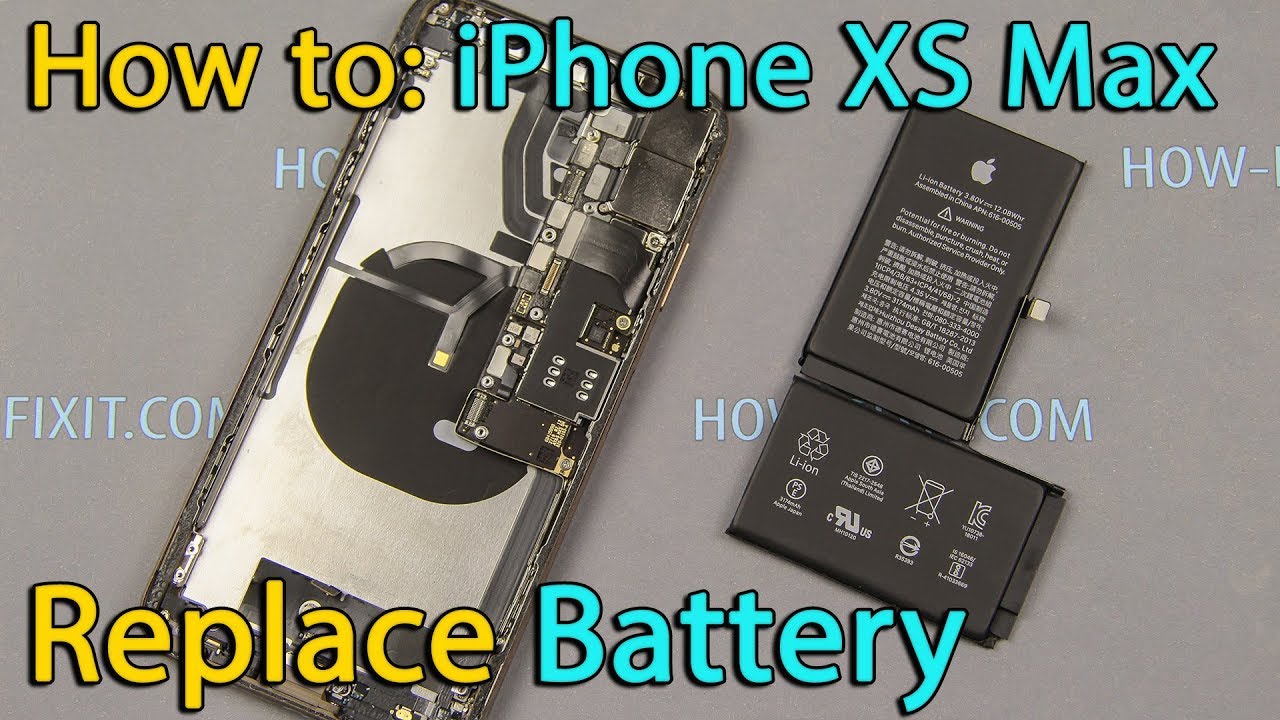
Hello everyone, today I show you how to disassemble iPhone XS Max and replace the battery To disassemble the iPhone XS Max you need the following tools: Screwdriver set Tweezers Opening plastic tool Plastic mediator Suction cup for removing display Before disassembling, turn off the iPhone and remove the sim card tray. Unscrew two screws near the lightning port. Display glued around perimeter of iPhone and we need to heat the surface of iPhone for open it. Apply the suction cup to the bottom edge of the display and pull up on the ring. Next, push the plastic mediator between the display and iPhone case. From this position, evenly and slowly, open the display around the perimeter of iPhone.
The iPhone case opens like a book; the display opens to the right side. Next, using a Tri-Wing screwdriver, unscrew the 4 screws and remove the metal panel. Disconnect the battery cable from the mainboard. Unscrew the 3 screws and remove the second metal panel. Disconnect 2 cables of the display from the mainboard.
For replacing battery on iPhone XS Max, we need to remove Taptic Engine and speaker. By using Tri-Wing screwdriver unscrew 6 screws. Unscrew 3 more screws, using Phillips PH00 screwdriver. Using flat screwdriver, unscrew 2 screws. Disconnect the cable located under the metal bracket.
Now we can remove Taptic Engine and speaker from iPhone case. Slowly pull one adhesive tape away from the battery. In the same order repeat with the other three adhesive tapes. If one of adhesive tape is torn - using a hair dryer, heat the rear case, directly over the battery. Next, use a plastic card to break up any remaining adhesive behind the battery.
In the description of this video, I left a link where you can buy a new battery. On new battery, apply the adhesive tape and install the battery in housing of iPhone. The battery should be glue to the metal surface of the iPhone case. Connect the cable and install the Taptic Engine and speaker in iPhone case. Set the metal bracket between Taptic Engine and speaker.
Connect the cable and fasten screw. Screw another similar screw to the speaker. Install the antenna module and fasten 5 screws. Fasten the one screw on metal bracket. Fasten one screw on speaker and two screws on Taptic Engine.
Now you can install the display and test how phone works before final assembly with gluing the iPhone case. Connect 3 cables from the display module and only after that connect the battery cable to the mainboard. Turn on the iPhone and install the sim card. Let’s test how everything works, and if it works well, let's go to the final assembly with gluing the iPhone case. Remove the old adhesive tape from the iPhone case.
After, using medicine alcohol wipe the surface of iPhone case and display module. Now, take new adhesive tape and apply to the case. With this tape, you save waterproof resistance of the iPhone. I left link where you can buy this adhesive tape in description. You can install the display without adhesive tape, but you will lose waterproof resistance.
Connect 3 cables from the display to mainboard. Set metal panel and fasten 3 screws. After, connect battery cable to the mainboard. Set metal panel and fasten 4 screws. Now, close the iPhone case... and press down the display around the perimeter.
Fasten the two screws near the lightning port. Now you can turn on the iPhone XS Max and use it.
Source : How-FixIT
Phones In This Article

Related Articles


![Top 10 BEST Gaming Setup Accessories UNDER $10! 🎮 Best BUDGET Gaming Equipment For YOUTUBERS! [2020]](https://img.youtube.com/vi/d68DzSWwsOM/maxresdefault.jpg )

![Xiaomi Mi note 10 Lite Review in Late 2020 [TAGALOG]](https://img.youtube.com/vi/uWIinIITegs/maxresdefault.jpg )


Comments are disabled
Latest Articles


