iPhone XS Max Battery Replacement and Reassembly! By iFixit
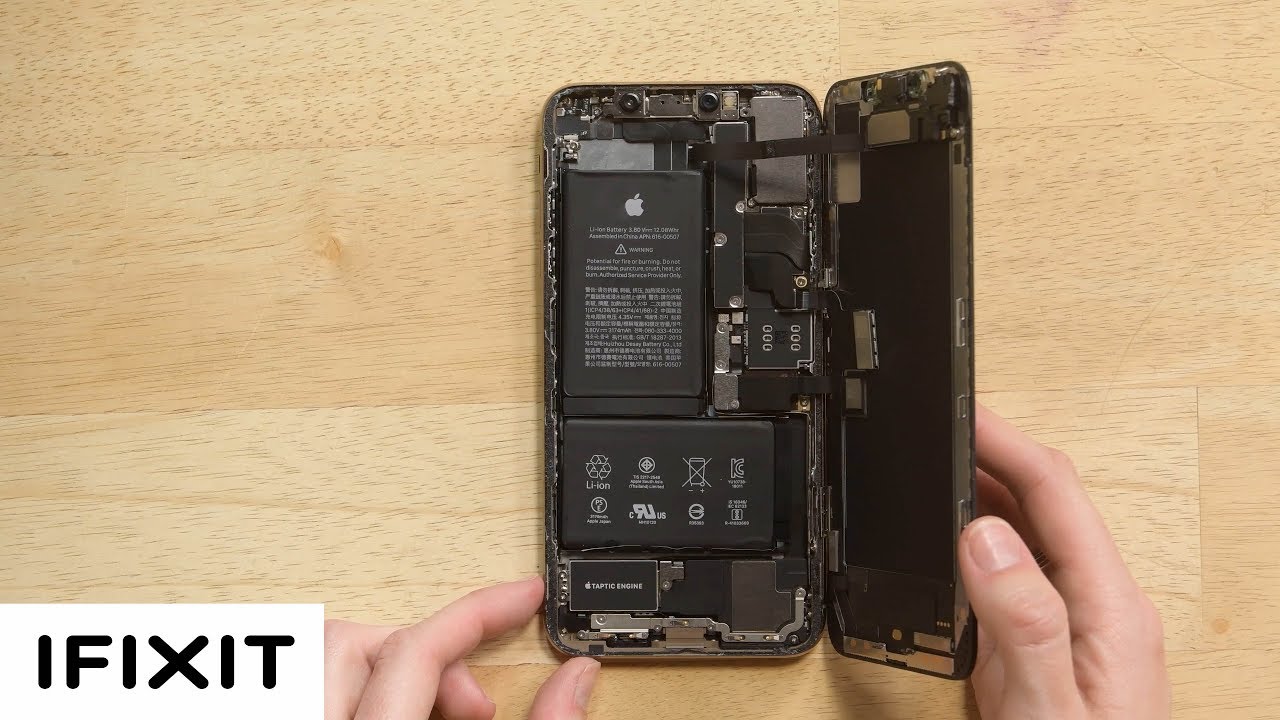
Batteries are disposable, but your thousand dollar iPhone is not, which is why today I'm going to show you how to replace the battery in your iPhone 10s max for safety be sure to drain your battery below 25%. For this repair, you're going to need a P two pantalone screwdriver, a tripping Y, triple zero driver, a spider tweezers, an eye-opener isopropyl alcohol, a suction handle and opening fix. We also recommend using a magnetic mat for this repair. It'll, keep your screws organized and safe from rolling away start by removing the two pantalone screws at the bottom of the phone near the charging port. Then heat your eye, opener up and lay it across the iPhone at the bottom grab your section handle and press it on the area. You just heated, lift on the suction handle and insert your pic and work it around the phone.
Try not to insert the pic too far, because you could damage cables once you've released. All the adhesive lift the display to the right slowly. You still have cables connected to the logic board. To disconnect the battery, you must first remove the top bracket unscrew. Four TRI wing screws and then remove the bracket disconnect the cable that leads to the battery first and then remove the three screws and the smaller bracket below the battery connector disconnect the display cables and be careful with the sensor assembly cable, as it's slightly adhered with, the cables disconnected the display is now free, remove the three screws on the tactic engine, but be careful with the ground on the left side.
You don't want to lose this piece because you'll need it. When you reassemble your phone grab, your tweezers and remove the plate covering the connector make sure the plate is flat and pushed towards the battery to release it once the plate is off, go ahead and disconnect the cable under it right below that connector is a standoff screw. Remove that next there's a bracket near the Lightning port being held down by five screws once those screws are out, you can lift and remove the bracket to the right of the speaker. Remove one stand-off screw and one Phillips screw use a spider to lift the speaker on the right side. While lifting carefully D route, the cable you disconnected near the tactic engine use some tweezers to unstick all for the adhesive tabs.
Once that's done, grab some isopropyl alcohol and squirt a little of it into the phone under the battery. Wait a minute for the adhesive to soften, and the tab should come out with ease use your tweezers to grab the tabs and roll the adhesive out once you've removed. All the adhesive strips the battery should be free to reassemble. Your phone you'll need to apply some brand-new adhesive to both your battery and the display. Thankfully, we have videos on how to do both once you have your new battery set in place, go ahead and insert your speaker and the tactic engine.
There's a cable under the tactic engine that you need to reconnect, go ahead and connect the cable on the speaker and screw the speaker back on next screw. The brackets back in place be sure to place the ground on the tactic engine correctly before screwing it down next grab your display and connect the display connectors make sure you connect the battery last everything all connected, go ahead and screw back on all the plates and close up your phone as you close up your phone, make sure not to pinch any cables and don't forget to screw back in your pantalone screws. That's all for this repair be sure to hit like and subscribe to check out. All of our awesome, teardown and repaired videos see you next time.
Source : iFixit
Phones In This Article

Related Articles


![[Chanel News] Google pixel 2 and pixel 2 xl to be available for pre-order on flipkart from 26 octob](https://img.youtube.com/vi/57p2acIiBUQ/maxresdefault.jpg )


Comments are disabled
Latest Articles


