iPhone 7 Lightning Connector Replacement- How To By iFixit
Hey everyone Kelsey heroes, I fix it messing with all those dongles has probably screwed up your lightning connector, but who saw that coming? We did we're going to show you how to replace that lightning connector in your iPhone 7, so this repair you're going to need a p2 pantalone screwdriver, an eye-opener, a suction cup, a spider, some Isaacs opening pics a TRI point wide triple-zero screwdriver, some tweezers, a Phillips double zero drivers and a sim card eject tool. When you complete this repair yourself be sure to follow the step-by-step instructions on ifixit. com. Not only will you find helpful photos and detailed instructions. You'll also be able to read comments and suggestions from other users who have already completed the repair, which can be super helpful, especially if it's your first DIY sale, keep in mind that opening the iPhones display will compromise this waterproof seal once your repair is complete. You'll need to take extra care to avoid exposing your iPhone to liquid damage in the future.
As with any repair be sure, your phone is powered off before. Beginning then begin by removing the two pantalone screws on the bottom edge of the iPhone, with the screws out it's time to soften up the adhesive holding the screen in place detailed instructions on how to heat the eye-opener can be found over on the guide attach of suction cups, of the lower half of the display assembly. Just above the home button be sure the suction cup does not overlap the home button, as this will prevent a seal from forming between the suction cup and the front glass. Pull up on the suction cup to create a small gap between the display assembly in the rear case then grab your spider in insert the flattened into the gap slide to subject to the left along the lower edge of the iPhone. Now slide.
This ledger up the left side of the iPhone, starting at the lower edge and move towards the volume control buttons and silent switch. Now do the same thing, starting from the bottom right corner well upon the suction cup, to lift the display, but be careful not to raise the display more than two degrees go ahead and remove the suction cup and slide an opening pic along the top into the iPhone between the rear case and the front panel. While the display is definitely slightly away from the top edge of the phone disengage, the clips holding it to the rear case open the iPhone by swinging the display up from the left side, but don't try to fully separate it just yet their ribbon cable still connecting it to the logic board. Now we can use our driver to remove the four tripping screws from the lower connector bracket with the screws out of the way we can lift away the bracket now grab your slider and disconnect the battery connector embeds it away from the socket then use the flat end of the spider to pry the two lower display connector straight up from their sockets on the logic board. Moving to the top of the phone remove the two Phillips screws securing the sensor assembly bracket with the screws out of the way you can remove the bracket grab your sputter and disconnect the front panel sensor assembly from its socket and remove the display assembly next, take out the two Phillips screws to remove the barometric vent from the rear case and use the flat end of a spider to disconnect the tactic engine connector from a socket on the logic board.
Unscrew the three Phillips screws, securing the tactic engine to the rear case and take out the tactic engine, tackle the Phillips screws, securing the Wi-Fi diversity intended to the rear case and use the pointed end of a spider to lift the two antenna: cable connectors up off their sockets on the logic board. The speaker has three Phillips screws: securing it to the rear case. Remove the antenna cables from there clip on the speaker then use your tweezers to gently, lift the speaker off of the rear case, eject your SIM card and use the flat end of a spider to disconnect a rear-facing camera connector. Remove the two Phillips screws, securing the rear camera bracket to the rear case and then remove the bracket grab your smudge again to disconnect the camera. Flash cable connector then remove the two tripping screws holding the upper cable bracket in place, lift away the upper cable bracket and use the flat end of the spreader to disconnect the upper cable connector.
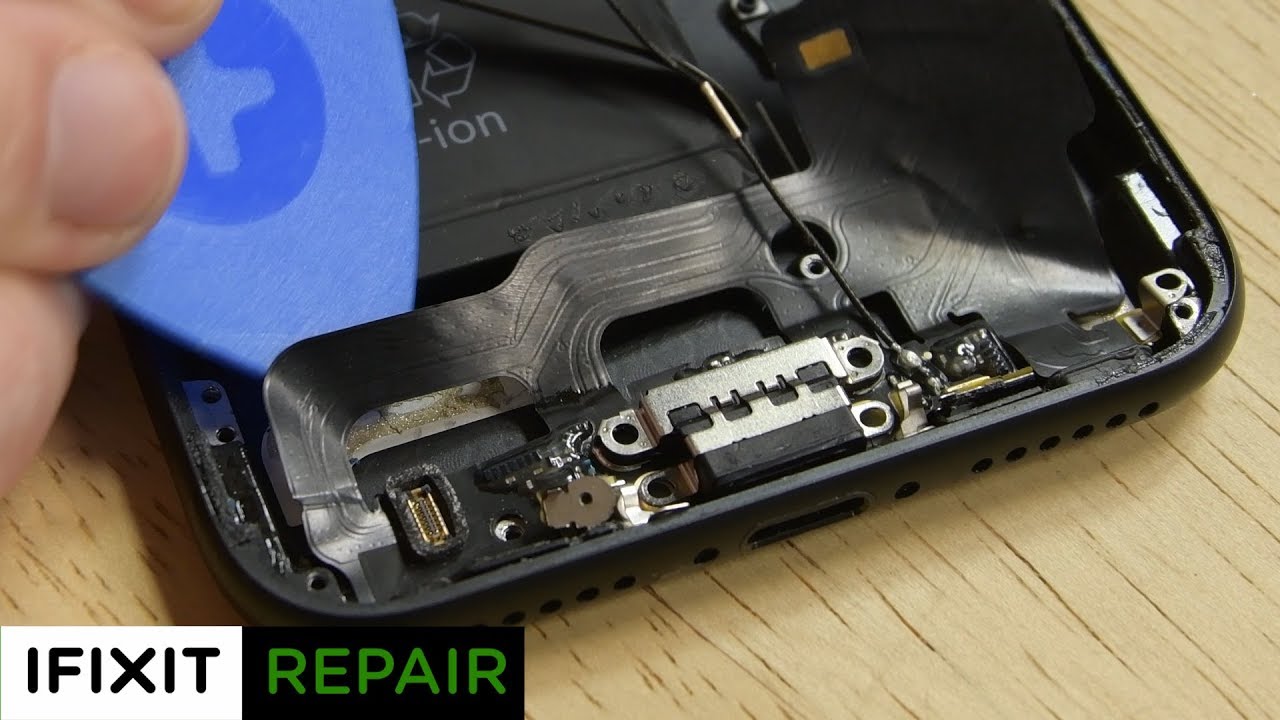
Remove the four Phillips screws securing the antenna and remove the top 11 antennas then take out two more Phillips screws to remove the bracket grab. Your standoffs did and remove the standoffs screw from the grounding bracket use tweezers to gently bend the logic board grounding bracket out of the way and use the point of a spider to disconnect the lower cable connector. Remove the four screws from the logic board then use the point of a spider to move the SIM card. Eject vendor out of the logic, works way, lift the battery connector end of the logic board up and pull it out of the rear case, remove the Phillips screw and the spring contacts of a lightning connector then remove the two screws securing the lightning connector cable in place. If you have a new phone, you might need to remove two stickers covering the screws that secure the lightning connector to the bottom of the root case then use the pointed end of a spider to separate the two microphones from the bottom of the rear case, heat up your eye-opener for 30 seconds and lay it over the lower edge of the phone starting from the middle of the phone slide and opening a pic towards the lightning connector to separate it from the rear tape.
Stop sliding the paper when it reaches the lightning and just like that gently pull the lightning connector out of its hole on the rear case. Now before you tackle this fix yourself, don't forget to check out the full length guide and get all the parts and tools you need at ifixit. com. We want to teach you how to fix all the things so don't forget to subscribe to our Channel and follow us on Instagram and Twitter. Add fixity and give us a like on Facebook at facebook.
com. Slash eye fixes, happy fixing.
Source : iFixit
Phones In This Article

Related Articles


Comments are disabled
Latest Articles


