iPhone 7 Front Camera Replacement By Save Apple Dollars
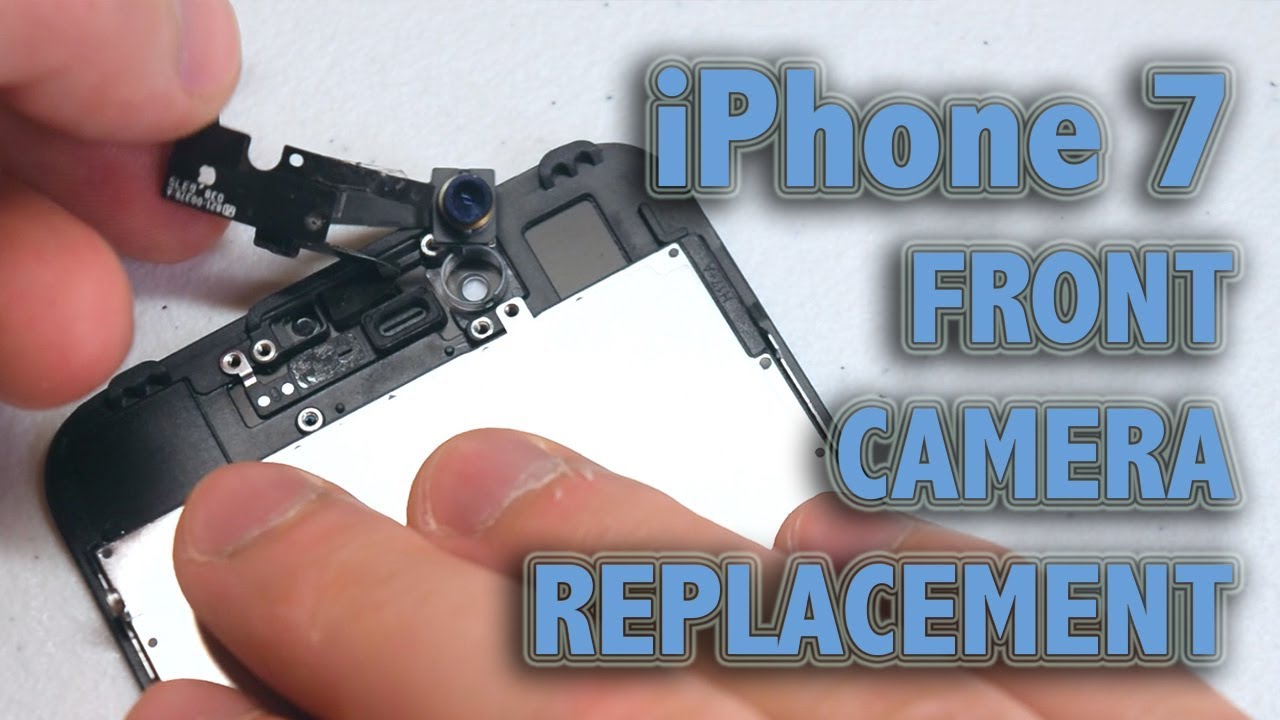
iPhone 7 front camera replacement, guide the tools, we're gonna, need our proprietary pantalone screwdriver at Philips, head double zero or a triple zero screwdriver, a Y tip, double or triple zero screwdriver, a suction cup for pulling the screen apart, as well as a plastic pick for prying the screen apart, a metallic prying tool for removing the adhesive that water proves the phone around the contour of the screen and a plastic spider for pulling the connections apart, make sure to turn off the iPhone before we begin now place the suction cup right above the home button. The screen will need to be slid down first and then flipped open, like a book, will close it like a book and slide it back in when we're done. Locate the two pantalone screws near the charging port that are holding the LCD to the phone chassis and go ahead and remove the two screws. Now insert your index finger into the suction cup and pinch the sides of your phone with your middle finger and your thumb then gently tug on your index finger. This will create a small crack now, a little to the left of the home button go ahead and slide in the plastic pick and start prying it apart. You might have some adhesive waterproof adhesive.
That makes it difficult to separate, go ahead and use the metallic prying tool to separate the adhesive in combination with the plastic tool, go ahead and start prying the LCD away from the phone once you get it going, go ahead and slide it down first and then open it up just like a book and that's it we're in now. Let's disconnect the LCD and the front-facing camera for the LCD and the digitizer we're going to need the Y double or triple zero screwdriver. If the shield is secured with four white tips, screws go ahead and remove those screws with those four screws removed, we can go ahead and lift the shield, and this will expose the two ribbon cable connections now, with the plastic prying tool go ahead and get underneath the ribbon, cable and pop it out. Here we pop out both cables at the same time go ahead and fold the screen over. Like you see here now, we're going to move the two Phillips head screws that are securing the shield that protects the ribbon cable that connects the camera to the phone, go ahead and remove those two Phillips head screws and remove the shield.
This will expose the camera ribbon, cable connection and just pry it out with your plastic tool. There we go. The screen is now okay. Let's remove the shield that guards the ear speaker in the camera go ahead and remove the three Phillips head screws that you see here. First, with those two big three screws removed, you can go ahead and lift the shield and move it over to the side.
Now, let's remove the two Phillips head: screws that are securing the ear speaker go ahead and remove the two Phillips head: screws, peel back the camera and the speaker should come right out. Here's what it looks like up close the camera can just be tucked over to the right and then and pry, underneath with your plastic prying tool, and the cable should come right out just like that. That's the first part now fold it up and the ambient sensor is still right. There go ahead and push that out gently and that's it. The camera is free.
Here's what it looks like up. Close reassembly begin, the front camera installation by first plugging in the ambient sensor into its little socket. Once that's pushed in, we can go ahead and fold the rest of the cable into its position. The part where the speaker plugs in there are two little guiding pins there. You can use a plastic tool to line that part of the cable right into those little guiding pins, make sure to align the speaker connection Springs, with the dots that you see on the camera.
Cable goes ahead, place the speaker in the following orientation and re, secure it with the two Phillips head screws go ahead and fold the camera over and tuck it into its socket. Now we can place the shield over the speaker in the camera and re secure it with the three Philips head screws. If you get the three folks head, screws mixed up, just remember the long one is the one that goes in the middle. This screen is now assembled and ready to get reconnected, align the screen with the phone and a book like orientation start off with reconnecting the camera and speaker ribbon. Cable first go ahead and align it in the following four Ian station is going to loop awkwardly, but that's how it goes right.
There I go ahead and click that into its socket now fold the screen over and place it on the side and now place the ribbon cable shield over the ribbon, cable and secure it. With the two Phillips head screws, the screws are identical, sighs it shouldn't be a problem now go ahead and fold. The screen back over to a book like orientation and tuck in the two ribbon cables for the digitizer in the LCD make sure that they click and firmly. And then you have a nice solid connection. Now go ahead and place the LCD shield cover over it and secure it with the four Y screws.
Okay, we're now ready to clamp up the phone go ahead and fold it and begin by tucking in the top latches in first ones. Those are locked in. We can go ahead and go gently around the contour of the phone, pushing it in and finishing up the clamp if you feel any resistance make sure to reseat. The screen now go around the contour. Make sure that it's a nice and solid lock and there are no gaps in between now go ahead and place.
The two pantalone screws into their sockets, you just place them in first align them and then secure them with a pantalone screwdriver with the pantalone screws, secure, go ahead and power on and test the phone. This concludes this tutorial. Thank you for watching, hit like and subscribe and check out more awesome videos at apple. com.
Source : Save Apple Dollars
Phones In This Article

Related Articles


Comments are disabled
Latest Articles


