iPad Pro 2020 tempered glass screen protector with alignment tool - by ESR By David Harry
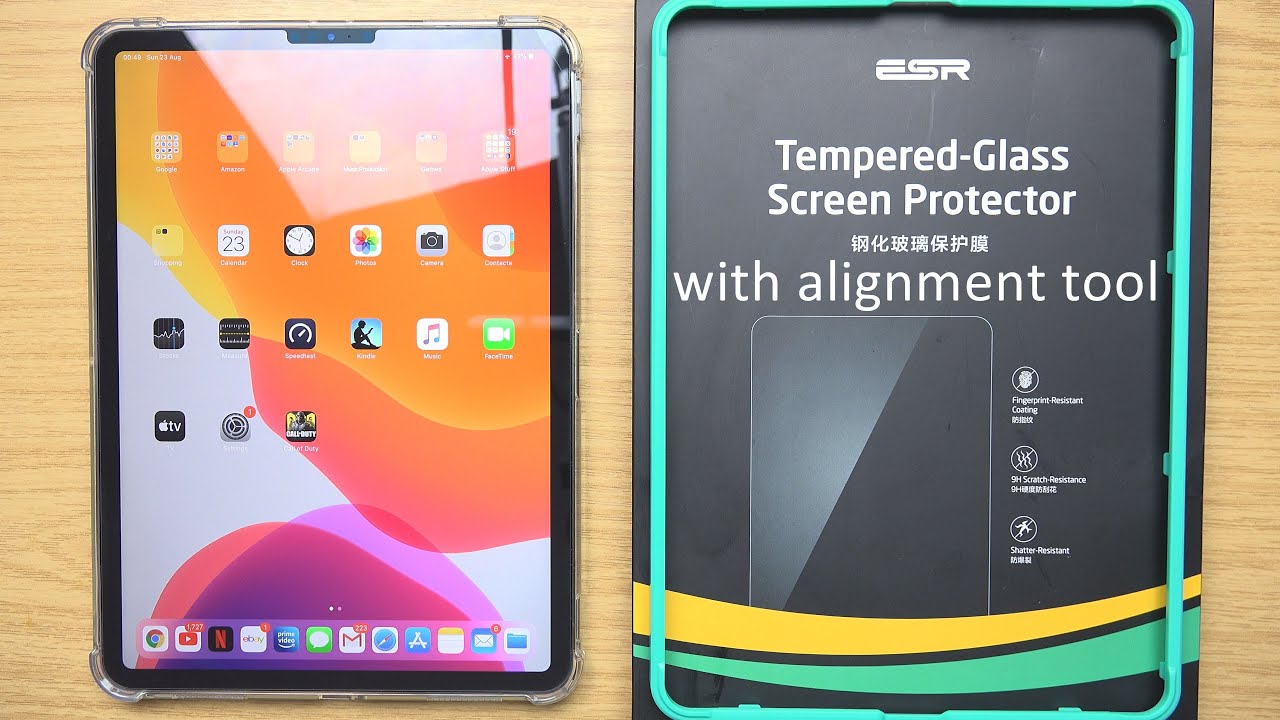
All right David harry here now in this video, I'm going to be applying a tempered glass screen protector to my iPad Pro 2020. Now in this instance, this particular screen protector by ASR is actually a little different from some of the others that you get, because this one actually comes with an applicator for sticking over the top of the iPad to guide in the actual screen protector, because, if anybody's seen any of my other videos where I apply screen protectors, I'm absolutely terrible at it. So hopefully this one is going to do fine, so I'm going to do now is just dive straight into this box and let's see what we get in the box. So the first thing that we're looking at here is the guide which you clip over the top of the iPad. So, as you can see here, this just fits over the iPad and then becomes the guide for placing the tempered glass screen protector in then also what we've got here is one and two cleaning kits now. There are two cleaning kits here, because this particular package has got two tempered glass protectors with it.
Then we also get a couple of little guides here and also a contact sheet. So what we're looking at here now is this plastic frame guide, and this is actually turned upside down, so we can see it has got clips all around the edges, so when I turn it the right way around here, what happens is when we push this over the iPad. Those little clips are going to help to grip the iPad. So I'm going to start at the top here, so I'm going to just push them in then I'll come to the bottom. Push them in hold on camera might shake it here, and then I'll get onto the sides, then I'll, just kind of pat it down all the way here and get down the other sides and stuff.
Now, as you look at this, you might think that these aren't fitted properly at the sides here now I've I'm just going to hazard the guess here that the only important thing that we're that we're worried about here are actually the corners being in place. Now those corners are solid because I've got a feeling. It's going to be the corners that actually do the guiding and not the straight edges on this side or this side. So I'd say: don't worry that it looks like this doesn't fit because, like I say, I've got a feeling: it's going to be the corners that are going to be the lining up part for the actual tempered glass. Now the other thing is here: you could have prepared the screen before this point and cleaned it.
I've not done it this way, because if I clean the screen first, I'm likely to kind of get marks on the screen. Once I put the plastic on, so I've put the plastic on first, and now we will look at the cleaning kit, although you could do this. The other way around, if you think that you're not going to get thumb, prints and stuff all over the screen, if you've already cleaned it and what we're looking at now are the contents of one of the cleaning kits. So what we have here is a wet, wipe, a dust, remover sticker and also a cloth. Now I never use these dust removal sticker things, because I just think that the more hassle than what the weight you, however, can do that yourself.
If you want to try it, but what these are designed to do. Are you peel it off, and then you pad it down or pat it down over the glass, and it will remove any extra dust? I find that they leave a residue behind, so I don't use these so for the sake of this, I'm going to use the wet wipe and then also the actual cleaning and drying cloth. Okay, so I'm just going to go over it with this wet wipe and don't forget, these wet wipes have got like fluid in them and stuff to be able to clean the glass properly. And what have you? So let me just go over this and let me cover it sufficiently enough and give it a good wipe. To be honest, I already gave this a pretty good clean before I did this anyway, so you might want to do that yourself, just clean.
You know the glass the way. Maybe you would normally do it and then give it a final clean with one of these wet wipes before we do the final run on it with the cloth. So I'm happy that I've covered everything there, and I've gone right to the edges. Like I said you could have done this. The other way around as in cleaned it faced and then put the plastic guide on.
I just know that, in my experience, I'd be likely to put thumb, prints and stuff on it. You know, so I put the plastic guide on first. Okay, so that's enough cleaning of that. So what I'm going to do now is use the cloth just to finish it off with now. If you just leave these things alone without this final cloth bit, what you'll find is that that fluid that goes onto the screen from the wet wipe that will actually evaporate this kind of alcohol and stuff like that, so that will evaporate anyway on its own.
What this is going to do, though, is just let us get a nice finish on it, so I think I'm dead happy with how clean this looks, and what have you? Let's just get this last bit into the edges here, like I say you can go about doing this. Whatever way you feel best as far as pre-cleaning it and then doing this final finish on it, but as far as I'm concerned that looks really nice so to the next bit. So here is the tempered glass screen protector and the way that we apply. This is to get it orientated in the correct position. First, and basically, what I mean by that is just make sure that the tab on the corner pulls down, because it's got a film underneath that we're going to pull off so make sure we pull the film off, so it's down, and then we can place the screen protector straight over onto the iPad and let it guide itself in with the guide that we've got on it.
Okay, so I'm just going to pull off this layer of film here of the screen protector, I'm just using the edge of the guide just to take it off with as well just to give me some stability now, I'm just going to pop it in top face like this, and I'm just going to let it drop in and guide itself, and I'm just going to push it a little from the center here. Okay, so hopefully that should all go on fine. Now I've got a big bubble here in the middle, so what I'm going to do is just spend a little while and see if I can push the bubble out with this little cloth. Okay. So having spent a couple of minutes there doing that thing, where I'm forcing the bubbles out towards the edge and stuff which, by the way I found, I have to do that, nearly every single time I put any screen protector on any device.
This actually is probably the best I've ever had out of a screen protector going on before now. What it is, you can probably see it hasn't stuck down quite right just in this top corner up here, but to be honest, that is on the bezel, so it doesn't bother me that little where it hasn't stuck down, isn't in the visible screen area up there. So that doesn't bother me now. As far as I can see, this has got on not only straight but now doesn't have bubbles on. I've got to say right now.
This probably is the best experience I've ever put in screen protector on. So what I'm going to do just quickly, I'm going to try it in a couple of different cases just to see if the cases will still go on, and then I'll just do a little of a touch test as well. So the first thing that I've tried, then is one of these typical rubber bumper cases, and this has gone on perfectly. What it is. The glass has not impeded the bumper going on at all.
So that's brilliant! Now let me just try my main case. So what we're looking at now is the iPad inside my main case now this particular case is by a company called cover, and this is an awesome case- keep an eye on me channel because I'm going to be doing a video about this very soon. It's an amazing case, but the good news for me is that the glass screen protector does not impede the way that the case grips the iPad when it goes in. So this is a double bonus for me now, so I've got protection with the actual tempered glass screen protector and also inside a great case. So this is me nailed now for protection and whatnot with the iPad now just quickly.
Let me just have a little flip around here. Okay, so that's very responsive. Now I think. Maybe, if I go to YouTube, then the actual scrolling here will give me a very good idea. So yeah, that's perfect what it is, I'm just doing very light touches here, I'm not having to press hard or anything.
That's great. Let me just try the menu on the top here. Okay, so all this stuff is changing really quickly. That's brilliant right! As far as I can see there, there is no difference as far as the touch is concerned with the glass on also just looking at it very quickly. I can't really say that I've seen any noticeable difference either with the picture with the glass on now just quickly.
One thing I didn't mention the glass has obviously got a notch on it as well. Here make sure that that notch lines up where the cameras are so the cameras are not covered and that you don't turn it the other way around when you put it on and cover the cameras with the glass, so just make sure the notch lines up with the cameras on the front okay. So it's probably about time for me to get off now, because this is awesome um. Would I recommend this tempered glass screen protector absolutely all day long? I think the applicator has made the difference for it for me anyways, if you want one of these tempered glass screen protectors or one of these cases, or indeed anything that I use in my iPad Pro videos, because I'm going to be covering a bunch of peripheral type things there'll be links in the description to the videos for this stuff also as well. If you want to see more of my iPad Pro 2020 videos, there'll also be links to videos and the playlist in the descriptions as well and don't forget if you've liked the video please give it a thumbs up, also consider subscribing to my channel and click all over that bell notification, icon thing down in the corner, I'm David hardy.
Thank you very much for watching this. Video take care and goodbye. Now you.
Source : David Harry
Phones In This Article

Related Articles


![Xiaomi Mi 10 PRO - Review with Photo + Video + Audio + 5G! [Xiaomify]](https://img.youtube.com/vi/dwe8oj_EvVU/maxresdefault.jpg )


Comments are disabled
Latest Articles


