iPad Pro 10.5 Camera Tips and Tricks By sakitech
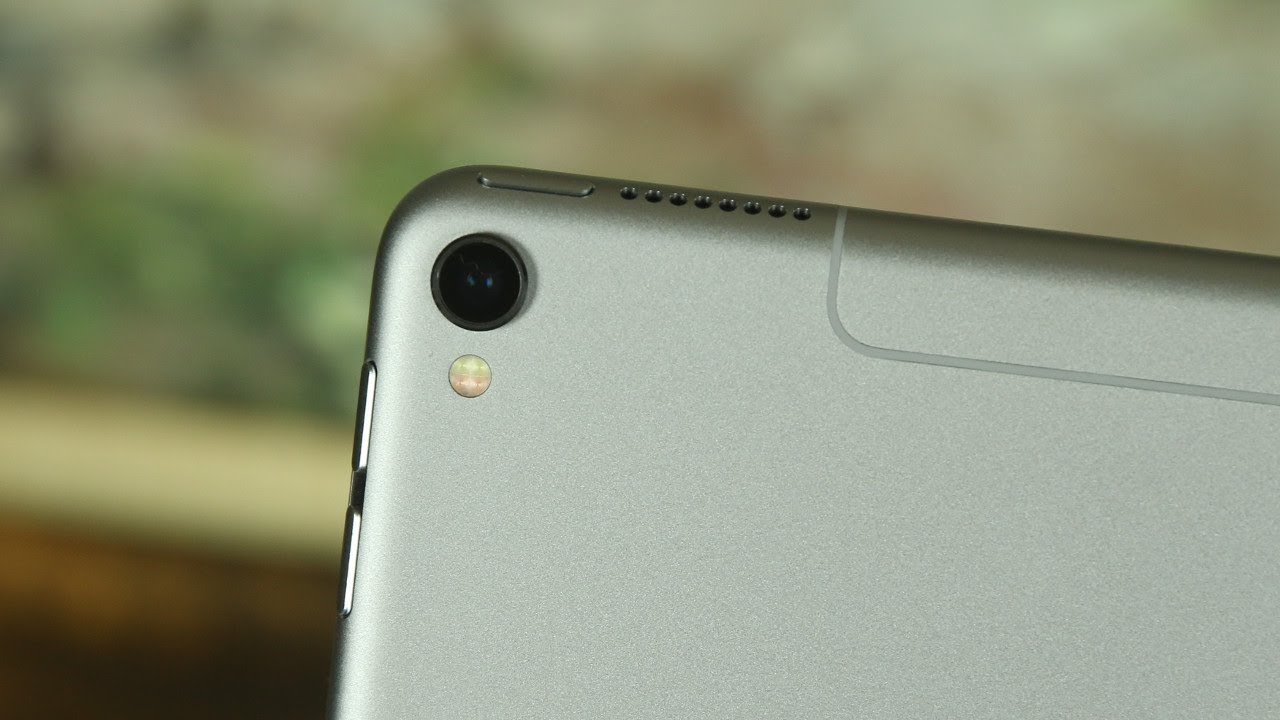
Hey, there's Saki here from sake, tech and up until recently, I couldn't care less about cameras on a tablet because they all usually suck, but that has changed with the iPad Pro 10.5 inch model. This iPad Pro model has a superb 12, megapixel F 1.8 camera, which is the same exact camera that can be found on the iPhone, 7 and iPhone 7 without a doubt has one of the best smartphone cameras in the world today. As such, it is essential to understand everything it is capable of. So let's dive in and discover all the tips tricks and features required to be known to master the camera, let's dive in alright. So let's launch the camera and take a look at the basic interface really quick, just to be safe, so here's the camera and then, as you can see, if we have a bunch of buttons on the top over here this one on the top is you can turn on and off the live photos feature. So let's turn that off for now and then over here.
If you tap this, it expands up, and you can actually enable disable or set the HDR to auto, which is what I recommend and, of course we also have a timer ability. So if you tap that you can choose a timer between 3 seconds and 10 seconds, and if you tap this, you can turn the flash on and off or set it to auto. And if you tap that button, it's going to switch the camera from the rear camera to the front, camera, okay and, of course, to take a picture. You press this and also just so. You guys know to take a picture when the camera application is launched.
Furthermore, you can also use the volume control key. So if I tap the volume key right now, it's going to take a picture. You can use the volume up or volume down. It does not matter. They both work as shutter buttons and, of course, you can switch between all the different modes.
You get panorama mode. You've got the square mode, the photo mode, the video mode, the slow-motion video mode and the time-lapse mode. Now, I'm going to dive into a bunch of details here that allow you to adjust the quality of your video modes, so I'll be talking about video and slo-mo, and then I'll be talking about even more tips. So by default, when you purchase your iPad Pro for the first time it is set to or in 1080p, which is full high-definition at 30 frames per second okay, so that setting is dictated by going into the settings menu. So let's go home and let's go to settings and then scroll down all the way -.
It says photos and camera so tap that and when you scroll down a little more there's a block here that pertains to all the camera settings now before you do anything else, just make sure that grid is enabled. So if you enable grid what that's going to do is it's going to give you? Let me couple tap that it's going to give you a grid, a 3x3 grid, so you can better align your photos as you can see now, there's a line in the back, so you can better align your photos or even your videos so make sure the grid is in fact enabled alright. So the grid is enabled let's go back into settings and take a look at the video settings. Quality adjustments so go to settings, we're back in the photos on camera and let's go into record video, and immediately you're, going to see that you have actually four different recording modes for your video settings. So right now, I have it set to 1080p, which is full high-definition at 60 frames per second, but when you first buy the iPad, it comes in default at 1080p, which is again full high-definition at 30 frames per second now this setting on the top here is a 720p setting.
You can just ignore that setting, because that is just low quality video. So that is the lowest possible resolution you can Can record on. This is the standard these days. So, let's just stick to that, but the difference between 30 frames per second and 60 frames per second is the fact that the videos that you record at 60 frames per second are going to be considerably smoother than what you would get with the 30 frames per second. So what I want you to do is just grab your iPad and record a video walking from point A to point B in 30 frames per second okay and then go back and record the same video at 60 frames per second and then watch the video to see how different they are.
The 60 frames per second is going to be much smoother and the only other thing you need to know with this mode is it's going to take a little more space on your iPad in the 30 frames per second and, of course, clearly, your iPad is capable of recording at 4k at 30 frames per second, which is a great standard. So you can tap that, and now it's going to record at 4k now let me show you something really quick, as you can see, I just chose 4k. So when I go back into the camera, let me go back in the camera. If I scroll over to the video and if I look on the top here, it actually says 4k in a little square box. So you will know if you're recording in 4k or not and the other thing.
Let me go back here to the settings: let's go to 1080p at 30 frames per second, if I go back out to the camera, that four case disappeared and there's nothing there. If you see nothing there, you should know that by default it is recording at 30 frames per second at 1080p and then finally, if I go back in here and go to 60 frames per second for 1080p and if I go back into the camera, you'll see on the top. Here, it's going to say High Definition, and it's going to say 60. So that does mean it's 1080p at 60 frames per second. So that is how you track exactly what is happening on your iPad, alright.
So those are the four different modes for video recording, and you should be aware of them all. Obviously 4k is the highest setting it's going to give you the most crispy video, but nothing compares to 1080p at 60 frames per second, it's a smooth and stable and a beautiful video. Now, when I scroll over to slow motion, it's the same story in the slow motion. I can change the modes. If you look at the top here, says: high-definition, it says 120.
So that means this is being recorded at 1080p at 120 frames per second. So that's going to be slow motion video, but if I go back into the same settings, that I was just in if I go back, I can choose the record slo-mo button, and from here you again see that you have two options. You have 1080p High Definition at 120 frames per second or 720p high-definition at 240 frames per second. If you choose this and go back into the camera, you'll see that on the top, the indicator is not going to show anything so that you know that you're at 240 frames per second now, what's the difference with the 720p at 240 frames per second, you can create even slower motion video, okay. So the number makes all the difference that number 240 FPS makes all the difference.
This means the video is going to be able to cram 240 photos within a second okay frames per second with this one. It's only 120 frames per second, which is not bad, but this is going to give you even better slow-motion shots. Alright, so that's all you need to know about adjusting the settings for your video and for your slow motion. Video. Now let me go back in the settings.
I'm going to show you two more settings that are important to know. The first one is the one on the top. It says: iCloud photo library. So when you buy the iPad by default, you get five gigabytes of storage in the iCloud and what you can do is you can actually save your photos online, so you never lose them. So if you enable this option, what it's going to do is it's going to bring these two options, make these two options available, so the first one is optimized, iPad storage and the other one is download and keep the originals.
So, let's think let's say you take a photo using the camera. What's going to happen? If this setting is enabled optimized, iPad storage is the photo on your iPad is going to be compressed into a lower quality to save you space. But if you choose this option over here, the photo that you take with your camera is going to retain full quality, and it's going to take more space on your iPad, alright, but in either case all the photos are being uploaded to your iCloud as a backup. So big, that's why this is enabled, so you're backing up all your photos to iCloud. Now this one I recommend this.
If you have a pad with a lower capacity for storage, maybe 64 gigabytes- you may want to enable this, so you can save a lot of space on your photos on your iPad. But if you have a lot of a larger capacity, I pad, maybe the 256 or 512, then you can choose this one over here, and you can keep the original pictures on your iPad at the highest resolution at the highest quality. All right I like to keep it this way, because no matter what you have backups online, so that's the first option and of course, if you don't want to create backups, you don't want your photos to go online to iCloud, just disable it. Okay! It's going to ask you! Would you like to remove all the photos from your iPad right now, but we like to download the photos and videos and, at the same time, disable uploading to the iCloud? Alright, some people use their iCloud space for other things. So that's setting number one and if you scroll down all the way at the bottom, it says keep normal photo.
So this actually pertains to high dynamic range now HDR, so with the HDR, when you take a photo. What happens in the background is, let me just go back to the camera really quick over here and there's the HDR just enable this. So what happens? If I take a photo right now in HDR mode, it actually is going to take three different photos, and it's going to stitch them together. To get me the best result and when you have this option enable here it also happens to keep the normal photo. So this is a normal photo of the photo without HDR.
So if I go back to the camera over here and I take a picture, what just happened was it kept a normal photo and also saved the HDR quality photo. So if I go back out here, this one says on the top: it says HDR, if I scroll over this is the same photo, but without the HDR badge it says, live but no HDR. If I scroll over this one says life, but it says HDR, ok, so this photo gets saved automatically. Now let me go back here. Let me just disable this for a minute.
Okay and let me go back to the camera. Let me just move this one just a little, so you guys can see that it's a different photo now if I take another photo right now with HDR enabled and if I click take a photo. Let me go back here, I'm sure. Let me go back into the gallery and, as you can see, there's only one picture as HDR, because I disabled the keep normal photo option. Ok, so just something to be aware of: let's go back out and that's basically the end of this video.
Hopefully now you will be able to better utilize the fantastic camera on your iPad Pro, alright, so make sure to subscribe to sake, tech and give this video a thumbs up and do not forget to follow me on Twitter and Instagram. At Saki. Tech online guys have a fantastic day.
Source : sakitech
Phones In This Article

Related Articles


![OnePlus Nord CE vs Poco X3 Pro Speedtest [SD750G vs SD860]](https://img.youtube.com/vi/lXu2FqmDuIA/maxresdefault.jpg )

Comments are disabled
Latest Articles


