Huawei P40 Pro Teardown Disassembly Repair Video Review 5G By PBKreviews
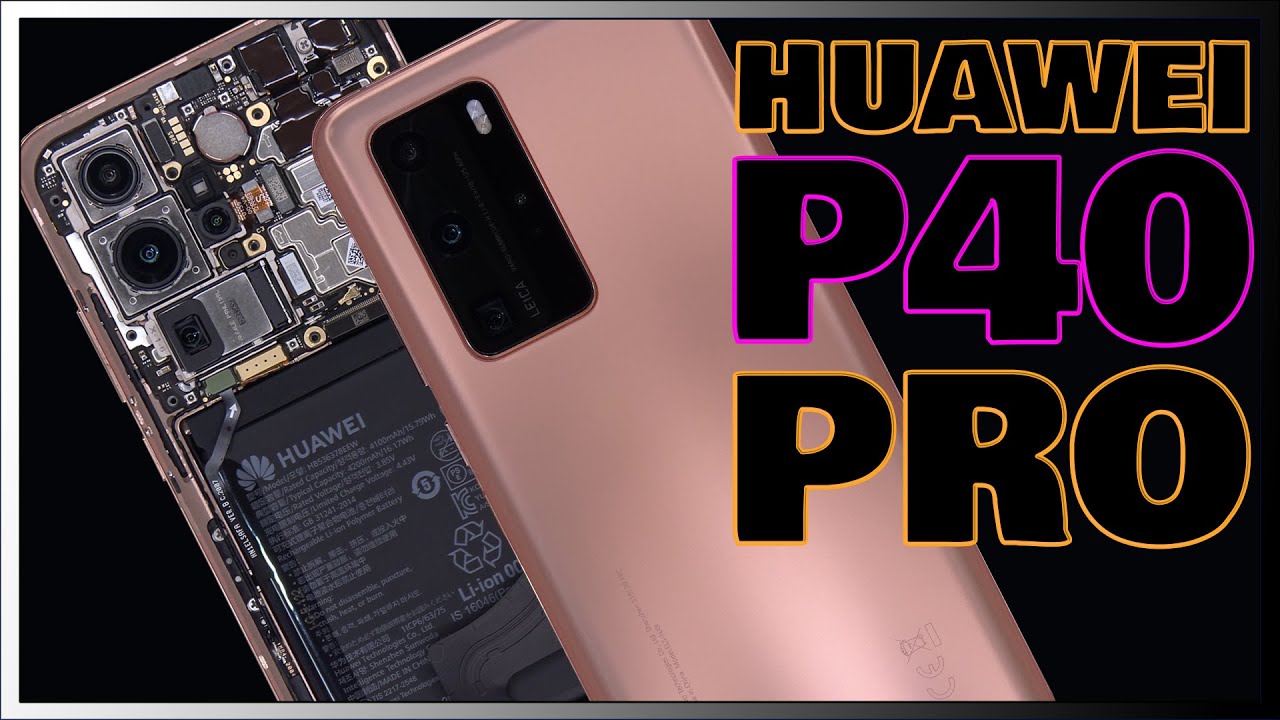
You're watching the Huawei P 40 pro disassembly after this M trays are moved, heat will be applied to the backplate to loosen up the adhesive underneath and the plastic pry tool will be used to pry off the backplate, not just to warn you. The adhesive on this phone is very strong, so it's going to take you some time to pry it off you. Here's a better look at the inside of the backplate. There are 18 Phillips screws which need to be removed. Now we can peel off the wireless charging pad and then there's a catch over here, holding the top cover down, put a pry tool in between pop it off. So here's your wireless charging pad the context of the wireless charging putter right here, and you have contacts over here for your flash and also one of your microphones, which is located right there.
You all saw some antenna lines running to this plastic piece and, if I'm not mistaken, this is going to be your NFC antenna right here. I'm not contacted, but that's going to be over here now, it's time to disconnect the battery cable, and then we can go ahead and disconnect the rest of the cables. There's one wire cable right here, pop that up we're going to remove the 12 megapixel telephoto camera, there's a better iPad that we can disconnect these cables. We have one more wire cable over here in the corner. Now I went to peel off the two films over here, the time to disconnect the front-facing cameras.
You have one more cable right here. There's one Phillips screw over here, holding down the main board. We can finally remove the main board. So here's a better look at the main board. You have one of those two layer boards on this one where you have one board, that's sitting on top without their board, and that's only for this portion of it.
Here's the backside of the board. You have a microphone over here. You also have thermal paste on the backside. Removing the shield on the back reveals more thermal paste on top of the processor and some other chips. Now, as far as the cameras go, you have your 40 megapixel ultra-white camera over here.
The connector is right here you have a 3d depth. Sensing camera over here. The connector for is right here once you disconnect the cable for that, you can see the cable underneath, which is for your 50 megapixel, ultra vision, camera, which is the one right here so once the main board is removed. You can see it lies on the mid-frame with the thermal paste over here, so it transfers the heat to the mid-frame and there's a 3d, copper vapor chamber underneath which is sandwiched in between the mid-frame and the screen. So it transfers the heat to that.
Here's, a better look at that yeah one Philips screw over here, holding on your front facing cameras once that screw is removed, the cameras can be lifted and removed as well. Here's a better look at the front facing cameras, it's time to remove the bottom cover. You have a wire cable over here. You need to pop up and disconnect you have three more flex cables. Furthermore, you need to disconnect there's a lot to the screw.
Holding on your bottom board now we can lift and remove that bottom board. So you have another microphone down here, which is gonna, be your main microphone and on your backside. You have your SIM reader. Now we're going to remove the charger port. You tore your pro flex.
You have a rubber gasket around your charger cord, it's time to pry off the speaker assembly. Here's a better look at your speaker assembly, this cable over here's, a short flex cable which connects to the flex cable right here that runs to your fingerprint reader, underneath the battery and underneath the screen now again good thing: this battery has pull taps which makes it much easier to remove the battery. If you need to replace it, they're numbered one two and three, so you pull them off in that order, however, I'm going to remove the battery the old-fashioned way, so I can leave those pull tabs intact in case the battery needs to be replaced later on, so I'm just going to apply some heat to loosen up the adhesive underneath, and then I'm going to pry it off here's a barrel, okay battery. So the battery is a forty-two hundred million power battery, which is the same as the p40 light, except on the p40 light. It's three point: eight two volts compared to the three point: eight five volts on this one.
So here's your embedded fingerprint reader underneath the screen you have this cable over here, which connects the bottom board to the top main board. Give your vibrator motor over here on the bottom right-hand corner this flex paper over here is for that and over here on the side. You have your power and volume button flex cable over here, so this one doesn't have a traditional speaker. Instead, this over here is, what's gonna, be your speaker, which provides sound by giving vibration is off on the screen. After removing the two Phillips screws over here, we can lift it up and remove it and there's a very strong magnet.
Is it better look at that magnetic coil, so the magnets work together to provide the sound you every cable over here for your proximity, sensors and this flex cable over here- is the one for your screen. It's run through a slit in the mid-frame, so, if you ever have to replace the screen, you have to disassemble the phone disconnect the cable from your main board. Remove the battery heat the front up to loosen up the adhesive underneath pry the screen off slightly your flex, cable to the slid over here in the mid-frame, get your new screen or a new cable back through the slid in the mid-frame, reapply it to the front of the phone and just reverse the whole process. Aurora. Now it's time to put the phone back together once all your screws are back in place, apply some new adhesive and payback tape back over flip.
It over powers it on, and you're done, hope you guys enjoyed this video I think eyes want to see more videos like this make sure you subscribe and click on the notification bill, so you'd be notified. The next time I upload a video thanks again for watching guys, and I'll, see you guys in the next video.
Source : PBKreviews
Phones In This Article

Related Articles


Comments are disabled
Latest Articles


