How to Use Camera Pro Mode on LG Velvet – Camera Pro Settings By HardReset.Info
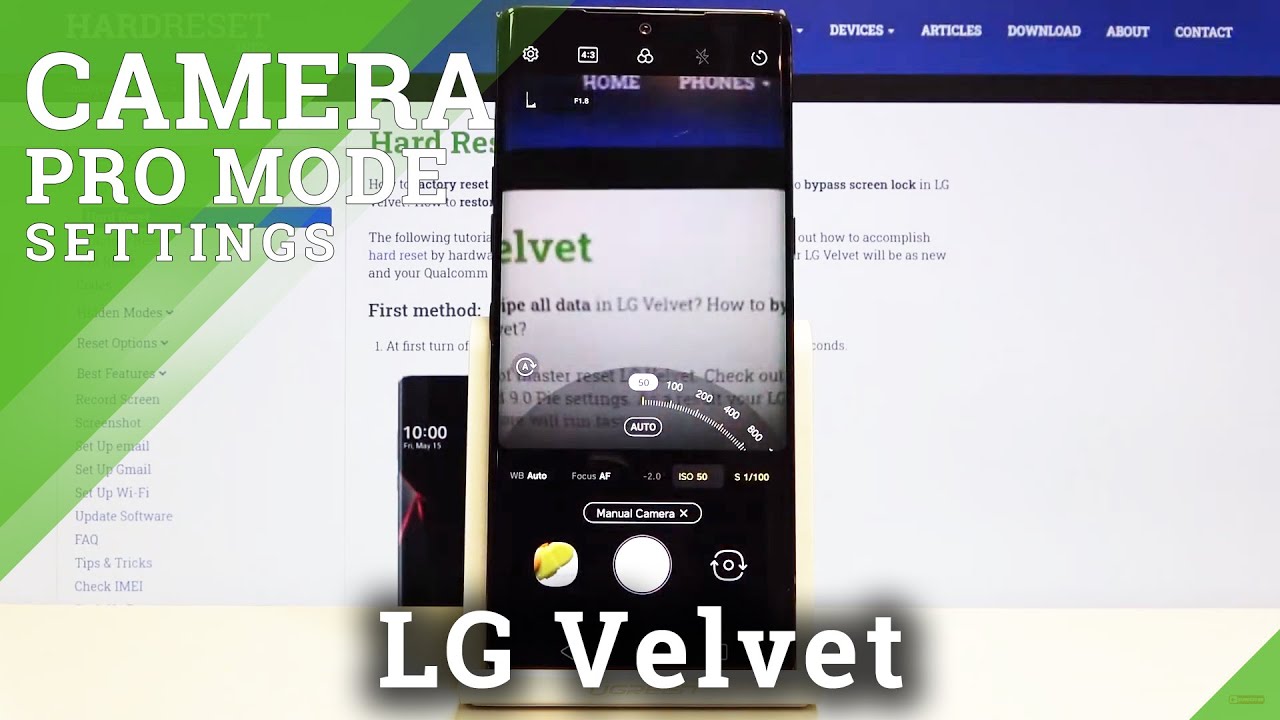
Welcome here I've got lg velvet, and I'm going to show you how to use the camera promote at this device. So at first we have to tap in the center here to open the camera up and, as you can see for now, we are in the standard photo mode. So let's change it. We can do it by using this settings bar and just simply going to the right two more and here we have access to other modes of this camera. One of this is the manual camera. So let's pick this and to promote gives us possibilities to show shooting parameters by ourselves.
This is useful when we want to learn photographic skills and making experiments. So here we are- and let me start with these settings bar- let's go from the right. The first one button here is the shooter speed. So here we can change the time of taking picture. As you can see, we have access to this slider, and we can pick from 20 set cons of taking picture, which is very long, and this is better to objects in stable, and we can also go to the end of this.
To one and four thousand this, so this is really short and this is better to objects in move. So this is how it works. We can also easily go back to auto settings by just simply tapping on auto here and now, let's move to the next one button. This is the ESO. So here we can control the camera sensitivity to light and, as you can see, we have also the slider.
We can make it less sensitive from 50 to more sensitive to three and two thousand it. So this is really cool here, and also we can go back to all the settings by tapping on auto here and now, let's move to the next one button, but I want to show you that when we have ESO manually adjust, this is locked, so the ISO should be on auto because from for some reasons, these two parameters are not cooperating each other to unlock this. So this is exposure compensation. Here we can also manage the light of our picture and by using the slider, we can make it more bright or dark as we need. This is how it works, but remember that when we have this turnip on, we can't pick the ESO, so it adjusts manually uh when we take an ISO manually.
This adjusts automatically for some reason. So this is really weird here and now, let's go to the next one button. This is the focusing. So here we can add just the manual focus and as you can see, by using this slider, we can easily do it and in the green I agree as we have in places where we have this focus. So this is really cool here and now, let's go to the next one button to the white balance.
So here we can control the temperature of our picture in carving the crease, by using the slider and going to the left. We can make it more cold and by going to the right, we can make it more warm. So this is how it works, and we can also go back to the outright button lens by just simply tapping on auto, but I want to show you the better uh button here now when we adjust all the settings. Sometimes we want to go back to the outdoor, and we can do it by just one tab and tapping this button here. So when we tap on this, all of this came back to the outer settings.
This is really cool and useful here and now, let's move here to the left corner at the bottom. When we tap on this, we go to more advanced settings of the camera. A lot of this is also in the standard photo mode, and I want to show you two options. The first one is here, save as rough. So by tapping on this button, we can turn on saving photos in rough format.
This format is used by professional photographers, taking photos in better quality, with more details and post-producting them in graphic programs. This is really pro here and really cool and also use in useful features. We have the graphic photos so by tapping on this button, we can turn it on and turn it off. Also, this is really cool, because here we have some set of existing photos with some parameters, and we can add these parameters to our own photos. So let me keep this turn it on and let's go back to to promote and, as you can see here, we have this button now, when we tap on this, we can pick which photo we want to have, as you can see, night sky, for example, night view snapshot street also scenery.
A lot of this is here with caf? also and as you can see, it changes this manual settings to these parameters. We can also adjust it manually now, so this is really cool here and also by tapping on this. We can easily go back to outer so for now. Let me pick, for example, one of this to show you, for example, maybe nightfall. So this is really dark, and we can add just Esau to make it more bright and lets we take a picture, and now let's go here to the left corner at the bottom.
When we tap on this, you can see it. So this is how it works. Thanks for watching, subscribe, our channel and leave the thumbs up. You.
Source : HardReset.Info
Phones In This Article

Related Articles


Comments are disabled
Latest Articles


