How to Replace iPhone 7 Plus Battery Safely By moon X
Disassembly of any electronic device involves a certain risk to replace it successfully. Please operate it by professionals before disassembling your iPhone discharge, the battery below 25, the charged full battery can catch fire or explode if accidentally, punctured power off your iPhone before beginning disassembly. Remove the two pantalone screws at the bottom edge of iPhone with a pantalone screwdriver apply a suction cup to the lower left corner of the display assembly be sure the suction cup does not overlap with the home button. Pull up on the suction cup, with firm, constant pressure to create a slight gap between the front panel and rear case, insert a triangle. Plastic opening tool into the gap disconnect its adhesive slide. The triangle plastic opening tool to the left along the lower edge of iPhone, widen the gap between front panel and rear case slowly, starting at the lower edge and moving towards the volume, control buttons and silent, switch.
Insert the triangle plastic opening tool into the bottom right corner of the device widen the gap between front panel and rear case slowly slide the tool up the right edge of the phone to break up the adhesive, holding the display in place gently grasp the display assembly and lift it up to open the phone using the clips at the top of the front panel as a hinge insert the triangle plastic opening tool, underneath the display, along the top edge of the phone and slide to loosen the last of the adhesive, pull the display assembly slightly away from the top edge of the phone to disengage. The clips holding it to the rear case open the iPhone from the left side of the display do not raise the display more than 90 degrees. Before disconnect several front panel assembly. Remove four tripping y/o hundred screws place. These screws, orderly, do not mix up; they need to go back into the same place were removed from otherwise your phone will be damned removed, the metal piece, a net one battery cable and two front panel assembly cables in turn, unscrew the three tripping you hundred screws place.
These screws orderly do not mix up. Remove the metal piece pry the front panel sensor assembly, connector cable, remove the display assembly to have an easier workspace. There are three strips of white adhesive underneath the battery hold it in place. The best way to remove the battery is to roll and pull these strips out slowly, with patience, peel off the adhesive tab located on the bottom of the battery, don't puncture the battery pull the adhesive out from under the battery toward the bottom of the iPhone slow down, don't hurry! You need to take your time to pull the adhesive out and remove it. Don't pull too hard to pull the adhesive away? Otherwise, adhesive may be broken and cannot be pulled out fully repeat for the second strip, repeat for the third strip.
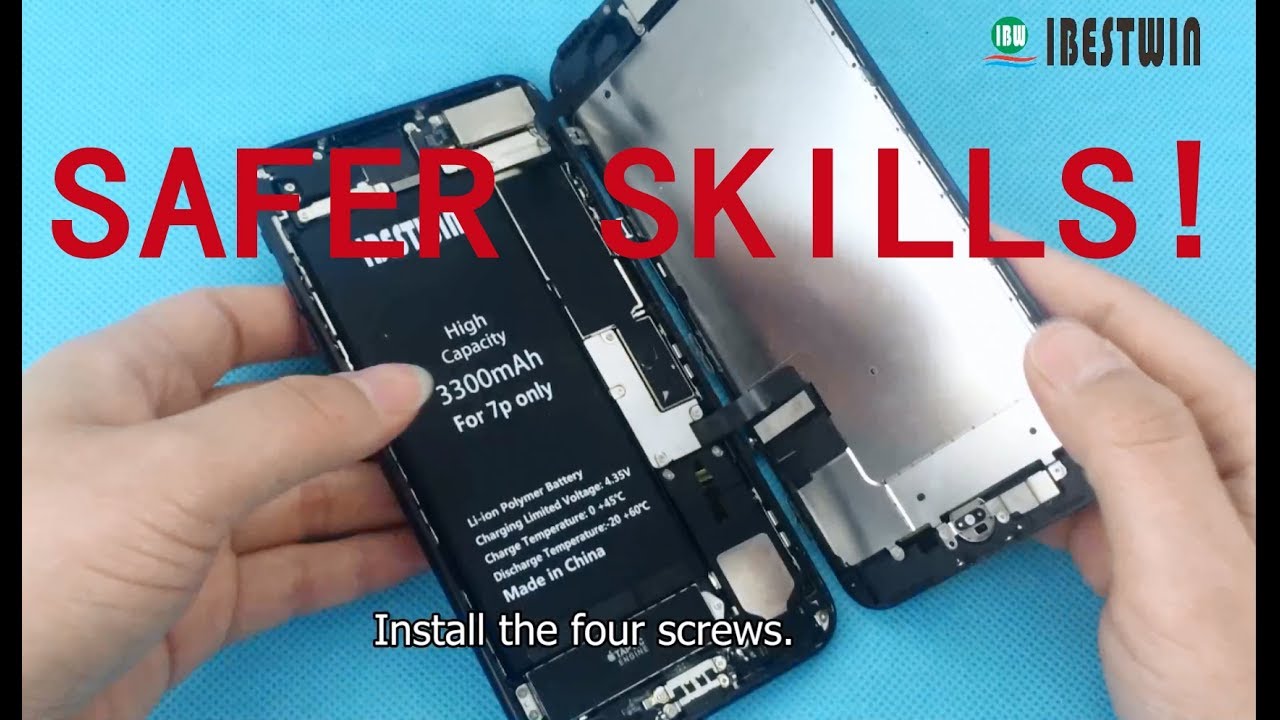
If the adhesive strips accidentally broke on use a hair dryer to heat the rear case behind the battery position, then use a plastic spider to gently pry. The battery, don't puncture the battery note that the temperature should not be too high, otherwise the phone will be damaged. Remove the battery apply the adhesive on new battery and bend new battery cable to slot into place easily install new battery connect the front panel senior assembly, connector, put the metal piece back and install the three screws connect. The two display cables connect battery connector, make sure all cables will go back to same place, removed from and slot into place. Otherwise, the phone may not work such as touch function, cannot work for damaged phone motherboard and display connector, put metal piece back, install the four screws carefully press.
The top left of the screen into the top left of the frame turn on the phone make sure it is successful if the phone cannot turn on. Maybe battery is out of power charge it for 15 minutes. If you notice the touchscreen function is not sensitive. Please reopen the screen and install the three front panel assembly cables again make sure cables will be put back to the place, move from and slot into places. Snap down the screen make sure it clicks into place.
Finally, install the two pantalone screws. Thank you for watching.
Source : moon X
Phones In This Article

Related Articles


Comments are disabled
Latest Articles


