How to get Linux App Store on Chromebook By Eevnos
Hey, welcome back to the channel. So I've already shown you how to install many Linux applications on your Chromebook. Using the native Linux support. The thing is almost every time that involves like downloading stuff from a website and then going into the terminal and typing a bunch of commands to get it to install today, I'm going to show you a way to make that much, much easier. And we're going to install a Linux app store on your Chromebook in the native Linux support. You're not going to have to go into developer mode or anything shady like that.
This is going to allow you to install a large selection of applications in a graphical store, just like on like MacOS or windows. You can search for your applications, browse through categories, and one click install to install these applications. I'm going to show you how to install two different ones, show you what they look like and how they work and let you make the decision on which one you want to use. The only other thing is I want to say, just because these app stores are running on your Chromebook, it doesn't necessarily mean that every single application in that app store is going to work in the native Linux support on ChromeOS I'm going to show you how to get the store on there. And honestly, the vast majority of applications will work just fine, but that Linux support in ChromeOS is still beta.
So there's some applications that will not work with that out of the way. Let's jump right onto the Chromebook. All right. So here we are on the Chromebook desktop. And the first thing I'm going to do is turn on Linux beta support.
So if you already have Linux set up on your Chromebook, you can skip this section. So we're just going to go into our settings and then look for Linux beta down here. If you don't see that, try doing an update on your Chromebook, but there's a possibility that your Chromebook may not support it, or it may be turned off if you're using something like a school Chromebook or something like that. But if you have Lennox, beta, we're just going to click turn on and hit next, and then you can select your, your username in here. So I'm just gonna select a YouTube and we're gonna set a custom size.
You can do whatever you want on here, depending on how big the storage is on your Chromebook. By default, it's five gigabytes. I'm going to do 20 gigabytes cause I want to in store install more applications. So I'm just going to hit install. And then this is going to take a few minutes to download all the components and needs and set it up.
And then when it's done, it'll open a command prompt and we can do the rest of this tutorial. So I'm going to stop this right now and then come back when this is all complete. All right. So Linux native support is all set up on our Chromebook and it brought us to the command prompt. This is using the Linux terminal automatically opened up.
I just zoomed in a little bit. The first thing we want to do is do a pseudo apt update is going to go and look for any updates for our system. And then we want to do a sudo apt dist dash upgrade. That's going to upgrade the distribution, the core components for us, if there's any that need it. And we want to make sure to do that so that we can get all the latest and greatest components for our install.
Again, I'm just going to let this run. This takes a few minutes and then I'll come back when it's all complete. Okay? So that update is all done. Now we're ready to install. Now, there are two different software centers or app stores or whatever you want to call it.
Then I'm going to show you today. One is the KDE discover, and one is the Janome software center. They both let you install applications with a visual interface, but they handle it a little bit differently. They're both slightly different looking. And it's really just a matter of preference, which one you want to use.
I'm going to show you how to install both of them, because it's really easy to install either one. Let's start with the gunner home software center. And just as a side note, this is spelled gnome, but typically in the Linux world, it's a pronounced good gnome. So just go with it. Um, so we're going to do a sudo apt install, um, Ghanim dash software and get home dash package kit it enter.
It's going to go and look for all the components for that. We're going to hit yes. To install that stuff. That's going to take a little bit to install. And again, I will just skip to the end when this is all complete.
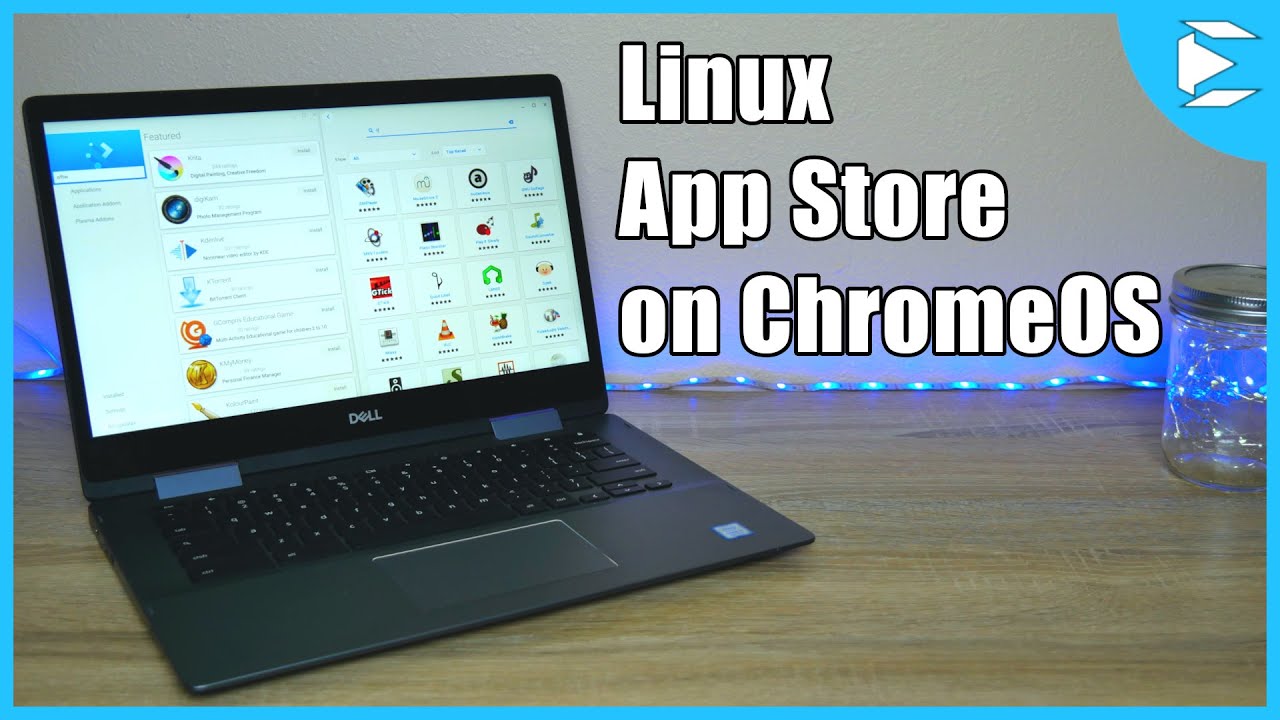
All right? So that installation is all complete. And if we go into our menu here and go to our Linux apps, we can see that software is in here. Now what, the first time we launched this, this is probably going to be blank. It's probably not going to show any software in here and it doesn't, don't be alarmed about this for some reason. Uh, it downloaded all the software, but it didn't apply.
And you actually have to restart your Chromebook before the applications show up in here. So I'm going to go ahead and do that right now and come back. All right. So here we are back on the Linux desktop, and I'm going to go into my menu here and go down to software launch that. And I'm actually kind of glad this happened because sometimes it happens where even after the restart, there's no applications that show up in here.
So what we're going to do is just go into the Linux apps again, we're going to launch terminal and we're going to do a sudo apt update, and then we're going to restart our Chromebook again. All right. So here we are back on the desktop. Now, if we go into our Linux apps folder and launch software, give it a second to start up here. The now we can see that it's populated with our applications.
Now, sometimes it works with just a restart. Sometimes you have to do the pseudo app update and then restart. So, um, you know, your mileage may vary. So I'm kind of glad that it didn't work the first time in this video, so I could show you how to fix it. But anyway, now that we're in here, you can go to these different categories and you can browse for your application and then install it.
You can search for stuff. So say we wanted to install the, a DMP image, editing software. We can type in gimp. Uh, we get the new image manipulation program, and then we can just click install right here and it's going to install it for us. It takes a little while.
So I'm probably gonna speed up through this. And, uh, and then, uh, launch it real quick and show you how to install the, uh, KTE discover application store while this is installing. I wanted to point out one thing. So in this application, it says it's installing it's at 93%, but it doesn't really give you a good progress bar when we do discover that's one thing you're going to see is that it gives you much better feedback when you're installing applications. So that's actually one thing that I like better about, uh, discover than I like about the, you know, software center.
All right. So that is all installed. And as you can see, we can click launch right from the application here. Or if we go into our menu again and go to the Linux apps, we can see that it's right here. We can launch it from there.
And it launches just fine. Now, like I said before, at the beginning of the video, just because an application is in this store, doesn't mean it's going to install well in Linux, on your Chromebook. Not every application works because that Linux support is still kind of in beta and not every application is supported. So now let's go and install the KDE plasma discover. Now the way we're going to install the discover application is very similar to how we installed the genome software center.
We're going to go into our terminal and we are going to do a sudo apt install, plasma dash, discover again, it's going to go out and find all the components that we need. And then we can hit yes to install. Now, you don't have to install both of these. I'm only installing both of them to show you how it works and you know, to kind of help you make a decision on which one you want to use. It doesn't hurt to have both installed, but you don't need to install both of them.
The thing is with plasma, when you first launch it, you may have the same issue that we had with the genome software center, where the applications may not show in there. But if you do a pseudo app update and a one or two restarts, then the application will be populated with the apps that are available to install just like with the software center. All right. So discover is all installed. And just like we did with the genome software center, we can go into our Linux folder and we have discover right there.
We can launch it. And here we go, this is what discovery looks like. It functions similarly to how the Janome software works, but, uh, just looks very different. This is some, you know, featured applications. And then you can go into the different categories.
Now it has much more granular categories and quantum software did, uh, which I kind of liked that as well. And you can also do a search. So say we wanted to install something like Libra office. It searched for Libra, and we see all the different, um, applications that have to have Libra in the name or in the description. Uh, so say we want to install Libra office writer.
We can just click install on that. And we can see down in the tasks, it shows the status. Now this is what I was talking about earlier. This shows you a much more useful status than the genome software did this actually as a ticking task bar and shows you how, uh, the installation is progressing versus just kind of a task bar that jumps to different segments. You know, it might go from 0% to 40% in your own software where this is kind of a real time ticker.
So again, I'll let this run and then, uh, just show you what that looks like as well. Again, this is just going to put it into our Linux apps folder. So now that is all installed. But one thing I forgot to show you is if you want more details on any of these things, you can click into them and get the information and you know, all the details of the package just as you could in, you know, software. I just forgot to show you that before.
And if you go into the installed area, it'll show you all the applications that have been installed, and even the ones that you installed with quantum software. So we can see that we have gimp in here that we installed with that other application. So we can go into here and we can launch it right from here, or, you know, even easier. Again, it puts it into the Linux apps folder, and we can just launch, we were office writer directly from that icon. And now we get into our word processor and it works.
That's fine. Um, once these applications are installed, it doesn't care how they were installed. So, you know, even though we installed these with two different, um, package managers, the, the core install is exactly the same. So there's no problem with launching these applications together. So you can move these and treat them just like windows.
You can do split screen because it's using that native Linux support now, which you use is totally up to you. They both function kind of the same. I mean, on the backend, they function exactly the same. It's the front end. That's a little bit different.
My personal preference is discovered just because it gives you a little bit better feel back on what's being installed, but they both worked just fine. And again, I want to stress that just because an application yeah. Is in here does not mean it's going to work. I need to stress that because I always get a confusion with that. With when people watch my videos, they assume that when I show them how to install steam or something like that, all the steam games are gonna run.
That's not the case. This is a portal to these applications, but it's still going to on the support of your Chromebook. Let me know if you have any questions or comments down in the comment section, or ask me on Twitter and Instagram Graham. I'm happy to answer questions on there as well, found this useful or informative. Please hit that thumbs up.
And if you really enjoyed it, please consider subscribing. If you haven't done so already, thanks for stopping by, and I'll see you in the next one.
Source : Eevnos
Phones In This Article
Related Articles


Comments are disabled
Latest Articles


