How To Fix Upgrade Replace HDD / SSD & RAM Acer Chromebook C710 C720 C730 Series Laptop Computer By PC Monkey
Hey guys Jamie here, bringing you another do-it-yourself computer video. We have an Acer Chromebook, we're working on here, we're going to show you how to swap out the hard drive and ram if you need to replace it or upgrade it. The model number we're working on is a c7 10 series or a q1 VOC series. They go by the same number now keep in mind. This is an older model, so it shouldn't really matter but keep in mind on any computer pair you're doing when you're breaking a seal or a sticker to get out of screw, which we did here. I're voiding your warranty.
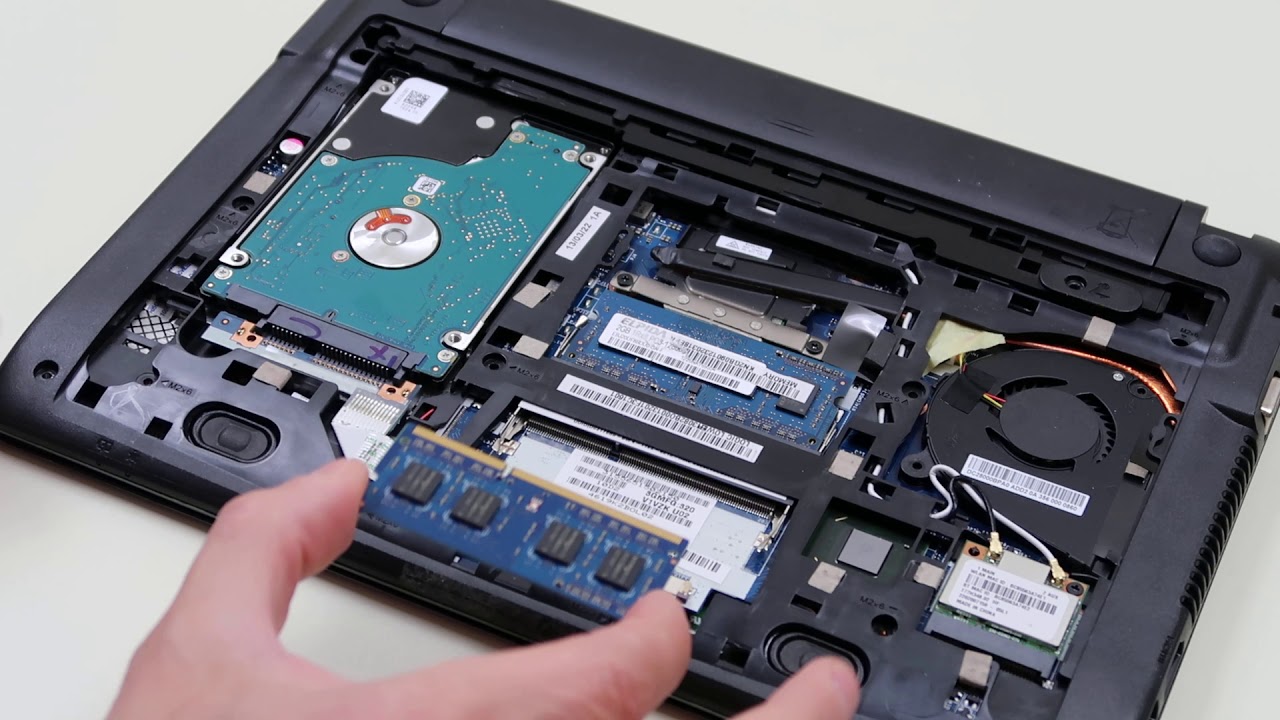
So just keep that in mind but yeah. We took out this screw here in the middle to release this panel, and then we're just going to pop this panel up like that, your model, if it's a little different, you may have more screws than we did, but in our model it only took one screw to release that panel, so just to zoom in a little. This is your saw ram, and this is where your hard drive or solid-state drive is going to be all right now the RAM is held in pretty typically there's two little spring-loaded arms here that hold the ramen so to release it, you bend these arms back, and it pops up, and then you just slide it out same goes for that one there's! A lot of numbers on these Ram sticks if you want to know how to buy the correct Ram for your computer check out the link in the description, so you know what to search for to buy the correct Ram, because not all Ram is going to work in all computers and if you buy the wrong Ram, your computer won't work and then to get this back in keep in mind is a long port short port, so the orientation matters it's going to go back in this way. Won't go in that way, so slide it in there be careful, get it nice and flush, nice and secure and then just push down, and it snaps in so relatively easy. The hard drive is right here.
This is a SATA connection. SATA and it's a 2.5 inch, hard drive, which is pretty typical in smaller laptops. So that's how you would know how to buy this. It's a SATA connection, 2.5 inch, and then you can get it whatever size. You want 500 gigabytes, one terabyte! You can also go to solid-state drives, but this is placed in there just going to pry this up a little get this up, and it's plugged into the board right here, so slide it out of the board.
Like that same thing, this has an orientation along port in a short port. So when you're putting the new one in make sure you get it the right way, snap that in and then that goes down like that, so that's how you would replace and change out your hard drive and your RAM. By just note, the Wi-Fi card is here the antennas on plug there. It screws in- and that's not a very common part to have to replace, but that's what your Wi-Fi card would be, and this is where your fan is. If you got to clean it out for any reason, if it's getting dirty, so that's how you would replace the RAM and the hard drive if this was helpful, please like and share have any questions leave them below.
We try to get back to you at least a couple of times a day on the questions and if you enjoyed do-it-yourself computer repair, please subscribe. Thank you for watching.
Source : PC Monkey
Phones In This Article
Related Articles


Comments are disabled
Latest Articles


