How to fix iPhone 7 Cracked Camera Lens (iPhone 7 Plus too) By JerryRigEverything
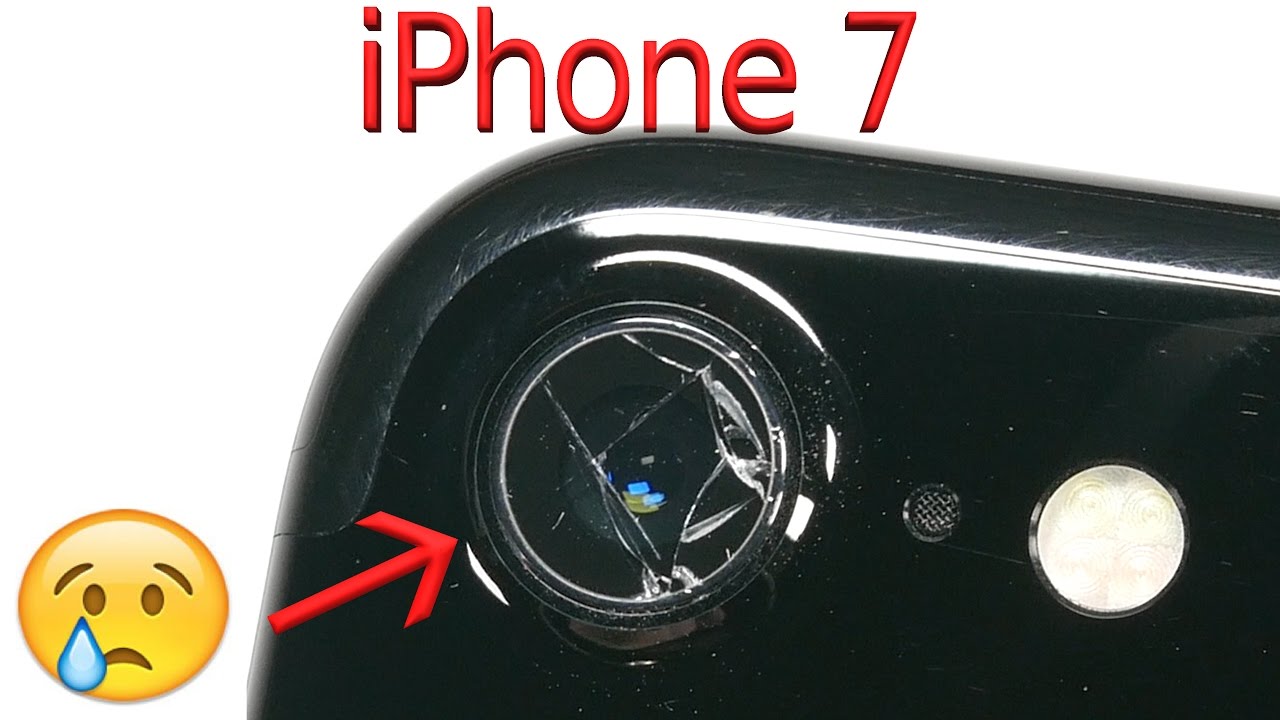
Today I am going to show you how to replace a cracked camera lens on an iPhone 7, and 7 Plus. The process is the same for both phone models, and you don't even have to open up your phone. Only attempt this project if your cracked camera lens is keeping you from using your camera. Several things can go wrong during this repair, which Ill explain as I go, and you really don't want to risk anything unless you have nothing left to lose. Now that we have that out of the way, lets get started. I am using a Bonafide Hardware glass camera lens replacement for this project.
Ill link these down in the video description. They are pretty inexpensive and you can find them on Amazon. Bonafide Hardware sells two versions of this lens. One with a frame, that is way harder to install, and then this 'Glass only' version, which is what we are going to use today. It is incredibly small, but it is precision cut for the iPhone 7.
Now we start one of the hardest parts of this project. Removing the old cracked glass. Heat is going to be your best friend during this process. If you have hair, you can use your blow dryer. As for me, I am going to use a heat gun, Ill warm up the lens until it is just barely too hot to touch with my finger.
As you are pulling the glass chunks out from the little circle make sure nothing falls into the camera itself. The camera, that you see underneath this broken lens, is very fragile in more ways than one. First, it can scratch very very easily. Which means if any of the glass chunks brush up against the actual camera, you'll lose your focus ability. Also, there are moving parts inside the camera that are a part of the Optical Image Stabilization, and these moving parts can get jammed up by glass dust.
So you want to keep the inside as free from dust and glass bits as possible. I like to use a sturdy sharp razor blade to remove the glass chunks, but you can also use a pair of metal tweezers. You'll probably want to warm up the lens about every 30 seconds or so, since it does cool down pretty fast. The adhesive gets tough when it cools down. You can hold the phone vertically to help keep the glass and adhesive from falling inside; using gravity to your advantage.
You do want to clean off that entire inner ridge. Because if there are any dust or adhesive 'pressure points' left when you install the new lens, the new glass will be more prone to breaking. You want that surface as flat as possible. Now we have that inner ledge pretty well cleaned up. This looks big on your screen right now.
But in real life it is incredibly small. This is like a repair project for ants. You can see how the camera moves around inside the frame. This is part of the mechanical stabilization I was talking about earlier. Thumbs up for apple finally implementing OIS.
Also, at this point, the camera can still take clear pictures and focus just fine even without a glass lens in place. Now to install this lens Ill need some clear silicone. This can be purchased at literally any hardware store, and it is dirt cheap. Ill include some in the video description as well though. This clear sealant is made for aquariums, sinks, tubs, and anything that might come in contact with water.
So technically, your iPhone 7 will still keep its water resistance with the new lens installed. But I still recommend avoiding water either way. This adhesive is also rubbery, so it will allow the lens to fluctuate with any temperature changes and not crack. I am going to take a wooden toothpick and gently 'dab' some of the rubber sealant all around that inside shelf of the lens frame. Go slow.
Don't let any stray silicon strands drape like a spider web over the camera unit. It'll be a nightmare to clean up inside of that hole. So go slow and be careful. This stuff doesn't dry very fast, so you have plenty of time to make sure the silicon is evenly spread around the edge. Now, the Bonafide Hardware lens replacement for the iPhone 7 has two sides to it.
One side is glossy, and the other side is more of a matte finish. You want the glossy side facing outwards. The camera will still function if you get the direction wrong, its just more aesthetically pleasing if you get the shiny side facing out. Im going to remove the plastic cover over the matte side, and then gently set the lens down into the hole we cleared and already added silicon to, and Ill press it into place. Firmly, but gently, keep in mind that it is still glass.
As long as there is no glass dust or bits of hard adhesive under the new lens it shouldn't crack under pressure. The Bonafide Hardware glass is just as thick as the original. If your lens did not come with the protective plastic shields, just make sure it is clean on the underside before you install it. It takes about 45 minutes for the silicon to get super tacky, and a full 24 hours to fully cure, or dry. So hold it in place with your finger for about a minute or two before wiping off the exes silicon.
Silicon is very easy to clean up when it is wet. It just wipes away. Unlike super glue. Which would be a royal mess. Make sure the lens is flat inside its little frame.
And try not to disturb it for at least 2 hours, or better, leave it alone over night. My focus ability is still intact after replacing the lens, It would be difficult to tell that the lens was ever cracked in the first place. Its kinda fun that you can fix your iPhone camera lens with some fish tank sealant, a tooth pick, and some replacement glass. Speaking of which, I have a spare lens just to show that the Bonafide Lens is indeed real glass, and Here is both lenses side by side. on the left side is an original piece of Apple iPhone glass, and on the right side is the Bonafide Hardware glass.
Both are the same thickness, and pretty inexpensive. It might be smart to buy 2 lenses just in case something goes wrong with the install. Hopefully this video was helpful! You can always find my behind the scenes stuff posted on Twitter and Instagram. Lets see who's still awake and made it to the end of the video... Tell me what you had for breakfast in the comments.
I had a bowl of chocolate cheerios with a scope of protein in it... Which actually now sounds kinda weird now that I say it out loud. I do read all the comments! Even if I cant respond to every single one of them. Thanks for watching! Ill see you around.
Source : JerryRigEverything
Phones In This Article

Related Articles


Comments are disabled
Latest Articles


