How to Bypass Google Verification on SAMSUNG Galaxy XCover Pro - Unlock FRP 2021 Samsung Method By HardReset.Info
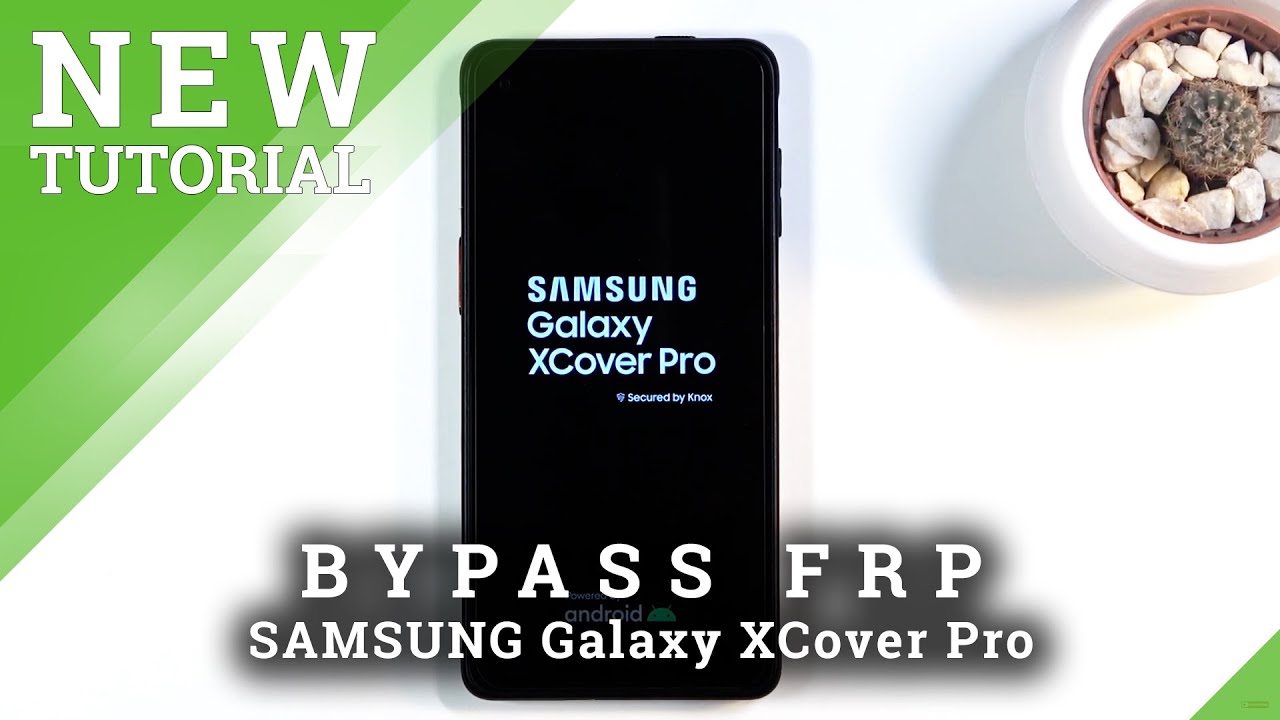
Welcome and follow me is a Samsung Galaxy cover pro, and today I'll show you how to bypass the Google verification on this phone now for this process, we will need a couple of things um, so one of the most important parts, and probably the one that will make a lot of people not be able to do this bypass, will be another Samsung device. So I have what is it the a52 yep? It looks like a52, so that's what I'm going to be using for this uh bypass, but basically the majority of the Samsung devices will suffice. Now, apart from a Samsung device, you also need a cable like this one plug it into your computer and also the computer and also and lastly, a stable, Wi-Fi connection so start off by connecting your luck device to your Wi-Fi and from there let's take the cable log it in, and we're going to move right now to the computer side. So I'm going to jump there and tell you what you're going to need so right now, okay, so continuing the process now from the computer, there are several things that we'll need um. Now I would advise you just to simply start on your phone connect to Wi-Fi on your phone and then leave it aside and on the computer side, go to the link that is provided in the description, and it should take you over here. So there's a couple of things that you need from this site here, so you need the Samsung drivers, as you can see, that is so.
When you plug in your device, a computer will actually see it and then Samsung by FRP bypass tool. You also need that for the actual process of bypass, so once you have that um, I already downloaded it and extracted it over here. So let's run it now. I have already done this now. Let me just close this.
This is just some trash that opens up every time you actually open up this application. So just close up your browser, uh ads, are the cancer here, but yeah. So once you open it up and close the browser that it automatically opens. What you want to do is start off by tapping on disable driver signature uh. It will then pop you up with a message that you do need to reboot your device, so simply do so um.
I already have done it as you can see uh once you once your computer boots back up. You should see that your windows is in test mode, as you can see for me test mode windows, 10 pro so yeah. I am right now in uh the test mode, which is what this program does it basically boots your device or your computer to test mode and from here all you need to do is reopen the program again and let's plug in our phone. So let's just a satisfying click. There we go, and once it's plugged in all you really need to do is make sure that you're connected to that Wi-Fi on your phone and press bypass FRP before start, you must connect your device to Wi-Fi it's already connected, so that's redundant and, as you can see, it will start the process and there we go.
It's finished so from here. Uh. All you really need to do is well you're kind of done with the computer side uh almost uh before I actually progress any further. I will just add this little info right here, so it's going to be relevant later on, but at this moment we're done with the computer side, so we can kind of well not use it anymore, but at one moment, throughout the bypass on the phone side, we will need to re-plug it in and once you rep lug it just simply type again, the bypass FRP just to get the window uh to pop up again on your phone, which basically is the necessary window that we need to actually get access to things like the web browser. So that being said, let's now switch back to the overhead camera and continue the process from there.
Okay. So now that we're done on the computer side, I can see right here. I should be having this pop up on the screen, just as I do um. So if you see this, you can unplug a phone from your computer and basically do not touch your screen anywhere where the actual pop-up isn't, because if you do, it just disappears so on the pop-up, you want to tap on view. Obviously let it load up, let's accept and continue, and I'm going to say no thanks and then right at the top.
You want to type in hard reset dot info bypass like so. Oh, wait actually not like. So I made a mistake here there we go like that. So if you need a moment, pause it, otherwise, I'm just going to tap on go and up. Oh, I did also misspell it right there.
So let me just fix that up. So how do we set that info slide? There? We go like this. Okay, so from here you should see a bunch of applications, but we're only interested in the galaxy store. So let's click on it from here. You want to select that try now and this will open up your galaxy store.
Now you want to select the agree and then tap on continue and from here we do need to update our galaxy store. So let's select that and wait for the update to finish this will bring us back to. I believe the browser give it a moment and so find out yep there we go, so it looks like this is the case uh from now on that, basically, once it updates, it brings us back to the browser uh before it will bring us back to the actual setup screen. So to get back to where we are right now we would need to reconnect our device and basically run the program once more and basically the bypass part to get that pop-up again and get back here. But if it didn't take you back to the setup screen, then there is no need, because all you need to do now is stopped again.
Try now, and this will simply launch your store now from here tap on the search icon, which is barely visible and from search options. You can select the smart switch mobile. You can see it here. If you don't see it, then you can simply just type it in and from there select the button to download right program here. Smart switch mobile should download fairly quickly now, once it's done, installing you want to click on the play button to run the app continue and allow, and now we want to select that this device will be receiving data, so let's select receive from galaxy android, and I'm going to be using a cable for this purpose.
I do have one over here. These are the cables that come with the newer, newer androids, where both of the ends are type c, so I can connect basically both of the phones with the single cable. But if you don't have such a cable to the possibility, you can use the Wi-Fi option. So simply, would you connect to uh same networks on both of the devices and basically connect them together through Wi-Fi? That's it now, the process will take a little longer over the Wi-Fi than it does over the cable. So that's where I'm going with the cable, so I'm going to select cable and once that is selected, let's just kind of move that to the side and then move that out of the way I'm going to bring this in to view.
So here we got a secondary android. Now this one is unlocked, it needs to be unlocked. I need to have access to it and what you want to start off with is going into the settings and making sure that you do have a Google account in here. So let's go into: where is it accounting and backup manage accounts? And for me? Actually I don't have an account at it, so I'm going to quickly add one. Oh, I actually first need to connect to Wi-Fi.
Apparently there we go so from here once I'm actually connected. Let's add the account there we go, so I'm going to log in if I wouldn't misspell it actually uh come on seriously. There we go, and I'm obviously going to put in a password. So let me move it off the screen. There we go so now: I'm logged in okay, so you can see there is the account so from here once you have added the account: let's go back home, and now we want to open up the galaxy store over here.
Let's agree and continue, and again we're looking for the uh smart switch, and it looks like we do need to update galaxy store on here as well. Okay and once more, let's look for the smart switch which again comes up as a suggested right here, and again you want to download it so again open it up. I think I missed it, so you can select open from here and now. Let's allow to allow to continue whatever and let's grab our cable uh assuming you're, using a cable if you're using Wi-Fi, then going to choose Wi-Fi later on so on this device. I'm going to select that I am gonna, be sending data so send over a cable there.
We go and connect just unplug it and rep lug it, maybe okay, so there we go so let's select allow here- and this is going to start. This phone is gonna, start reading the data that is on this device. Let's give it a moment- and you can see right here- uh there's a bunch of stuff selected in here, so we're going to top right at the top to deselect. All of it, and all we want to select now is the accounts, settings and home screen, so only those three and then scroll down and tap on, transfer and right here will bring up this question. If you want to copy your account, so obviously we're going to select copy because we do want to, and this will bring up a login screen right here on our lock device.
Now this account is the account that we have logged into over here. So you obviously should know the password for it. I'm going to take it off the screen, and I'm going to put in the password for this account. Okay, there we go uh, so it looks like uh when you're doing the transfer here it is case, sensitive, uh. Well everywhere else.
It's not! I don't know how that works, but whatever so, let's just wake up our device, hello. There we go okay, so from here transfer your account um, I'm not sure why it's staying on this one considering it shouldn't be, but let's just select skip, I guess. Hopefully it worked. I guess we'll find out. Okay, so from here, let's just select go to the home screen which won't go home screen, we'll go to setup screen, which is okay, unplug the device get rid of this one, because it's not needed anymore, assuming the account got transferred and from here we're gonna, simply progress through the setup yeah, and it worked as you can see, it gives us an information that account was added and right here.
You can see that this is the account that I have that has logged in. I can even bring it back up just go back here. If I go into the settings, accounts bam right here you can see. This is the exact same account, so it got moved from here to the locked device overwriting. The other account that we needed to verify, so we need to do, is tap on next and finish up the setup right here now.
At this moment I would recommend you to basically skip everything you can. It doesn't really matter how we set up our device right now, because we still need to perform a factory data reset of it, so just skip as much as you are able to so once the process is finished, and we are on the home screen. Let's just wait for the apps there we go so from here. Let's go straight into the settings, scroll down to general management, select reset, and then factory data reset and from here I'm gonna just select reset and delete all, and this will begin the process. So obviously it's going to start removing everything that includes your Google account along with the old one that was blocking us and once the press is finished, it will bring us back to the android setup screen, but at that point the device will be fully unlocked, so you can set it up as, however, you like now, I'm gonna wait for this to finish, and I'm going to go to a quick setup once I can so see you then, and as you can see now, the process is finished, so you can set up your device as, however, you like now, like I said before, I'm just going to go through a really quick setup.
Just so you can see that I don't actually need to confirm anything and there we go as you can see. That is it. So if you found this, video helpful, don't forget to hit like subscribe, and thanks for watching.
Source : HardReset.Info
Phones In This Article
Related Articles


Comments are disabled
Latest Articles


