Broken smartphone to working laptop transformation By DIY Perks
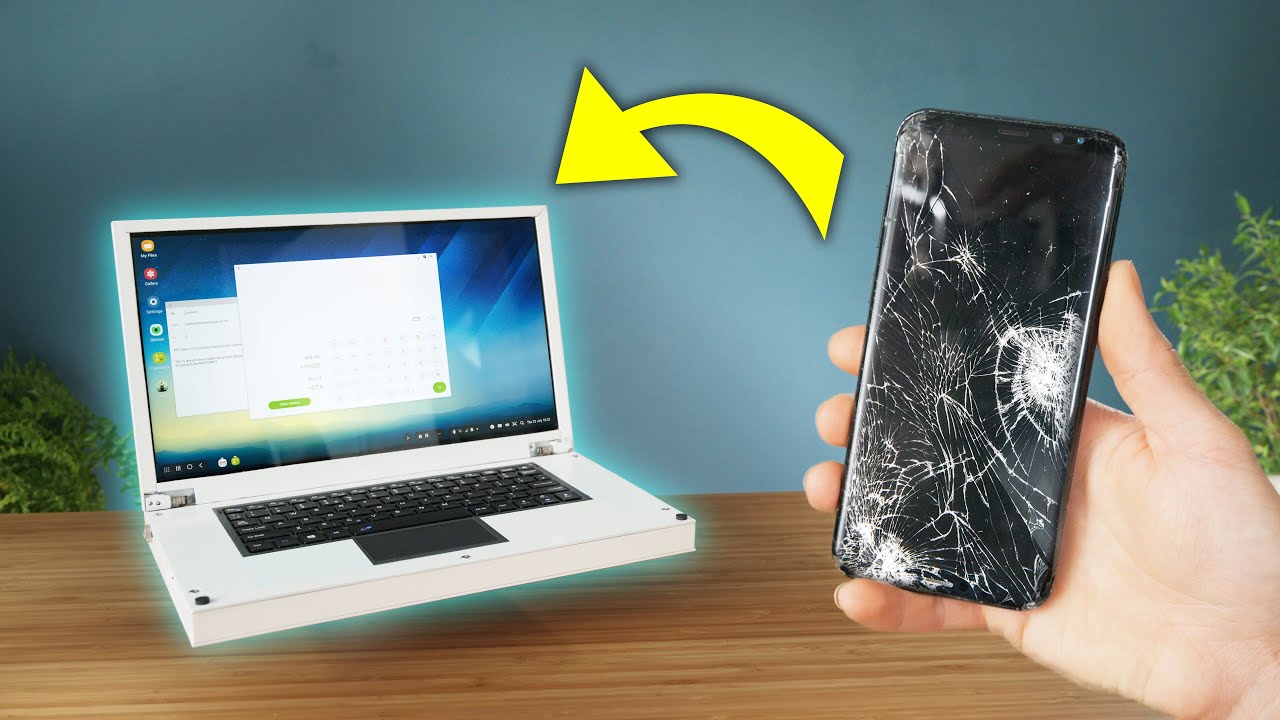
Smartphones are brilliant things, and they're super powerful, but if you drop them even just once, they can be rendered completely unusable like this one. However, if this is the case with something that you have don't throw it away because there's something pretty cool we can make out of it, which is the focus of today's project and that's to make a fully functional and actually quite useable, DIY laptop, let's get to it despite being homemade. This laptop is surprisingly useful, and it allows you to do things like write up emails run, various apps in a multitasking environment and even watch media or play games. Battery life is great as well allowing for 17 hours of continuous use, which makes it quite a workhorse. The software is a big part of what makes this experience work as well, and there are quite a few cool options for this, including vaguely mimicking a Windows, 10 PC, which I'll be exploring in plenty of detail later, so the phone I'm using for this build is a Samsung, Galaxy S8 and, as you can see, it's been rather smashed up. Despite this, the phone internally still works, although sadly, with a large dead zone in its touch digitizer layer making it frustrating to use as it doesn't register touch within this zone, as it's essentially useless.
Because of this is a perfect phone to use for this project. Especially, is it's so bashed up externally that it's just not worth repairing now, crucially for this product, it, like many phones, can send a display signal out of its USB port, which leads me onto the first required component for this build-a-bear LCD panel with an accompanying control board. Variants of these have been around for a while, but this one features a new 2020 control board, which utilizes not only USB type-c for power, but also USB type-c for the video input. This means that the phone can just be connected directly to it, with a USB, type-c cable, resulting in a crisp and clear display output, that's very bright and with vibrant colors, it can even charge the phone at the same time thanks everything being USB based nice. Now, there's a lot to set up in order to run the phone on the display as a desktop like environment, but I'll be going into that later.
For now, though, with these panels being so thin, they ask somewhat flexible and fragile. So the first thing we're going to do is build a frame to go around it. What I suggest for this is using some epoxy to glue it onto a sheet of 2 millimeter thick aluminum, to make it nice and rigid. This feels a lot more substantial, and it's a great way of giving it extra strength without adding much to its thickness. As you can see, I've pre-drilled a few holes in the bottom corners of this aluminum sheet, which are for screwing, some stiff hinges in place.
In my case, these were salvaged from a scrap laptop now. This still looks rather exposed, particularly for the electronics, so the next step is to get some aluminum angles and trim them down so that they fit over the sides to function as protective bezels you'll need to cut the ends of these at 45-degree angles so that they fit together well, after which it should look. Something like this now I. Quite like the look of the poor aluminum here as it's fairly industrial and cool, but to give it a more polished, look we're going to give it a coat of paint. So, after masking off the screen, we can first use some self etching primer for the base coat.
This needs to be applied as several thin layers for a strong finish and once left to thoroughly dry. It gives an extremely tough matte surface. That's ready for your choice of topcoat. You can choose any color or finish you like here, but I'm, going to keep things simple with some gloss white again, applying it to several thin layers, and indeed once the masking tape has been peeled away. It looks pretty sharp so with the screen now sorted.
It's time to work on the laptops base, which is again going to be constructed out of aluminum, to make the sides of this base will first need a set of aluminum new channels and, as you can see, these have been cut down with 45-degree angles again, so that they fit together nicely to mount these together. What we'll need is another sheet of 2 millimeters, thick aluminum, which will function as the bottom plate. The new channels need to be clamped on to this, and then some holes drilled through to them from the back. This will allow us to later use screws to fix them in place, but before that we need to add a set of screws in the bottom plate, with the idea being to allow a sheet of plastic to slide forwards and backwards on them. The reason for this is to disconnect the displays control board from both of its USB ports at the same time functioning as an on/off mechanism which prevents the board from sipping power once it's disconnected now, this plastic layer is actually just lightweight PVC, so it can be cut through quite easily, which is handy for making the slots to stop it from lifting away.
However, we can use a few nuts and washers to cap off the screws. Now all that's left to do is make the lever for which we need to get a strip of aluminum and hammer it into an l-shape once screwed in place and with a matching hole in the side you channel, a thumb screw can be used to slide it back and forth in this new channel. By the way, you may also want to add a few holes for the displays, control, joystick and headphone port. The only other piece that needs some work is the ACU tunnel as it needs some mounting holes for the stiff hinges and also a slot for the display ribbon, cable, a hole for a USB cable to pass through and a hole for a power socket which will later be used for charging. So with all of these pieces, prepared it's time to neaten them up with some more paint again.
This is a few thin layers of edging primer, followed by a few thin layers of topcoat once they're all dry. They like the screen, have a really nice finish, and they can be bolted together as well as have the screen mounted in place now. This is starting to look really cool, and we've only got a few small things left to do before we can use it, the first of which is to add the display board onto the plastic slider. As this moves easily back and forth, we can now add its USB cables, the first of which is for the display signal here. It's important that the cable is a fully fleshed-out USB type-c cable, rather than just a charging cable, as it needs full display transmitted capabilities.
Usually these are labeled as USB-C 3.1 cables. Now, while the display can be powered on by the phone itself, using this single cable, I recommend adding a power bank as it provides significantly longer battery life and is essential for using the desktop environment. So, with both the display, cable and power cable in a neutral position, we can now completely cover them with epoxy once dry. This holds them fast, allowing the board to plug in and out of them when it slid forwards and backwards. Now, I couldn't resist giving it to test out.
At this point and sure enough with the phone in place, the new mechanical power switch works perfectly to turn it all on so far so good. Now to keep the power bank topped up with power. It's a good idea to redirect its charging socket to the back of the laptop. This can be done by simply cutting through a USB charging cable and connecting it to the little power socket I mentioned earlier. When we're done, this power socket can have a USB Jack adapter plugged into it, which will directly charge the power bank from any old USB port or phone charger.
Another important thing to do is, of course, add a keyboard and trackpad so that we can actually use the thing. What I recommend for this is a Bluetooth keyboard cover from a tablet, as this will give you a full typing experience, as well as cursor control, thanks to its built-in trackpad. This magnetic strip on the back isn't necessary anymore, though, as we aren't going to connect it to a tablet, so that can be trimmed off to neaten it up, and another thing you might want to do is remove the back panel in order to solder a pair of wires directly to the charging port. These wires can later be connected in parallel to the power socket that we just added, so that it too will be charged when the laptop is plugged in now to attach this keyboard to the laptop, we can take another sheet of aluminum and score round the keyboard. To give us a cutting line, this shape is a little difficult to cut out.
So what I suggest is using a drill to make a pilot hole in the corners and then using a step bit to open it up to a matching radius. You can then use something like a jigsaw to cut between them, which results in quite a nice frame. Once this has also been painted, we can glue the keyboard to it using epoxy, which means it's ready to be mounted in place. One thing you'll notice here is that I've already made some screw holes for this job. They were drilled earlier before the electronics were added by first making some pilot holes through the aluminum and then adding some little threaded inserts to give the screw something to thread into now.
As you can see, it is somewhat beefy, but this is, after all, a DIY laptop, and it's completely unique. Looking now, you might be wondering why I haven't left the phone inside the chassis. One reason for this is that aluminum kills the Wi-Fi signal, so you wouldn't be able to use the Internet if it was left inside. The case to get around this, you could simply use some wood for the sides or around the keyboard, for example, but instead what I recommend is wrapping the phone first in food wrap and then using some sure to mold some custom clips to hold it against the back of the screen once this is set, it holds the phone quite well and retains full Wi-Fi access, as well as the ability to still use the rear camera, which would be super handy if you need to scan a document or something. It also opens up the design to work with phones that have been looked after well, as they can just be simply slid in place when you want to get serious with some emails etc.
and then removed when you want to go out. So how is it to use well sliding the power button in place immediately connects the phone and power bank up to the screen and as I'm using a Samsung phone, it automatically triggers the phone to launch its desktop mode, which is called Samsung decks. This is actually really awesome. Software that allows you to operate the phone and apps as if it were a real laptop with multitasking capabilities and far more space to work in compared to the phone on its own typing. Things up is a breeze thanks to the keyboard, and it's genuinely useful to have access to the many thousands of Android apps out there on a full form-factor laptop.
Even just watching, media is a great experience thanks to the quality of the display, although this does bring up something I missed out speakers originally I did want to include some small one inch drivers, but it turned out that there wasn't really any room for them in the end. If you want to have a go at having some tea or so it's worth, noting that the control board does have some speaker ports, especially for this job as I'm happy with the phone's own speaker, output, though I can live without the extra speakers, but I can always plug in some headphones or pair up a Bluetooth speaker if I want to improve things either way is a brilliant build and a great use of a smashed-up phone. So, overall, this works brilliantly, especially if you use a smartphone like a Samsung, Galaxy, s8 or newer thanks to its built-in desktop mode. But what, if you want to use an older phone that doesn't have a desktop mode or even feature something like USB type-c, well be exploring this topic in just a minute, including how to limit a Windows 10 machine, but before that, it's time for a quick ad from this video sponsor links blink Asst, take key insights from over 3,000 non-fiction, bestsellers and condense them down into 15-minute blinks, which are condensed explainers. That help you to understand the core ideas at hand.
These can either be read through at your own leisure or even better, listen to which is great for when you're perhaps commuting to work or cooking a meal. Now a new feature that they've got. If you want to dive into topics more deeply is full-length audiobooks and premium members get up to 65% off retail pricing. So if you go to Venus comm /, DRI perks, you can get completely free, unlimited access for one week now you can cancel at any point. So there's no pressure, but if you do decide to continue, you get 25% of a premium member.
So again, that's blink, Storm, slash, DIY perks right. So what? If your phone doesn't support a desktop mode nor USB, type-c video output? Well getting around USB type-c is quite easy because you can use an MHL adapter if your phone supports it. This just plugs into the USB port and adds an HDMI output allowing you to mirror the phone onto an external display. This works with any monitor or display board that has an HDMI input, including the one I used earlier, as it does feature HDMI along with USB type-c. One downside to this method, though, is that you'll just have a standard, Android interface, and you'll need to install a little app to force rotate.
The screen, once this is done, is actually somewhat decent, and you can do quite a lot with it to make it more laptop, like, though we can install one of the several apps that mimics a Windows 10 environment. This works as a new home screen from which it can launch your apps, and it even features a pretty good copy of File Explorer. It doesn't feature multitasking or anything like that, but it is still super neat to see, and it does make it feel like you're, using a Windows, 10 machines nice, you can even have a bit of nostalgic fun and install a Windows 98 simulator, which brings back a lot of memories, so I hope you've enjoyed, seeing how to take a smartphone and convert it into an actually useable, laptop I. Think it's a pretty cool project. Now, if you are a DIY, Perks superfan, you might be interested in the new DIY, perks, discord, server and there are all sorts of discussion going on there about DIY projects both from the channel and also things that people are doing in general.
It's a really cool community. So if you want to join it, you can go to patreon. com/scishow everyone who does join and is already supporting me on there, because this channel is my job, and I'm so grateful that I can actually do it as my job, and I've got each one of you, even if you're just a viewer to that, for it so other than that I'm apt, you've been watching DIY, perks and I. Hope I see you next time. Goodbye for now.
Source : DIY Perks
Phones In This Article
Related Articles


Comments are disabled
Latest Articles


