Acer Chromebook N16P1 CB3-431 Disassembly LCD Repair Replacement By It's Binh Repaired
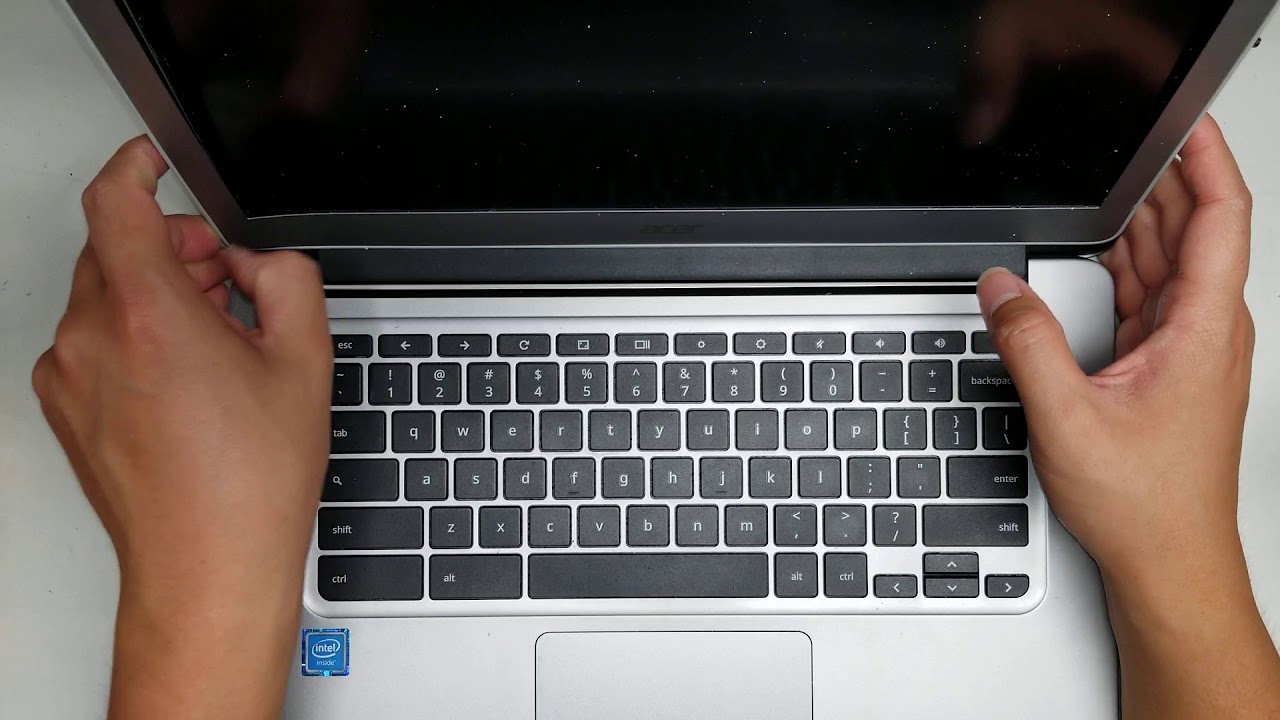
All right, so I'm gonna show how to open up and disassemble this Acer Chromebook model, n16, p1, okay, I'm, not sure, there's also a model number, but it says CB, 3, ?, 4, 3, 1, okay, so first what you want to do is remove all the screws from the bottom, so this uses a pH 0. So there's one two: three: four: five: six: seven: eight nine ten! Alright! So once you remove all those screws, you can go from the back or if you have like PI tools or your fingernails, you can kind of get along the edges, but I found the back works the easiest. So it's clipped in like this. Basically, you just get your fingernails and kind of pull on it and then, while you're doing that, you can slide a pry tool or your fingernail along the side. Alright, just like that, and it pops open okay. So here you can see the clips.
Alright, you can see everything alright know. What you want to do is disconnect the battery first. So to do that, you want to undo the screws that are holding the battery in place. Alright looks like there are two screws: okay, so remove those two screws, alright keep the screws in order. You don't want to get them all mixed up.
Alright, then you can lift the battery up, see if there's another one, okay, yeah so lift the battery up and then try and get the connector out. So it's a little tricky because the board kind of extends a little, but I use my fan, nails, and then I can pull it like that. Okay, then, after that, you can lift it out. Just like this battery model is, as you can see, hopefully, Acer ap1, three j3k alright, and that's how you remove the battery all right and then here you can see the keyboard connector. So this it slides out the latches slide down like that, and then you can pull the connector out I'm going to leave it in because the only thing I need to change is the screen.
So here you can see the touchpad connector these. You have a little latch that you flip up, and then you pull these out all right, and then you got this board on the side. The audio board with the lights and then also the speaker, connector here so that comes out just like the touchpad one and the speaker goes all the way around to this other speaker all right, then you got the connector for the DC jack or the charge port, pull that out just by grabbing the wings, and then you just keep wiggling this and eventually the connector will come out, don't try and pull too hard because you didn't break it, but yeah just wiggle it, and it'll pop out like that all right. So we put this one back in alright and usually after you remove the charge port or not the charge for the battery to be safe. If you're going to do anything with the screen cable, you want to hold the power button.
So after you take out the battery open, it uphold the power button for a few seconds, all right once you do that, you can close it I actually don't need to take out the screen connector because I'm replacing the screen from the other side. But if you do peel up this tape, and then you can kind of get the edges of the connector and kind of pull it out, be careful if you try and pull from the cable, because you can actually damage the wires that way all right. Everything else is part of the board. Then there's the wireless card here. If you need to replace that there's the two Wireless antennas here, so you can pop it up just by like pulling up from the tail, and it'll pop up at an angle and then there's one screw holding you in place to put it back, you just line it up and then make sure it doesn't wiggle around and then just push it back down.
Okay, so that's how you would open that I'm going to put the cover back on, so I can flip it over and then go to changing the screen. Alright, so put the cover back on just so it doesn't get shorted or anything on it. If I were to set it down. Okay, so cover back on then go back to opening the screen. Alright, just lift it open like that and then to open the screen.
You just get your finger, nails or pry tool along the edge here. If you're going to do this make sure that your screen is already broken if you're using a pry tool, because if you kind of pry out in here, you actually damage the screen. This screen is broken, so that's okay! So what I do is Lisa here if I can show this, so I get my fingernails under here, and then I use another one on the side here to kind of push it forward. Okay, so let's see it's difficult to do this and be in camera? Okay, so just like that, alright then we'll go to the top I think this one has an adhesive, so it makes it a little more tough, but basically just go around the edges. It's hard to do this on camera.
I might not be able to do this on camera. That's good fight! Okay! There we go okay, so just like that, I slide my thumb along the other side and then I kind of pull another one. So hopefully you can see all this just like that, and then what helps is. If you get this, you can actually push the bezel inwards while your kind of pry it up. Just like this.
Okay I, don't remember. If I had to take out this whole piece, hopefully I, don't all right and if this gets stuck, you'll have to use like a pry tool. So you can use a tool like this something thin and then just be careful not to stick the tool too deep, or you can cut the wire but um basically just go like that along the front and that'll get that he's about. Okay, alright, so just like that all right, once you get it going, you can slide your finger along just like that. All right and the thing comes out just like that all right and then to replace the screen.
There's only four screws holding the screen in place so take the four screws out, see everything we need to take these four screws out all right and then once you get the four screws out, lift it up, and then you can pull the screen forward. Hopefully, you can see this pull the screen forward, and then you can lay it down, so be careful with the cable, it's kind of short but yeah. Once you get that, then you can peel up this said he said it's pretty strong, okay, just peel that he said back alright, this one that he Civ is sticking to the screen, but not the plastic tab, so I'm, probably going to have to add adhesive on top or a piece of tape. Okay, once you get that you can go towards the wings of the connector and then kind of wiggle it out just like that, and that's how you remove the screen. Okay and then to put the screen the new screen and just get the new screen.
Lay it down like that and then take the connector and then reconnect it all right, but that's pretty much all there is to it yep. So hopefully, this video helped you if it did please like and subscribe, because that'll help me, and thank you for watching make sure when you pull this connector in that it goes in between the two, the slot not on top I've. Had some people bend these, and then they bring it to me because they broke it so make sure it goes within the slot and then just pull it to get it seated completely tight. So, as I said, this tape kind of the adhesive isn't holding well, so I'm going to put some more tape on top, but other than that. That's pretty much.
It there's also the camera and the microphone in the top here, if you somehow damaged that but yeah. Thank you for watching. Hopefully again, hopefully this video helped. If it did please like and subscribe, because that'll help me and see you in the next one bye.
Source : It's Binh Repaired
Phones In This Article
Related Articles


Comments are disabled
Latest Articles


