Xperia 1 ii Photo Pro Tutorial (PERFECT for BEGINNERS!) By James Lavish
The Sony, Xperia 1 mark ii has a great set of cameras, but its real genius lies in the photo pro app. So that's exactly what we're going to talk about today before we start to all you knew subscribers. Thank you. You're literally pushing this channel forward, and I'm super excited to have you as part of the photography community here and if you're new, we do simple to understand, photography and video tutorials and sites and reviews so hit that subscribe button. You won't be sorry, okay, so if you saw my video last week, then you know all about the new experience, camera's strengths and weaknesses, and you also know that this phone really shines in the pro apps. And if you haven't seen that video, it gives you plenty of examples from all three apps and I go into deep detail the capabilities of each of those apps.
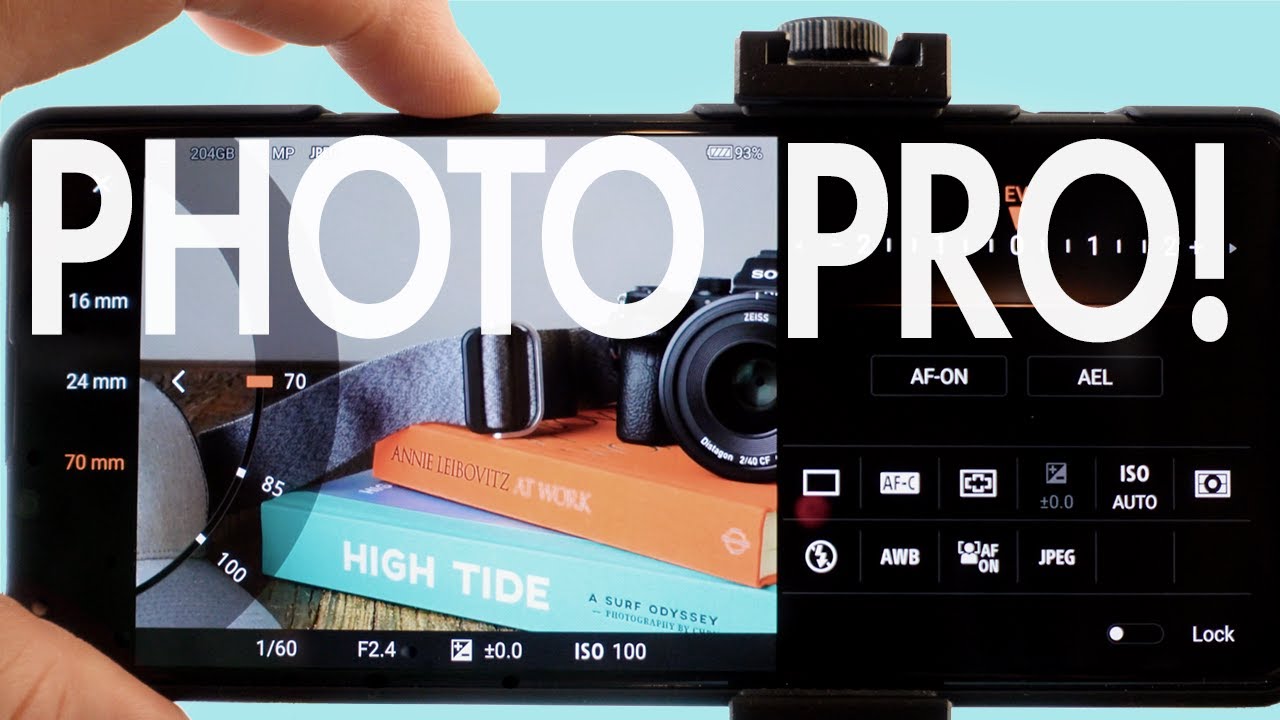
So I encourage you to go see that first I'll leave a link below, and you can go check it out anyway. I've gotten a lot of questions about the interface and the features of each of these apps, and so today we're going to go over the photo pro app. So if you're already familiar with the Sony alpha system, and you're comfortable with the manual controls of a camera, then this video is probably not for you, but if you're new to Sony- and you either have this phone or you're thinking about getting it, and you're interested in using its cameras to their full capability, then this may be exactly what you're looking for I'm going to walk you through all the features and controls of the photo pro app, and I'm going to show you exactly how and when I use them to maximize my chances of getting a great photo right in camera by the end of this, video you'll have a good understanding on exactly how the photo pro app this phone and its cameras, work, and you'll be ready to take some great photos yourself. So, let's get to it. Okay, so here we are, and we've got our still life set up, and so the first thing we do is open the photo pro app, and you'll notice that it will be on auto mode most likely when you open this up for the first time, and I would say that if you're just running around taking snapshots and quick photos, you'll probably end up just staying in the regular camera app, but there is an advantage to staying in auto mode on the photo pro app, and I'll show you in just a second, but the first thing I would do is I would decide what mode to be in and so you've got choices between program mode, shutter, priority or full manual.
So if you put it in program mode, that's typically what you're going to use if you're trying to take photos quickly and there's changing environments where there may or may not be people involved, and you're using eye autofocus, or you're. Trying to take quick snapshots of your kids and what's great about program mode, is you can still choose between a number of the different features here in the Sony alpha camera system, and so the next thing you'll probably want to do, is decided what lens you want to use, and so you just touch this button here, and you've got your choice between 16 24 and 70 millimeters. And if you saw my review on this phone and camera, then you know that you can use the volume buttons to zoom in or out a little closer to your liking. So you could zoom between 24 and 70, between 16 and 24 and if you go to 70 you'll be zooming up to 200. Now, remember that each of these zooms is a digital zoom.
It's not optical, so they're not blending the cameras together somehow to give you a different lens focal length. So if you do choose to do that, you're using some digital enhancement on your lenses, okay, so the next thing I would do is- I would probably decide whether I want to be shooting in JPEG, raw and JPEG or just raw. Now, typically, I would choose raw and JPEG and when I would not do that is if I want to do some continuous high speed shooting, because you can only use JPEGs in the continuous shooting modes. So let's keep it on JPEG for now, so we have the full range of options. First, in this button you would choose your drive mode, which would be single, shooting, continuous, high speed, shooting, which would be 20 frames per second continuous low speed, shooting, which would be 10 frames per second, and then you can have a self-timer.
If you want to take a nice selfie with the back camera, you could set it up, have a 10-second timer get into place and have the camera take the shot or this three-second timer is nice. If you have a tripod, and you don't have a remote, and you just want to eliminate some camera shake from the tripod, you can use it three-second timers it'll take a photo after three seconds, but for this we'll do single, shooting and then the next option is your autofocus mode, and you can choose either manual focus. So if you're trying to do something creative or if you have bionic eyes or something you can see on this tiny screen exactly how well it's focused, you can use manual focus, or you could use continuous autofocus or in this instance, we'll probably just use single shot. Autofocus. The next option is where to focus.
So if you have people moving around your frame, or you're trying to take pictures of sports or your kids playing, you probably want to use the wide focus choice, because it will use the whole sensor to determine what part of the image it should be focused on and then the other reason you might want to use wide is that you want to touch exactly where you want to focus rather than just the center. If you're taking a portrait you're most likely going to use the center focus as a default, so here's your exposure, compensation value option and that's right here and in the slider you can move it up. One stop one and a half stops. One two thirds stops two stops, and you can see the photo get brighter as you do that, or you can move it down a stop or increments down to minus two stops, and you can see the image get darker as you do that, but something that can be super helpful when you're using the exposure compensation values is, if you turn on your histogram, so you go back to display here, and you can have your level and your histogram on. So you see that the photo is level and then the histogram is kind of bunched here to the left.
Now I've done a whole video about histograms and how you can use them to maximize the dynamic range of your camera. So if you haven't seen that I'll link that below- and you can check that out and looking at the histogram, you can see that it's bunched up here to the left, and so I would move this exposure to the right and I would keep going until I see that graph push all the way to the edge without going off the edge, because that's where your highlights are- and that would mean that you're blown out now in this instance we're only doing JPEG. So we won't have as much flexibility once we take this image to dial it back later, and so I would be careful and not push it so far to the right that it might be overblown. I would pull it back a bit, so it's maybe right about there. So it's a little more exposed, and we'll be able to capture all of those details in the shadows and if we want to darken it down in post, that's a lot easier than trying to brighten it up.
So because program will automatically choose your ISO and your shutter speed. You can know that you're on a tripod here change your ISO to be the base ISO, which will give you the cleanest image, knowing that it will just drop your shutter speed to 1 30th of a second. But that's okay, because we're on a tripod- and you don't mind that being lower. Now, if you're just running around and taking handhold photos, I would keep this ISO on auto. Just be sure that my shutter speed doesn't drop so far that I wind up getting blurry images because I'm moving around and the camera's shaking.
So the next option is your metering mode, and this is your light metering mode. So you've got three choices: you can either use multi center or spot now spot metering would be. You choose how the photo's going to meter according to which spot you touch. So the photo's exposure will change according to where I want the camera to meter, and you can see that the histogram moves around according to where I'm touching here and how bright I want the photo and having it meter in this area seems to be about right, but you have a choice of there, or you can use center and so it'll meter the photo according to how much light is in the center of the image all but ignoring. How much light is on the edges of the image and then multi will try to compensate for bright areas and dark areas, no matter where they are on the image.
So if you have a super bright area in one area and a super dark area in another area, the camera will try to compensate for both of those and maximize the dynamic range to try to capture either or without blowing out your highlights. Your next option would be flash and whether you want to use some fill flash or in here. You also have the option to use red eye reduction, and you can turn on a flashlight. But for now we'll just keep this off. This next option would be your white balance and right now we have auto white balance on, but we can change this according to how warm or how cool we want.
The image to be so incandescent would be the coolest, and you would probably use this for night shooting modes shade will be the warmest because it will over compensate for cool areas. Making them warmer. Daylight is a little more of a balance and, of course, cloudy will be a little warmer as well, and then you always have the option of choosing a custom white balance, and then you take a piece of paper or a white card, and you put it in the middle of the frame you press set, and it will adjust the white balance according to that value. And then, if you feel like it's a little off, you can adjust, and you can make it a little cooler make it a little warmer. You can add some magenta or some greens or yellows, and it gives you a great amount of control.
Actually, it's super impressive and then your next option would be your autofocus and whether you want to have bass detection- and I would normally leave this on unless I know that I'm not taking any photos with faces on them like if I'm doing, architecture or cityscapes, and then I would turn this off in order to save the camera from trying to find a face, and it'll be just a little quicker on the autofocus okay and then these two buttons here are your auto exposure lock. So if you're touching the screen for your focus, but you don't want the exposure to change, then you can do that by locking the exposure and then this next button is your focus lock. So if you have your focus set to here, and you press this, then it will lock the focus there, and it will not change, and that can be handy in certain situations. And then, if we want to make some global adjustments to these settings, we go into menu, and you can see in the shooting menu. We have our file format, and you can choose between raw JPEG and just JPEG and our aspect ratio.
And if you saw my last video, you know that the center is actually cropped here, and you'll lose megapixels. If you use one of these different aspects, so I usually just keep it 4x3 get it close to the crop that I want and maximize the megapixels, and you've got your drive mode same as in the menu in the camera app and then the same thing. You've got metering mode and flash mode as in the camera app. But here you also have the option to turn on the dynamic range optimizer or auto HDR, and so what these do is that dynamic range optimizer will take a single image and try to optimize and maximize the dynamic range by using some computational imaging and the auto HDR will take multiple exposures and then blend them together in a HDR like result, and so because Sony is not yet caught up in the computational imaging game. I've left this off, and it seems to be working the best for me that way and then, of course we have that soft skin effect and if you saw the last video you know that I don't really love that, and then you've got your focus settings which are the same as inside the camera.
App there's nothing different here and in setup. You can change some settings to change how the screen reacts to your touch. So you could change this to just be autofocused rather than focus and brightness, or you can add, grid lines which is great for landscape artists or even beginners, who are trying to make sure that they have their image balanced. Using the rule of thirds, say you can recalibrate your level to be sure that it's right are seemed to be right, so we're okay, there you can change the volume keys and how they act. I like to keep it as zoom, but you can also just change it to volume, or you can make them the shutter, but that doesn't really make much sense, because you've already got a shutter button.
That's dedicated on this phone! You can change the audio and how that acts and whether it's just the shutter that you hear click or there are clicks on every single button that you touch, I like to keep it to shutter. One of the great things about this phone is that you can put a SD card in it and expand your memory and then save all of your images onto that SD card, which makes it super easy to then transfer them to your computer just by taking the SD card and plugging it into that, and then you can have your GPS on and then there's a small tutorial section, which is not really much. It just gives you a couple pages of how to use the camera, and that's not really all that helpful. So that's, actually. Why I'm doing this tutorial? Am I've gotten a lot of questions about how to actually use the camera app itself? And, of course you can reset your settings back to the original default settings for the app okay.
So, just a quick insight to how these different modes work, if you're in program mode- and you have your exposure compensation value at zero, and you've got your is oat auto. The camera will then make the decision on how to change these values in order to expose the image properly. So if we turn the light all the way down, you can see that the ISO and the shutter speed will change accordingly, and the camera is going to make its best guess at what these values should be in order to get the right exposure. So if we turn the light back up, you can see that these values will both change according to where that light is, and it's just making an estimation as what the best settings would be for this exposure. Now, if we change the ISO to the base ISO say, and then we did the same thing, and we turned the exposure way down, we turned the light way down.
You can see that the only thing that will change is the shutter speed, because the program mode will only be touching the shutter speed. It can't change the aperture and the ISO is now fixed at the base ISO. So the only thing is changing is the shutter speed? So then, if we go to shutter priority, and we choose our shutter speed and say that's 250, and you know that the aperture is fixed, and now the shutter speed is fixed and so that ISO is going to change in order to compensate for the change in the light. So if we maximize this, the ISO will go down to its base, ISO or as close as it thinks it needs to get to expose properly, and if we dial this back the other way and turn the light down, the ISO is going to go higher because the camera knows it must amplify the light. That's hitting that sensor in order to expose the image properly and then one final thing is: if we go back and put our eye autofocus on, and we put on our continuous autofocus, then even though we have the camera focusing on those books and the camera in the background, if we take this magazine here, and we put a face in the image, then you can see that box will detect the face, and it will focus on that face because that's the priority.
The eye autofocus is on and face priority is on, and so that is what the camera will focus on and if we half press the shutter it'll find his eye, and it'll stay with that, no matter where it is in the frame and no matter what else is in the frame, because this is the priority, and so that will be the part of the image that's most in focus. Okay, so don't forget to check out that full review. I did on the Xperia and all three of the apps I'll leave a link below, and you can check that out. I hope this video helped and if you feel like it did, please hit that like button. As that really does help.
And if you haven't already don't forget to hit the subscribe button and that little notification bell to stay in the loop around here, and I'll. See you in the next video.
Source : James Lavish
Phones In This Article


Related Articles


Comments are disabled
Latest Articles


