Samsung Galaxy Z Fold 2 Whitestone Dome Screen Protector Unboxing By TheDigitalDigest
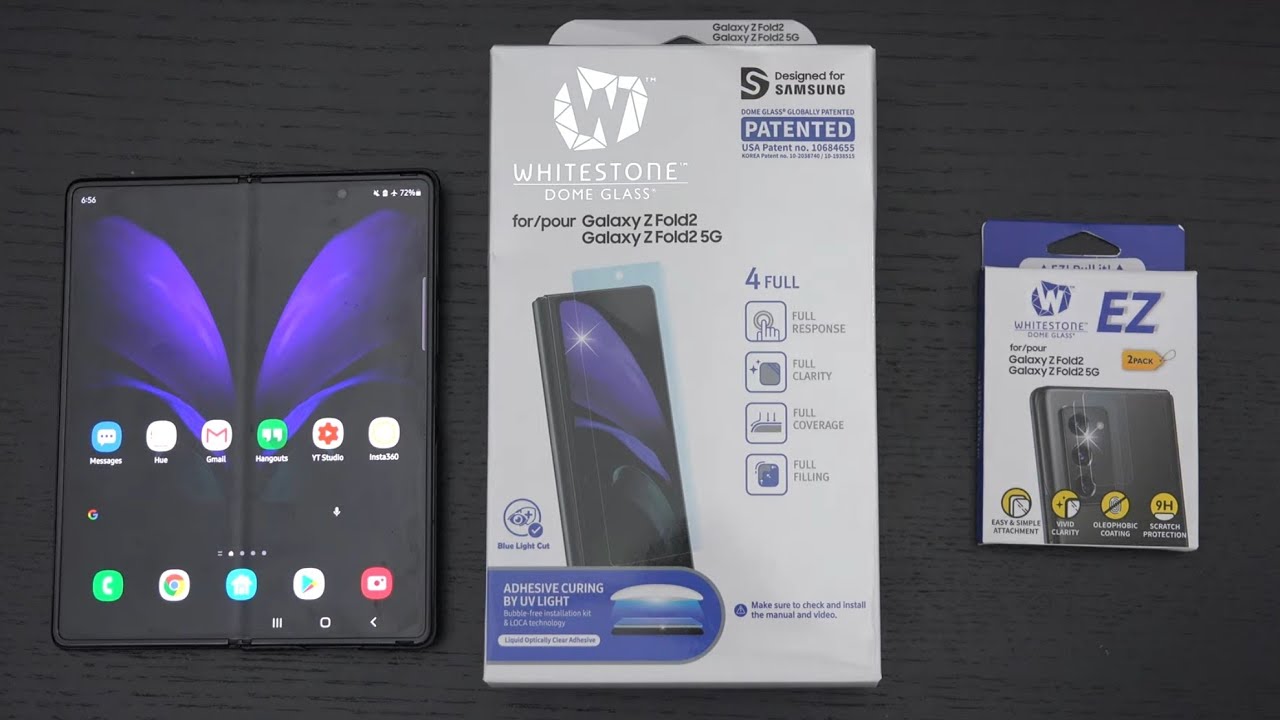
And here with the digital digest- and today I wanted to share a quick, unboxing and first look at the white stone, dome glass screen protector for the Samsung Galaxy z, fold, 2. So for those of you that have followed my coverage of this beast of a phone, you already know that it is very well-made and at 2 000 us dollars. You want to do your best to protect it, and while you can't do anything in terms of screen protectors on the interior display, you can on the exterior and if you caught my video the other day about the two close calls I've had with this one slipping out of the pocket into the well of my car in between the seat and the door, which was scary also at the ROG park, the ROG that infamously kicked up, rocks and hit the screen, even though this was actually, I was on a call. So this was against my face. So technically the rocks hit me in the face as well. I want to do anything I can to protect this and the plastic screen protectors they're better than nothing, but it's time for something, that's better and that's exactly where white stone comes in so uh at, I believe around 50 us dollars.
I'll include a link in the description. This was just sent over for review by white stone they're based out of South Korea. They also included easy uh protectors for the camera array on the back as well. This is a two pack. I think it's something like ten dollars.
These are much easier to install than any of white stone's. Traditional glass screen protection systems, even though now they do have a whole new system that I'll cover in another video. But so you know, basically you have to make sure you want to undertake this process. I have an installation, video for the note, 20 ultra, take a look at that and that'll give you an idea of whether this is something you actually want to get yourself involved with. So let me go ahead and get this open, which should open from the back here.
I believe there we go. I just butchered that nicely. Furthermore, I tend to with these white stone, dome boxes, and I'm not expecting anything new here, because this unfortunately does not include their new e-jig system, which kind of makes it turn key that you don't have to go through all the motion. So the first thing you're going to see is the UV curing machine. Now you want to make sure that this functions before you go through all the steps of actually installing the screen protector, because if this is not functioning, then you can't cure the screen protector to the phone, and you've done all the steps for absolutely nothing and again.
I reiterate this not because these have a tendency to be bad out of the box, but if you missed my previous videos, I've seen at least one review where someone has said they went through all the steps and then, unfortunately, the curing machine was defective. So I always recommend test this first before you get into any of this, and the UV curing machine is really straightforward. It is literally just an UV light panel that you're going to essentially once the process is finished, move over the portions of the device in order to make sure that you've cured the actual screen glass protector to the phone itself. So that's the device comes with an USB cable to power. It no power, brick you're, going to have to use your own brick.
For that, and essentially this is all I mean it's looking very similar, maybe a little different from past. Essentially what they give you are all the things you're going to need to clean the device thoroughly. This front screen also removes any dust so stickers, isopropyl wipes all that good stuff and then, above and beyond that, you can see they've got guide stickers, dust absorbers. They cover all the bases, your lint-free dust-free, I should say hopefully they're lint-free wipes and then uh LCD screen, cleaning cloths. Essentially what I was just referring to is like the isopropyl equivalent, and then you have the actual frame assembly for where you're going to be dropping the device in.
But let's get the paperwork out of there, and this is already so. I don't think this was ever like this in the past, they've already pre-installed, all the absorption pads here, which is smart. This is something in the past. You have to do yourself in order to make sure no excess liquid in the process of applying the liquid to the actual screen. You don't have runoff and essentially that this absorbs any excess liquid.
So, basically in here we have our warranty info 20 off for the next purchase some more stickers for absorption. I think these are to protect the speakers and earpiece. You want to make sure no liquid gets into those, and then these are the glass. Well. Is the glass screen protector only one in this pack? It is not a two pack.
You know they've been doing two packs lately a lot you can see. There is the glass itself, so you know the system, I'm not going to get into the whole process here, but essentially, once you've prepped your phone according cleaned, it prepped it according to what white stone calls for you're then going to. Let me correct the orientation I'm going to drop it in here, you're going to set this piece and if I'm wrong, this will be corrected. If I do an instructional video once you have your phone in here, I don't want to actually scratch anything right now, since I'm doing this purely based online of sight, but- and you know what I might wait to be a hundred percent sure- because I'm not looking to scratch anything up, so I'll- save that for a separate video, but essentially once you have it in here, you then place this over it uh, that's after you've done all of your clean prep and applied the stickers to make sure that nothing gets on or into any crevices that it shouldn't. And then you have two vials of the liquid that you're going to use in order to adhere the actual screen protector, and then this little guy right here essentially clasps on uh to the center of this frame.
You can see the cutouts for it right there, and so essentially, once you have that in place. You open this up pop it on here and that will then drop the liquid onto the display. Furthermore, you then have to make sure that you get basically a perfect circle. Furthermore, you want a perfect circle that has no bubbles. Furthermore, you don't want any liquid traveling outside the realm of where it's supposed to be, and then once you've got that done.
Furthermore, you apply the glass screen protector, that's right here, and it should basically fill in a bubble free fashion, the entire display of the phone. Once that's done, then you move on to the curing process. If you have any air bubbles at that time, you must immediately address it at that point. If you do not, you're going to have air bubbles in between the glass and the phone screen, I've never experienced sensitivity issues with any of the white stone, dome, glass screen protectors, and I've been using them for years. Let's take a look at the easy peel now this for the actual camera array.
Very simple: it's pretty much the opposite of this process, you're just going to literally wipe down the camera array and then use their dust removal stickers that they have right here and then this is the piece of glass that just fell out. That is just going to stick right on to the camera array right there and that's pretty much it. So this is nowhere near the process, of course, of the screen application and for good reason and there's another one in here, even though this one fell out. So if you're looking for screen protection, I highly recommend this. That is, if you're willing to undertake the actual process of application.
If you think this is more than you're willing to get involved with, then I don't recommend it in that. You really should only do this if you're comfortable with the undertaking watch some YouTube videos like the instructional video that my fianc? did that's on the channel or there are plenty of other YouTubers that have covered it uh well, and if you can follow those directions, you'll come out with a good product. A good end is what I should say. I didn't see how this was going to fit into the actual um mold here, but that's also because I'm an idiot, and I've been trying to stick it in uh with the case on. So that tells you a lot.
It's been a long day folks, my ROG was bitten by a copperhead snake yesterday, but thankfully is uh comfortably recovering. But apparently my brain is still a work in progress. Any questions or comments, please feel free to post them, hit that like button and as usual, please feel free to subscribe, and please stay safe later.
Source : TheDigitalDigest
Phones In This Article

Related Articles


Comments are disabled
Latest Articles


