Samsung Galaxy Z Fold 2 Whitestone Dome Glass Install & Review By Josh Quinonez
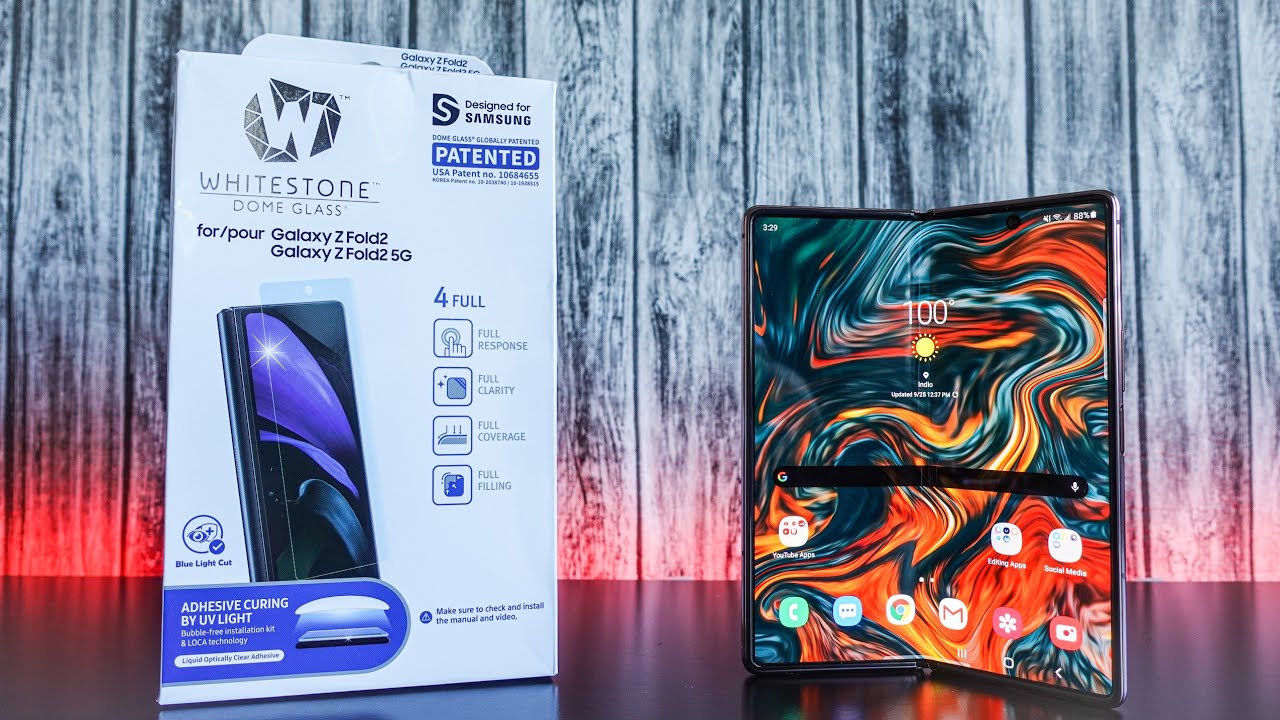
Hey, what's going on everyone josh quinones here, and today we're going to be taking a look at a screen protector for the Samsung Galaxy z, full 2. Now it is not a screen protector for that inside display. This already has a special screen protector that Samsung puts on themselves, but it is a screen protector for the outside display. Now this does come with a pre-installed screen protector as well, which is something we are going to need to remove for the screen protector. We are installing. So let me go ahead and remove this now here we go, pull it off.
Just like that. Whoa, there we go. Oh, my goodness. This display looks beautiful without that pre-installed screen protector, but the one we are installing today is actually a screen protector that I use on all of my devices, that is, the white stone, dome glass. It's got full response, full clarity, full coverage, and it is full feeling it's got adhesive curing by UV light.
This is a tempered glass screen protector and let me tell you it works great. Like I said I use it on all of my devices. It never lets me down. It always really protects those displays on every device that I put this on. So this is the white stone, dome glass and if, by the end of this video, you find yourself interested I'll make sure to have links down in the description below.
So to start this off, you want to make sure that your device is powered off whoops. Did that the wrong way? Let me go ahead and turn this off power off there we go so, as you can see, I pretty much got everything set up and ready to go everything that we need right here. The first thing we want to do is take one of these little wet towelettes that they put in at the box we'll take that out, and then we'll go ahead and clean that front display. Now I'm going to try to make this as quick as possible and hopefully as helpful as possible. If you do plan on getting one of these yourself, just make sure you wipe it down, perfect make sure it's free of any fingerprints or stains or anything like that.
Mine should be fairly clean. Since I did have that pre-installed screen protector on there, let me go ahead and dry it up a little here, and you want to try your best to do this in a dust free environment if possible- and let me go ahead and see there, and it looks pretty clean to me, so we're going to go ahead and drop this in just like that, and there we go all set up and ready to go in that tray. Then we're going to take our stickers here we got a dust absorbing sticker, pull that off right there and then just go around the screen like this, and it'll pick up any dust that may happen to be on that screen. That way, you don't risk getting any air bubbles in that screen protector and go around one more time boom. There we go okay, so next thing we want to do is add on our guide sticker.
So, as you can see, I got four right here: we'll go ahead and start off with the top and the bottom guide stickers, so they got kind of like little uh things popping up little slots right here on the top and at the bottom, all around the sides and, as you can see here, there's little holes right here in these guide stickers, as well as these bigger ones right here, little holes where you're actually going to set these right on top of these slots that they have right here all the way around. So I'm going to start with the top and the bottom. Let me pull that out. Let me get this one going here, and then you basically just pull it off like this boom, and then you're going to put it on the slot. It's a little tough to do this behind camera.
I'm going to do the best that I can. Let me go ahead and do this real, quick there we go. We got that bottom one on I had to go off camera to do this really quick, so I'm going to go ahead and throw the rest of them on, and then I'll be right back to give you guys the rest of the steps all right. So I got my guide stickers on here and ready to go, and what these are here for is basically to guide you, like, I said, and also to prevent any of that adhesive to rolling over to the back of your phone. The adhesive is basically just going to push out on top of these guide stickers if it does happen to make its way out of the screen protector.
So let me go ahead and go over it once more with the dust sticker here there we are looks good to me. Okay, the next thing we're going to do is throw the top tray on just like that, and, as you can see it has these white foam pads all the way around, which is also going to help absorb that adhesive. If any of it happens to push out of under the screen protector, and then we're going to go ahead and take this little piece right here and just stick- it right up top just like that and the next we're going to take our bridge right here and just put it into these top slots right here and just like that, and then we're pretty much ready to go. We got that adhesive right here now in order to put the adhesive on, you want to use the purple side first, not the black part, we're going to save that for after so let's go ahead and open the top portion. First, let me set that over here to the side, and we'll go ahead and drop it in there.
Just like that. Okay, now you want to make sure you're on a flat surface when doing this. If I didn't mention that in the beginning make sure you're on a flat surface, because as soon as we open up this top part right here, the black side, that adhesive is going to fall down to the display, and if your surface isn't flat, it can side left it can slide to the right up or down. You want to make sure you're on a flat surface. Let's go ahead and try this out, I'm going to go and open this top part boom.
There we go, so you can see, dropped right in the middle and what I like to do is just kind of tap it just like that, make sure all the adhesive is out, and then we'll go ahead and take off this bridge right here very carefully in case any of that adhesive is still dripping out, and then we'll take our screen protector right here, pull it out, and then you got this bottom sticker. Just pull it off like this all right- and this is where we just kind of drop it in just like that. Okay, so at this point, what we're going to do now is put our thumb or whatever finger you want to use down at the bottom, we're going to apply pressure, let that adhesive slide down to the middle once it hits the middle. We're gonna pull out this top pick right there and then just let that adhesive spread. So let's go ahead and do this and see how it goes three, two one there.
It goes wait for it to get to the middle and boom. Just like that. So what I'm going to do now is just wait a little, let it spread among the display, and then I'll be back all right. So it looks like the adhesive is all spread out nice and evenly. So what we're going to do now is use our UV light that we have right here and use it on the top middle and bottom for 15 seconds each.
So I'm going to go ahead and start at the top for 15 seconds and then move my way to the middle 15 seconds and then again at the bottom 15 seconds. Okay, that was 15 seconds at the top. Now we do the middle and then 15 seconds at the bottom, okay, so that was 15 seconds at the top middle and bottom. So what we're going to do now is take apart this tray right here by removing the top comes off nice and easy just like that, and then we'll go ahead and remove our guide stickers that we put all around the screen all right there. We are, let me go ahead and take the device out, and it looks like we did a very clean job.
It looks perfect. I don't see any air bubbles there. I got a little uh fingerprint stain right there, but other than that it is looking perfect. So what we're going to do now is take a wet uh, one of the wet cloths that they provided for us and just kind of wipe all around the edges in case any of that adhesive did kind of seep out, but it looks like we did a pretty clean job. I don't see any adhesive that had come out, everything's, looking perfect.
So what I'm going to do now is use that UV light one more time. Let me go ahead and put this down set, that to the side, we'll go ahead and use this one more time, this time, I'm going to do 30 seconds at the top and 30 seconds on the bottom, because I'm seeing that it's kind of hit in the middle as well, so we'll do 30 seconds at the top and 30 seconds at the bottom, all right, so that was 30 seconds at the top and 30 seconds on the bottom. Let me give this a quick wipe down, because I did get a couple of my fingerprints on there and my goodness it looks perfect. I think I did a perfect job with this one. I don't see any air bubbles see if we can take a close look.
Look at that. Looking really, really good the white stone, dome glass screen protector, let's go ahead and power on the device, and then we'll see how well the front screen responds with this screen protector on all right. So I got the device powered on and ready to go, and you can't even tell that the screen protector is on the display. I mean it looks perfect, as you can see, the phone responds just fine. It doesn't even feel like I'm using a screen protector honestly, and that's one thing that I love about these white stone, dome glass screen protectors is that you can't even really tell you're on there on your device unless you look really closely like.
If I were to put this up to the camera like this really close, then you can tell, and no it doesn't cover that front camera right there. So you don't have to worry about it, messing up your selfie, picks or anything like that, and the glue did not seep through either, so now I finally got my tempered glass screen protector on this device. I have a case ordered, so I'm just waiting for that. So I can have full protection for this device, but this glass screen protector does give me a little peace of mind to be able to take this out more often without being scared of accidentally dropping it on the display. At least.
I know that screen will be somewhat protected with this white stone, dome glass screen protector, but you all. Let me know what you think down in the comments sections below. Are you thinking of picking one of these up for yourself? If you are like, I said I'll, make sure to have a link down in the description below. Let me know what you think about my process here. If it did help, you out make sure to leave a huge thumbs up on this video.
Thank you guys so much for watching, don't forget to subscribe and hit that notification bell, so you don't miss out on any other future videos to come again. This was the white stone, dome glass screen protector, looking perfect on this device and working perfect you all. Let me know what you think. Thank you so much for watching this is josh. Quinones I'll, see you all in the next one peace out you.
Source : Josh Quinonez
Phones In This Article

Related Articles


Comments are disabled
Latest Articles


