Samsung Galaxy S21 Ultra 5G Disassembly Teardown Repair Video Review By PBKreviews
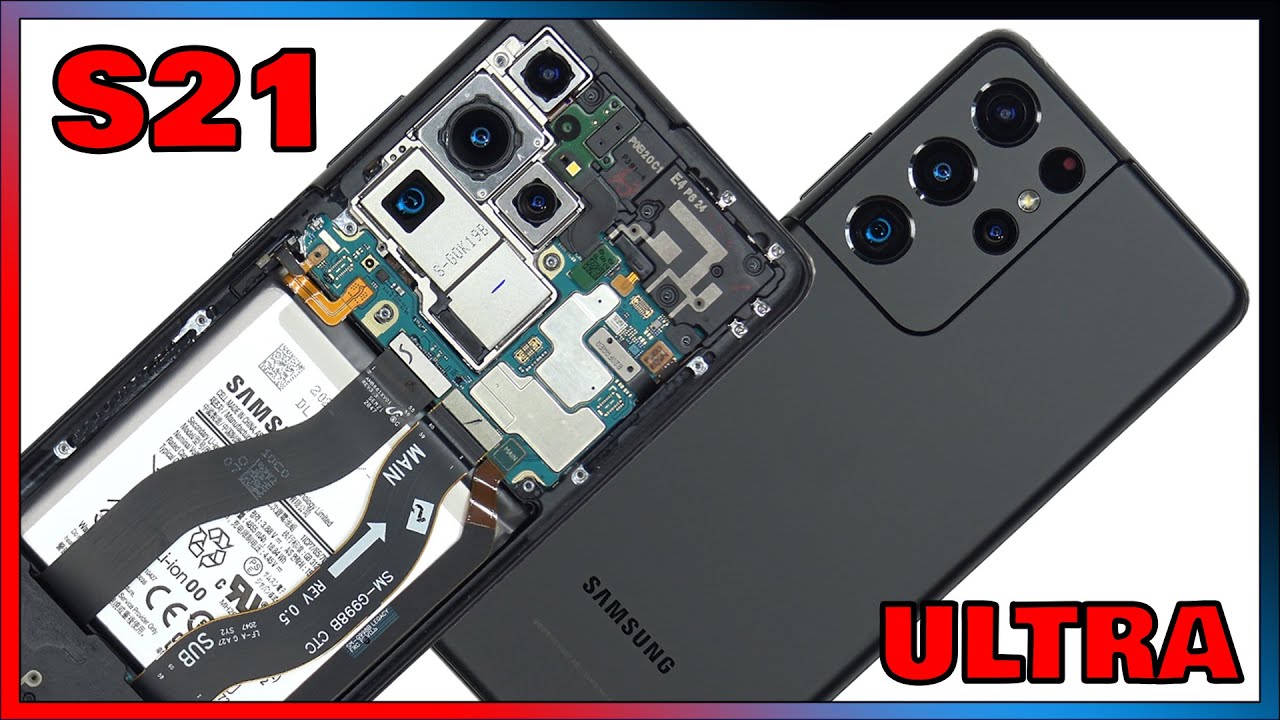
You're watching the Samsung Galaxy s21 ultra disassembly, if you need any tools, there are links in the description. This is the international model with the Enos 2100 processors, all right. Let's start off by removing the sim tray and here's a single slot sim tray. Now we need to use a hair dryer or a heat gun to apply heat to the backplate, so we can loosen up the adhesive underneath, and then we're going to use a plastic pry tool to pry the backplate off. So here's your glass backplate, so the camera lens cover over here in the corner is metal, and it is separate from the backplate it's just held on with adhesive, so you could separate these. If you want, you could separate it from the glass, as you can see over here and there's a look at the other side.
Also, these individual glass covers are replaceable by themselves. You could just pry them off they're held down with adhesive onto the metal frame itself, but I'm assuming the replacements will come complete with all of them together. Our first thing, we're going to do is peel off this wireless charging pad from the bottom speaker assembly. Another thing we noticed off the bat is that this international version is missing. The 5g millimeter wave antennas located here and here the slots are still there, but there are no antennas there.
At this point there are 14 Phillips screws which need to be removed. Now, once we've got those screws removed, we're going to disconnect the cable for your wireless charging pad located right here, just pop it off. We also have your NFC antenna, cable located right here, disconnect that now we're going to lift and remove the top cover. So here's your wireless charging coil over here and your NFC antenna is located right here and here's a look at the back side. You have some graphite film over here we're going to start off by disconnecting the battery cable.
Once the battery cable is disconnected, we can go ahead and disconnect the rest of the cables. Now, let's lift and remove the speaker assembly. So on the plastic portion of the speaker, assembly housing, we have antenna lines, these light color to grade lines. We also have this flex cable over here with a small board right here with your LED flash and laser autofocus and taking a look at the back. We have the speaker itself right here now.
One thing I find interesting is the speaker assembly on the s21 ultra does not have the white foam balls on the top speaker assembly, seeing it on the s21. I would assume the s21 plus and the s21 ultra would have it as well, but the looks of it doesn't. It does have the same speaker, but just doesn't have those white foam balls and what those white foam balls do they let air come through and make the speaker sound louder and larger than it is. As far as the cameras go, you have a 12 megapixel ultra-wide lens on top your 108 megapixel wide angle lens over here and your 10 megapixel telephoto lens is over here and all three of these cameras have optical image stabilization. Now, let's go ahead and disconnect the front-facing camera.
Then we can disconnect this camera over here now we can lift and remove the main board. The main board itself is fairly thick, as you can see as a dual layer board sandwiched together on the top portion. You can see a secondary microphone located over here. The proximity sensor is located on the back top over here and there's a graphite pad over here on the back shield. Your camera connectors are located here and here, and you can disconnect those by just popping them off once the graphite pad is peeled back.
We can see thermal paste on top of the ram and the Enos 2100 processors. Now, let's remove the bottom speaker assembly. Do you have some antenna lines running through the plastic assembly of the speaker, and you can see those foam balls over here and the speaker assembly? Now we can disconnect this flex cable over here, which connects your main board to your sub board, and then we can disconnect this cable over here. There are three screws holding down the charger port board, one here, one here and one here. Once those screws are removed, we can lift and remove the charger port board.
Your primary microphone is located right here. You have a red gasket around the charger port itself and taking a look at the other side, you have your sim reader located right here and again. This is a dual sim reader. However, this specific model only comes with support for one sim on the sim tray itself. So I'm not sure if you use a sim tray that has dual sim support if it'll actually work or not.
Here's your screen, cable over here and again, another thing, that's weird, on the s21. The cable is detachable over here from the screen itself. However, on the s21 ultra, it's not, and it's affixed to the screen. So if you need to replace the screen, you would have to take the backplate off, remove the top cover and disconnect the screen cable from the main board, and then you'd remove the speaker assembly on the bottom you'd heat up the front of the phone where the screen is, and you pry your old screen off, and then you take your new screen reapply. It back to the mid-frame and just reassemble your phone now, just like always with Samsung batteries.
There are no pull tabs to help. You pry the battery off, so you're just going to have to apply heat to the front of the phone where the screen is. You don't want to apply heat directly to the battery itself there, so you can do some adhesive underneath the battery and make it a little easier to pry the battery off. Now this batter is really difficult to pry off. I had to use some isopropyl alcohol to loosen up the adhesive underneath, so I could pry it off heating.
It is up alone, wasn't cutting it. So here's a better look at your battery. Once we peel off the film underneath the battery, we can see the large fingerprint reader sensor located right here. You have your power button flex, cable located over here, and this flex cable over here is for your volume keys. If you ever needed to replace the volume key cable, you would actually have to pry the screen off since the cable is running in between the mid-frame.
Your front facing camera is on top it's glued in every haptic feedback vibration motor over here on top right corner, and you have an antenna flex cable over here, and there are seven midpoint or y-head screws holding that down. So the Enos processor version also has a 3d layer of graphene over here, and the graphene is what helps to transfer heat. Here's a look at the mid-frame underneath the 3d graphite film. Now, I'm not 100 sure, but I believe this flex. Cable over here is for the fingerprint reader, which runs over here underneath in between the frame and the screen.
Now I'm going to go ahead and put the phone back together. Once all your screws are back in place, apply new adhesive and reapply your backplate and flip over your phone power it on, and you're done for repairability. I give this phone a 6 out of 10. The battery itself was extremely difficult to pry off, and it's not going to be an easy replacement, as was the fact that made the screen cable affixed to the screen itself and not detachable like the s21. That's another downside.
Another reason I give this lower score than the s21 is the back. Plate is glass, so it's a bit more difficult to pry off compared to the plastic backplate. I hope you guys enjoyed the video and if you guys want to see more videos like this make sure you subscribe and click on that notification bell, so you'll be notified the next time. I upload a video thanks again for watching guys, and I'll see you guys next time.
Source : PBKreviews
Phones In This Article


Related Articles


![iQOO Z3 vs Redmi Note 10 Pro Max Speedtest [SD768G vs SD732G]](https://img.youtube.com/vi/OkNHkAbEev4/maxresdefault.jpg )


Comments are disabled
Latest Articles


