Samsung Galaxy S20 Ultra Camera Glass Replacement By Ricks Tech
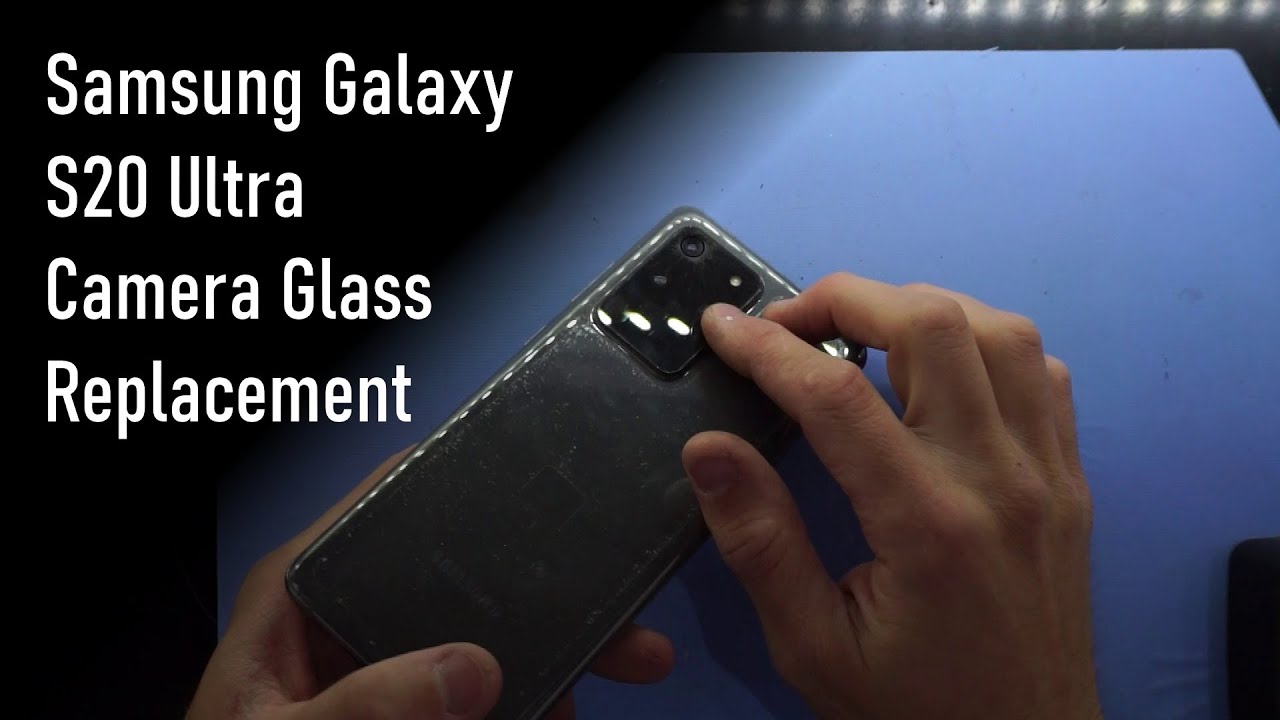
G'day in today's video I'm going to be replacing the camera lens on a s20 ultra, but, to begin with, I want to remove the back cover to see if I can replace it without any risk of further damaging the cameras themselves. So, to begin with, I'm going to use a thin metal pry tool with some isopropyl alcohol spray that on there and then work my way around the phone. So the blue mat you can see is a temperature controlled heat pad that has been running at 75 degrees Celsius just to soften the adhesive. Now I know you can just with most stuff, you can attempt to just simply remove the glass from here. I don't do that purely for the fact that if any glass shards fall in you're going to destroy a camera granted doing it this way you may destroy a back cover, but that is a cheaper risk than the camera module itself, especially on such a high-end phone, okay, and we're in so. As I mentioned, we've got some fairly delicate camera modules right here, and I've completely avoided any chance of damaging them.
So I'll just put that separately away, and now I'm going to focus on here. First, you want to double-check and see if your camera, glass replacement, camera glass is the same size. If it is, let's proceed, so I'm going to flip that over again now we do look to have a hole for a microphone up here and almost see if I can use some force and push it from the inside out the minute. That's requiring a ridiculous amount of force. So I'm not going to proceed with that.
Let's spray some isopropyl on here, and I'll go some tweezers and just see if I can lift some broken shards. First excellent, that's lifting I find if I was trying to do this over with the camera still attached to the phone, the higher risk, the glass shards will fall in and damage some perfectly functioning camera modules on there. So I much rather do the longer method which, in the end, should net a better result. But if you don't care, then you certainly can try just doing it straight up. I'm also spraying the isopropyl on their just makes it a bit easier as it softens the adhesive.
That, combined with the heat, usually does a good job of actually getting the old glass off. I might switch from the switch from the tweezers to a thin metal pry tool slightly thicker than the other one I was just using, but also slightly smaller. That's proving to be no good as well I'll have a look for a small Flathead screwdriver I'll give that a shot, so it seems to be working and do try to avoid getting glass shards in your fingertips. I find from experience that Samsung glass tends to make you bleed, as opposed to apple glass, which is normally pretty good. You tear apart an iPad and really have no issue of glass shards getting in your finger.
Tear apart a single camera lens by Samsung, and you'll, be bleeding all afternoon. So for me with that glass removed or the majority of it I'll give you another quick spray, and I just want to work around the outer edges to make sure there's no more fragments there. The minute it seems to be all good yeah, we'll go over just a cloth, a little just there, okay and lastly, I'll just quickly go over that with a toothbrush. You saw one fragment just came out just then, which would definitely break the new glass. When you go to install it there we go so luckily, for me, mine comes with a bit of a template to install it sucks it's around the other way I'd.
Rather is a different way. Now, here's the challenge. Take the backing off this side. Take the backing off, wants to leave as one piece that would make my life a bit easier. Nope, it's staying there, whatever I'll deal with that there we go.
That's stuck down flip this over put it in bingo, peel that off one replaced camera lens, just go over the cloth and keep pushing down just to spread the pressure make sure it's fully stuck then from here. If you've successfully taken off the back cover without too much damage to the gasket, you should just be able to stick that back over, and one thing I will quickly do, though, is give that camera lens a little of a white not much I'm not really applying any pressure, I'm just kind of dragging the cloth over it just remove any dust and whatnot it's settled on it over time. I can see two bits of damage to it or two spots that are on there. So I'd say that it's already damaged, and it's not going to be any good, but try to make it the best that I can. Okay I'll put this back on work our way around it, and this particular one lived in the case I'll be going back in there looking much better than it originally was granted.
I do believe he will require to replace this camera in the top left-hand corner to get that fully up and going once more there we go.
Source : Ricks Tech
Phones In This Article


Related Articles


![iPhone 8 Review [Part 1]](https://img.youtube.com/vi/85o_x7OoET0/maxresdefault.jpg )


Comments are disabled
Latest Articles


