Samsung Galaxy S20 Plus Camera Replacement Installation By ersbit
Hey guys welcome to orbit in this video. We are repairing the camera system on this Samsung Galaxy s20 plus this device has been heavily damaged on the back glass and that's the back glass that you're seeing let's turn on the device and test the cameras. As you can see, this camera is filthy and this is because of the accumulation of a lot of dust. So this is the main camera. It's really blurry, and you can see some kind of dark stuff on the cameras that do not move the ultra-wide angle. Camera is in good condition.
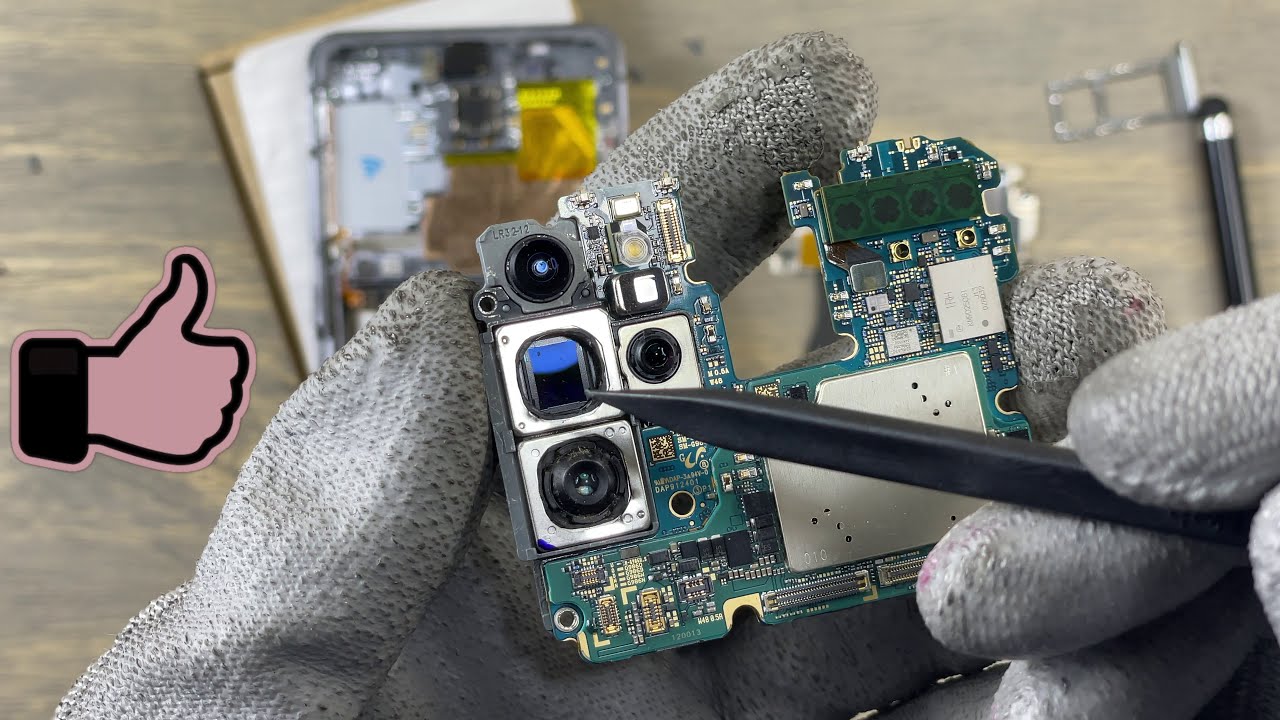
Let's go back to the main camera and, as you can see, it does not perform as it should be. The camera for the zoom also is in a bad shape, and you can see a kind of black dot on the sensor, so these cameras are in a bad shape and need to be replaced. So let's turn off the device and start the repair for these cameras. So at the end I open the main camera to check what's going on with the sensor. So the advice here is to replace the back glass as soon as it is broken, remove all the screws that you see, and we are going to take out the motherboard in order to inspect further the camera.
This is not hard. The links are in the description for the tools that I use. When your camera is blurred, it can be a lot of things. The housing of the camera can be broken, or you can have a lot of dust entering the camera system itself, so the next part is to remove all the flex cable connected to the motherboard, carefully lift all the flex cable in order to not damage any of them. Do not forget to remove your sim card tray before you take out the motherboard so make sure that everything is disconnected, and you can safely remove the motherboard from the frame of the phone, so the blue stuff that you're seeing is the sensor for the main camera, and you can see there's a small black stuff on the lower right of the sensor.
That is exactly what we were seeing when I was testing the cameras and the camera on the bottom of the one that has the exposed sensor is the zooming camera, the one that I showed you earlier in the video and that one also you can see it has some dust. Nothing can be done for this camera, except to replace it, detach the flex cable for the main camera module. Next, you need to pry out the camera module and make sure you do not damage anything in the process of removing the camera module. Oh, the camera on the top has its own flex cable. So you should remove the flex cable for the camera on the top, then remove the main camera module.
So these are what we are going to change to make this phone take beautiful pictures again. We do not need to replace the smaller camera module, because that one is working perfectly. You can remove the protective plastic that cover the camera lenses now or later, but I suggest you to remove them later in order to not touch the camera lenses and add some fingerprint on it. As you can see on the left is the new camera module it's crispy clean and on the right is the bad camera module. You can see the dust and I tried to clean that dust, and it will not come off attach the new camera module.
The same way that you removed the old camera module so make sure that you do not touch the camera lenses in order to not put any dust or any fingerprint on the tiny lenses. After the main camera module has been firmly attached. It's time to put the other camera module, the one that goes on top of the main camera module, attach the camera module and do not exert too much force. So we have brand-new cameras that will make your phone take astonishing pictures. So I was saying to not remove the protection on the camera lenses because you could have installed the camera module without removing them first to insert back the motherboard in just follow, as I am doing, it removes all the flex cable to create more clearance and make sure the motherboards sit in firmly before you start connecting anything.
So the next part is to reconnect all the flex cable, the same way that you disconnected them no particular order, but you should always connect the power cable at last, make sure everything has been connected and start the reassembly of the phone make sure you seal firmly the back glass to the frame of the phone to avoid any new dust entering the phone and damaging your camera, and hence doing this repair twice. Thank you guys for watching subscribe like and share I'll see you next time. If you like these repair videos subscribe to our channel, give us a like and ring the bell icon.
Source : ersbit
Phones In This Article

Related Articles


Comments are disabled
Latest Articles


