Samsung Galaxy A80 Teardown Disassembly Repair Guide By PBKreviews
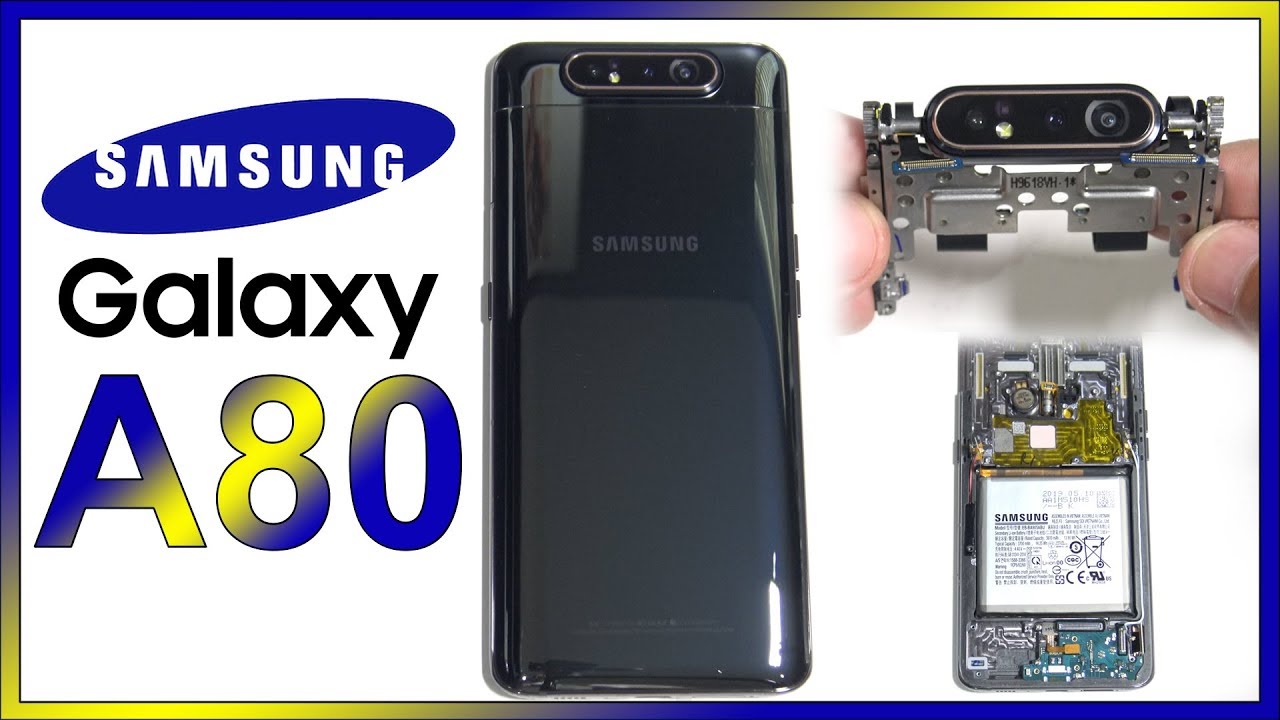
Alright guys, let's take apart the Samsung Galaxy AAT. First, let's remove the SIM tray now go ahead and eat the backplate up, so you can loosen up the adhesive underneath first manually push up the camera assembly, and then you can get your pry tool in the corner and work your way around. There's also some strong adhesive underneath over here you're going to have to use a plastic card or something long enough to be able to reach and pry it off. So at this point you get a glimpse of the mechanism for the camera. Okay, make sure you pull the camera fully up, so you can reveal this hidden screw over here, and then I remove the 14 Phillips screws. Let's remove the top cover.
Now we're going to disconnect the battery cable. There are a couple of wire cables into this connect as well, and we have one more cable running from the main board down to the speaker, assembly and charger port. Just connect that, and how does this connect the cable for the motor that runs the camera assembly up and down? There are two black plastic covers over here: go ahead and remove those you have a total of six Phillips screws. You have to remove for the camera assembly once you remove these two over here, you'll free, the motor from the assembly, so the assembly freely go up and down, and they're moving the two screws on either side on the arms for the assembly will release the assembly. So you could slide all the way up.
You have five Phillips screws holding down the main board. Alright, here's the back side of the main board we're going to set. These two cables coming from the camera assembly which are attached to main board here, are the levers that rotate the cameras. Okay, now you have to pry off the top panel over here covering the camera assembly. Remove the eight Phillips screws holding covers down.
So now you can see over here inside these two flex: cables rotate with the camera. When the lever goes up and down just wrap around pretty much, and we're going to disconnect those two cables. We have one more cable to disconnect right here, and then you got four more Phillips screws. You need to remove. Okay, now, finally, we can remove this from the housing.
If your cameras- and here you can see the small gear working on the side like a small little factory, but wait there's more. If you thought you were done with screws, I, don't think so. You got two more on this side, and you got to own this side to remove to actually get access to the cameras themselves, and if you actually want to remove this mechanism over here, you also have two screws. You have to remove over here ones, right there and one's right there to get this whole portion separated from the middle part. Now one thing to note this screws on the camera housing itself right here: they're the new pro-tip or TRI wing screws.
So it's not a regular Phillips screw or once you remove those pro-tip or TRI rank screws. You can lift this cover, but be careful because the cables are attached underneath you so here the cameras, here's the Neath it now back to the phone itself, we're gonna, remove the bottom cover. So here's a speaker assembly sundry at the bottom power right there, we're gonna, disconnect this cable right here. You have your fingerprint reader cable right here, disconnect that every screen, cable over here go ahead and disconnect that, and you have two wire cables here pop those off I have one Philips screw located here once you remove that you can lift and remove the charger port board down here. So here you have your SIM reader right there and your charger pull right here now you have two more Phillips screws right here.
Holding down the fingerprint reader now I mean this. One has a lot of screws, but at least I'm happy I'd rather take screws over like adhesive or glue down stuff I mean it's just a mess and try and put things back together, and this is the first phone I personally worked on, that the fingerprint reader isn't glued down, and you can replace it. If you need to know what those two screws are out, you should lift a fingerprint reader, and here you have it well. As far as the battery goes, there is some adhesive underneath it holding it down. I'm not going to attempt to remove it, because when it comes to Samsung on batteries, I pretty much want to stay away from that I mean I could take the time and remove it.
But there's no point: there's nothing really hiding underneath it. So you got this plastic tab over here, which underneath has some sort of antenna connection or something, and you got a squirt thermal pad right here. That it is! Underneath the board. You have your vibrator motor over here, your volume keys and your power button. The clickers underneath are seen on this black tab right here you could pull those off.
The cables are right underneath over here. These gold contacts make a connection with the board same over here for the power button. As far as they're placing the screen goes, you have the cable over here that runs through the frame, so you'd have to heat the front up. You're going to loosen up the adhesive and pry the screen off and then get your new screen to run the cable through and reapply it to. The front with new adhesive all right now, it's time to put this whole thing back together, we apply the backplate power on the phone and here's a camera see if flips around I'll take the backplate off again.
Just to show you guys, thanks again for watching guys, I'll see you guys in the next video.
Source : PBKreviews
Phones In This Article

Related Articles


Comments are disabled
Latest Articles


