Samsung Galaxy A51 Teardown | Repair By Geardo
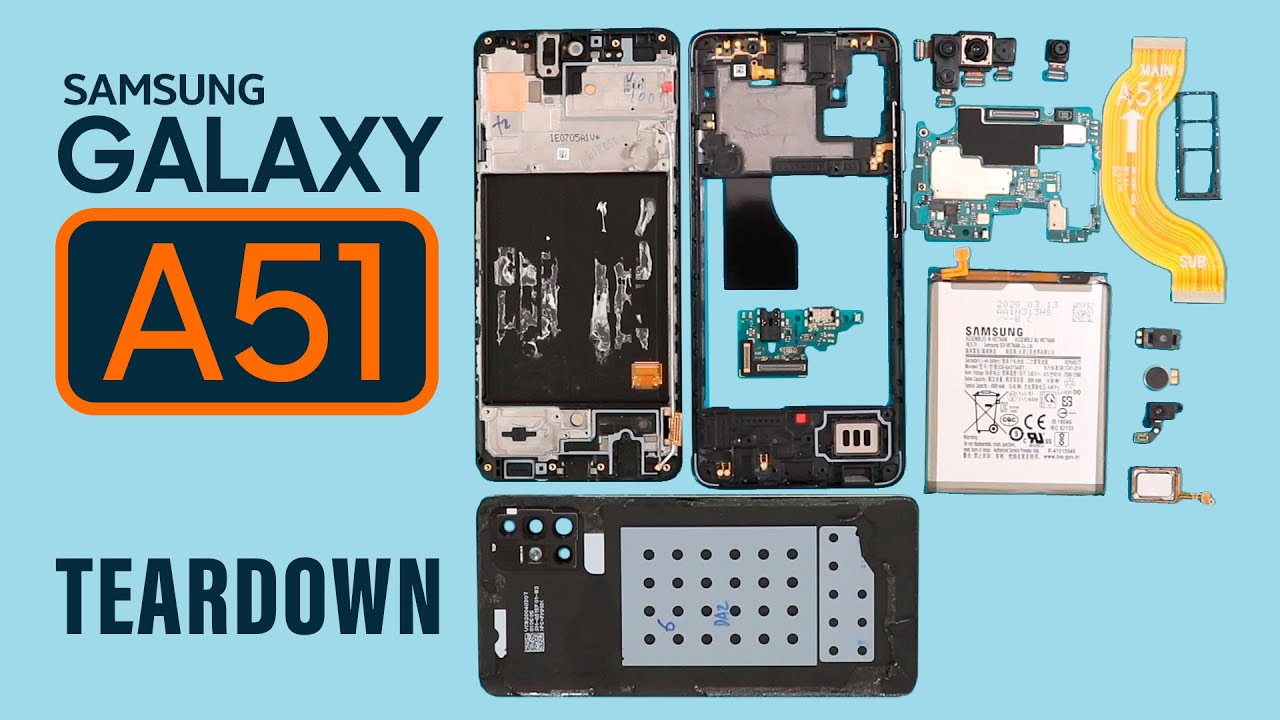
Hello everyone welcome back to gear. Today we are going to show you how to tear down or disassemble the Samsung Galaxy a51 and how to repair the same step. By step. To start, we need to have the right tools to proceed with the teardown, which you can find in the description first take out. The sim tray then followed by the battery cover removal to remove the back cover. It needs to heat gently around the rear cover edges until the pasted adhesive becomes soft, then to pull up the back cover or create an opening.
We got a backup removal tool by using this tool, you can pull up the back cover and any attached flex cables without damaging or d shaping it. The machine is minimizing the pulling pressure once you feel the opening is enough, insert a plastic car pride tool or something similar to cut the adhesive around the background. Take out the back cover and undo 13 screws on the rear, calf frame using a plastic card fry tool creates an opening to separate the background frame, be delicate and work around on edges to separate the plastic clips. Once you take out the frame speaker, buzzer can be found in the frame, apply little heat and take it out by a tweezer disconnect both ends on the main flex, cable and the battery connector unplug the antenna and undo the screw to take out the main board. Now we can disconnect the front, camera and rear camera.
A quick note. It is not required to take off the main board to replace the front camera. There are four rear cameras and all connectors plugged on the back side of the main board, disconnect all and give a slight force to take out the camera module. Unfortunately, these four cameras cannot replace individually. It comes as one unit now on the LCD frame apply little heat to take out the earpiece peak on the top and the vibrato motor below the battery on the bottom PCB board.
First unplug, the fingerprint sensor connector and the LCD connector then undo two screws to take out the fingerprint sensor, cable, apply little heat and take out the bottom PCB, including the charger port and the headphone jack. Let's move to the battery up to now. Samsung phones don't have any tab to pull the battery adhesive strips. So let's apply little heat on the battery and create an opening using a plastic cardboard insert it, and once you have some space use a pry tool to lift the battery. Now we can take out the battery and the last part will be the LCD removal or replacement nowadays, Samsung genuine screens are coming with the frame and also most of the aftermarket screens are coming in the frame.
It will make the LCD replacement much easier and faster hope. You have enjoyed the teardown guide for repairs. Let us know if you have any queries, please like share and comment on. Our videos do not forget to hit the subscribe button. Thank you.
Source : Geardo
Phones In This Article


Related Articles


Comments are disabled
Latest Articles


